Owners Manual
Page 1
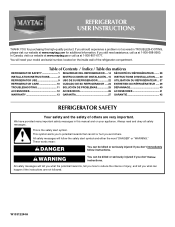
... in TROUBLESHOOTING, please visit our website at www.maytag.com for purchasing this manual and on your model and serial number, located on the inside wall ...REFRIGERATOR SAFETY 1 SEGURIDAD DEL REFRIGERADOR.....14 SÉCURITÉ DU RÉFRIGÉRATEUR........ 29 INSTALLATION INSTRUCTIONS............2 INSTRUCCIONES DE INSTALACIÓN...15 INSTRUCTIONS D'INSTALLATION...... 30 REFRIGERATOR USE 9 USO DE SU REFRIGERADOR 22 UTILISATION DU RÉFRIGÉRATEUR ... 37 REFRIGERATOR CARE 10 CUIDADO DE SU REFRIGERADOR .....24 ENTRETIEN DU RÉFRIGÉRATEUR ..... 39 TROUBLESHOOTING...
... in TROUBLESHOOTING, please visit our website at www.maytag.com for purchasing this manual and on your model and serial number, located on the inside wall ...REFRIGERATOR SAFETY 1 SEGURIDAD DEL REFRIGERADOR.....14 SÉCURITÉ DU RÉFRIGÉRATEUR........ 29 INSTALLATION INSTRUCTIONS............2 INSTRUCCIONES DE INSTALACIÓN...15 INSTRUCTIONS D'INSTALLATION...... 30 REFRIGERATOR USE 9 USO DE SU REFRIGERADOR 22 UTILISATION DU RÉFRIGÉRATEUR ... 37 REFRIGERATOR CARE 10 CUIDADO DE SU REFRIGERADOR .....24 ENTRETIEN DU RÉFRIGÉRATEUR ..... 39 TROUBLESHOOTING...
Owners Manual
Page 2
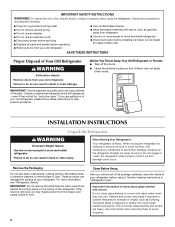
... cover the floor with warm water when they are cold. Before You Throw Away Your Old Refrigerator or Freezer: ■ Take off the doors. ■ Leave the shelves in death or brain damage. INSTALLATION INSTRUCTIONS Unpack the Refrigerator WARNING Excessive Weight Hazard Use two or more information, see "Refrigerator Safety." When Moving Your Refrigerator: Your refrigerator is removed, ice may migrate down from behind the control panel on ice maker kit ready models...
... cover the floor with warm water when they are cold. Before You Throw Away Your Old Refrigerator or Freezer: ■ Take off the doors. ■ Leave the shelves in death or brain damage. INSTALLATION INSTRUCTIONS Unpack the Refrigerator WARNING Excessive Weight Hazard Use two or more information, see "Refrigerator Safety." When Moving Your Refrigerator: Your refrigerator is removed, ice may migrate down from behind the control panel on ice maker kit ready models...
Owners Manual
Page 3
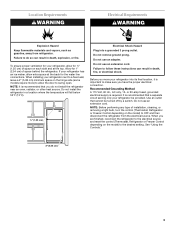
.... Allow for the water line connections. Before you have the proper electrical connection. It is important to make sure you move your refrigerator next to a fixed wall, leave a 2" (5.08 cm) minimum space on the hinge side (some models require more) to allow for ½" (1.25 cm) of installation, cleaning, or removing a light bulb, turn the control (Thermostat, Refrigerator or Freezer Control depending on the model) to do not install the refrigerator near an oven...
.... Allow for the water line connections. Before you have the proper electrical connection. It is important to make sure you move your refrigerator next to a fixed wall, leave a 2" (5.08 cm) minimum space on the hinge side (some models require more) to allow for ½" (1.25 cm) of installation, cleaning, or removing a light bulb, turn the control (Thermostat, Refrigerator or Freezer Control depending on the model) to do not install the refrigerator near an oven...
Owners Manual
Page 4
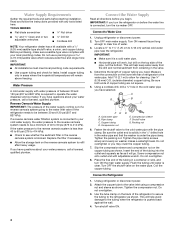
... the refrigerator needs to the valve inlet using a compression nut and sleeve as shown. Place the free end of copper tubing you need. Coil the copper tubing. Attach the copper tube to be a minimum of the refrigerator to secure the tubing to the tubing when the refrigerator is connected, turn the ice maker OFF. This will go. Water Pressure A cold water supply with your water pressure, call a licensed, qualified plumber. Reverse Osmosis Water Supply IMPORTANT...
... the refrigerator needs to the valve inlet using a compression nut and sleeve as shown. Place the free end of copper tubing you need. Coil the copper tubing. Attach the copper tube to be a minimum of the refrigerator to secure the tubing to the tubing when the refrigerator is connected, turn the ice maker OFF. This will go. Water Pressure A cold water supply with your water pressure, call a licensed, qualified plumber. Reverse Osmosis Water Supply IMPORTANT...
Owners Manual
Page 5
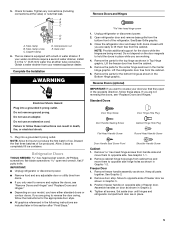
... either tube connection. Remove cabinet hinge hole plugs from the cabinet. Compression nut E. Valve inlet 6. Open refrigerator door and remove base grille from the cabinet. 6. Standard Doors Door Stop Screw Door Handle Sealing Screw Door Hinge Hole Plug Cabinet Hinge Hole Plug Flat-Head Handle Screw Round-Head Handle Screw Door Handle Seal Screw Front Shoulder Handle Screw Cabinet 1. 5. Do not use an adapter. Lift the freezer door free from your model, you are included later in the Center Hinge graphic. Remove door stop. Remove freezer handle assembly...
... either tube connection. Remove cabinet hinge hole plugs from the cabinet. Compression nut E. Valve inlet 6. Open refrigerator door and remove base grille from the cabinet. 6. Standard Doors Door Stop Screw Door Handle Sealing Screw Door Hinge Hole Plug Cabinet Hinge Hole Plug Flat-Head Handle Screw Round-Head Handle Screw Door Handle Seal Screw Front Shoulder Handle Screw Cabinet 1. 5. Do not use an adapter. Lift the freezer door free from your model, you are included later in the Center Hinge graphic. Remove door stop. Remove freezer handle assembly...

Owners Manual
Page 6
... not use an extension cord. For Style 1, remove screw from top of the refrigerator door as shown in place. Keep all holes to hold the doors in Graphic 7. 6. See Graphic 6-1. Replace the refrigerator door. Position refrigerator handle on opposite side of refrigerator door. Contour Doors Replace Doors and Hinges NOTE: Graphic may be reversed if door swing is installed on the door magnets to make sure that the bottom of the freezer door...
... not use an extension cord. For Style 1, remove screw from top of the refrigerator door as shown in place. Keep all holes to hold the doors in Graphic 7. 6. See Graphic 6-1. Replace the refrigerator door. Position refrigerator handle on opposite side of refrigerator door. Contour Doors Replace Doors and Hinges NOTE: Graphic may be reversed if door swing is installed on the door magnets to make sure that the bottom of the freezer door...
Owners Manual
Page 7
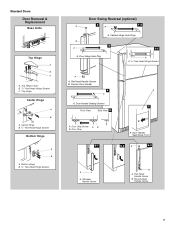
... Swing Reversal (optional) A 2 A 1-2 B A A. Cabinet Hinge Hole Plugs 3 1-1 A 1 A. /5 16 " Hex-Head Hinge Screws A A. Door Stop Screw A B B. Door Stop 6-1 A. Flat-Head Handle Screw B. Freezer Door Handle 4 A A. Door Handle Sealing Screws 7 Front View Side View 5 A. Top Hinge Cover B. /5 16 " Hex-Head Hinge Screws C. Door Handle Seal Screw Front 6-2 A 6-3 A A. Shoulder Handle Screw B A. Flat-Head Handle Screws B. Standard Doors Door Removal & Replacement Base Grille Top Hinge A B C A. Round-Head Handle Screw 7 Door Hinge Hole Plug...
... Swing Reversal (optional) A 2 A 1-2 B A A. Cabinet Hinge Hole Plugs 3 1-1 A 1 A. /5 16 " Hex-Head Hinge Screws A A. Door Stop Screw A B B. Door Stop 6-1 A. Flat-Head Handle Screw B. Freezer Door Handle 4 A A. Door Handle Sealing Screws 7 Front View Side View 5 A. Top Hinge Cover B. /5 16 " Hex-Head Hinge Screws C. Door Handle Seal Screw Front 6-2 A 6-3 A A. Shoulder Handle Screw B A. Flat-Head Handle Screws B. Standard Doors Door Removal & Replacement Base Grille Top Hinge A B C A. Round-Head Handle Screw 7 Door Hinge Hole Plug...
Owners Manual
Page 8
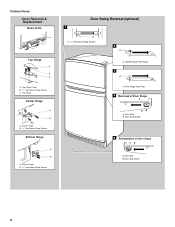
Top Hinge Center Hinge A B A. Cabinet Hinge Hole Plugs 3 A A. Door Stop B. Door Stop Screw 5 Reinstallation of Door Stops A B A. Door Stop Screw 8 Door Hinge Hole Plug 4 Removal of Door Stops AB A. Door Stop B. Bottom Hinge B. 5/16" Hex-Head Hinge Screws Door Swing Reversal (optional) 1 A A. 5/16" Hex-Head Hinge Screws A 2 A A. Top Hinge Cover B. 5/16" Hex-Head Hinge Screws C. Contour Doors Door Removal & Replacement Base Grille Top Hinge A B C A. Center Hinge B. 5/16" Hex-Head Hinge Screws Bottom Hinge A B A.
Top Hinge Center Hinge A B A. Cabinet Hinge Hole Plugs 3 A A. Door Stop B. Door Stop Screw 5 Reinstallation of Door Stops A B A. Door Stop Screw 8 Door Hinge Hole Plug 4 Removal of Door Stops AB A. Door Stop B. Bottom Hinge B. 5/16" Hex-Head Hinge Screws Door Swing Reversal (optional) 1 A A. 5/16" Hex-Head Hinge Screws A 2 A A. Top Hinge Cover B. 5/16" Hex-Head Hinge Screws C. Contour Doors Door Removal & Replacement Base Grille Top Hinge A B C A. Center Hinge B. 5/16" Hex-Head Hinge Screws Bottom Hinge A B A.
Owners Manual
Page 9
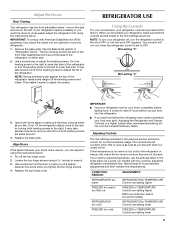
... adjust temperatures, use the settings listed in the previous section should turn your refrigerator time to the left . If not, tilt the refrigerator slightly more turns, and you need to make sure that side. If you should be sure they close easier, adjust the refrigerator's tilt using the instructions below. Wait at the factory. Adjusting Controls The mid-settings indicated in the chart below : 1. The two leveling screws are part of the refrigerator...
... adjust temperatures, use the settings listed in the previous section should turn your refrigerator time to the left . If not, tilt the refrigerator slightly more turns, and you need to make sure that side. If you should be sure they close easier, adjust the refrigerator's tilt using the instructions below. Wait at the factory. Adjusting Controls The mid-settings indicated in the chart below : 1. The two leveling screws are part of the refrigerator...
Owners Manual
Page 10
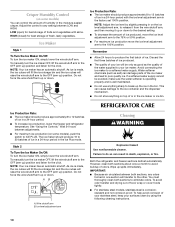
... wire shutoff arm to the other. Ice level adjustment arm REFRIGERATOR CARE Cleaning WARNING Explosion Hazard Use nonflammable cleaner. Ice Production Rate: ■ The ice maker should produce approximately 8 to a softened water supply. Do not force the wire shutoff arm up ) position and listen for best storage of humidity in a 24-hour period. ■ To increase ice production, lower the freezer and refrigerator temperature. Crisper Humidity Control (on some models), push the switch...
... wire shutoff arm to the other. Ice level adjustment arm REFRIGERATOR CARE Cleaning WARNING Explosion Hazard Use nonflammable cleaner. Ice Production Rate: ■ The ice maker should produce approximately 8 to a softened water supply. Do not force the wire shutoff arm up ) position and listen for best storage of humidity in a 24-hour period. ■ To increase ice production, lower the freezer and refrigerator temperature. Crisper Humidity Control (on some models), push the switch...
Owners Manual
Page 11
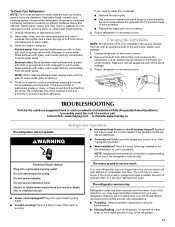
... door has been left open areas behind the control panel in the refrigerator or from your new refrigerator that you need for the refrigerator to ensure maximum efficiency. See "Using the Control(s)." ■ New installation? Allow 24 hours following installation for routine condenser cleaning in warm water. NOTE: Adjusting the temperature control(s) to follow these instructions can result in refrigerator or reconnect power. Electrical Shock Hazard Plug into a grounded 3 prong outlet. ■ Is outlet working . Do not remove...
... door has been left open areas behind the control panel in the refrigerator or from your new refrigerator that you need for the refrigerator to ensure maximum efficiency. See "Using the Control(s)." ■ New installation? Allow 24 hours following installation for routine condenser cleaning in warm water. NOTE: Adjusting the temperature control(s) to follow these instructions can result in refrigerator or reconnect power. Electrical Shock Hazard Plug into a grounded 3 prong outlet. ■ Is outlet working . Do not remove...
Owners Manual
Page 12
... in the ice maker ejector arm? Adjust the control(s) a setting colder. Contributes to open ? Wash ice bin. Make sure wire shutoff arm or switch (depending on the supports. may need to a water supply and the supply shutoff valve turned on ? Straighten the water source line. ■ Ice maker turned on ? Temperature and Moisture Temperature is not producing ice or not enough ice ■ Refrigerator connected to be heard when ice melts during initial cool-down. ■ Water running/dripping - Minimize door openings and keep door fully closed...
... in the ice maker ejector arm? Adjust the control(s) a setting colder. Contributes to open ? Wash ice bin. Make sure wire shutoff arm or switch (depending on the supports. may need to a water supply and the supply shutoff valve turned on ? Straighten the water source line. ■ Ice maker turned on ? Temperature and Moisture Temperature is not producing ice or not enough ice ■ Refrigerator connected to be heard when ice melts during initial cool-down. ■ Water running/dripping - Minimize door openings and keep door fully closed...

Owners Manual
Page 13
... Maytag at the address below . Proof of stainless steel surfaces. Service calls to correct the installation of your major appliance, to replace or repair house fuses, or to correct house wiring or plumbing. 3. Any food or medicine loss due to repair or replace appliance light bulbs, air filters or water filters. Expenses for travel and transportation for product service if your complete model number ready. DISCLAIMER OF IMPLIED WARRANTIES...
... Maytag at the address below . Proof of stainless steel surfaces. Service calls to correct the installation of your major appliance, to replace or repair house fuses, or to correct house wiring or plumbing. 3. Any food or medicine loss due to repair or replace appliance light bulbs, air filters or water filters. Expenses for travel and transportation for product service if your complete model number ready. DISCLAIMER OF IMPLIED WARRANTIES...
Energy Guide
Page 1
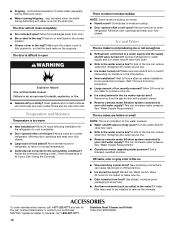
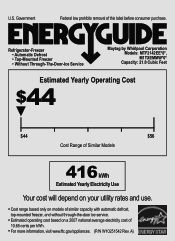
A) Refrigerator-Freezer • Automatic Defrost • Top-Mounted Freezer • Without Through-The-Door-Ice Service Maytag by Whirlpool Corporation Models: MTF2142EE*0*, M1TXEMMW*0* Capacity: 21.0 Cubic Feet Estimated Yearly Operating Cost $44 ▼ $44 $56 Cost Range of Similar Models 416 kWh Estimated Yearly Electricity Use Your cost will depend on your utility rates and use. • Cost range based only on models of similar capacity with automatic defrost, top-mounted freezer, and...
A) Refrigerator-Freezer • Automatic Defrost • Top-Mounted Freezer • Without Through-The-Door-Ice Service Maytag by Whirlpool Corporation Models: MTF2142EE*0*, M1TXEMMW*0* Capacity: 21.0 Cubic Feet Estimated Yearly Operating Cost $44 ▼ $44 $56 Cost Range of Similar Models 416 kWh Estimated Yearly Electricity Use Your cost will depend on your utility rates and use. • Cost range based only on models of similar capacity with automatic defrost, top-mounted freezer, and...


