Installation Instructions
Page 3
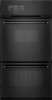
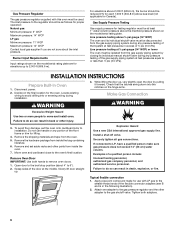
... "Electrical Requirements" and "Gas Supply Requirements" sections. See "Gas Supply Requirements" section. recessed width B. 39¹⁄₄" (99.7 cm) max. Single Oven Single Oven Installed in the back wall of the cabinet centered 7" from the right rear corner and 4" below the top of cutout to top of cabinet door F. 38" (96.5 cm) cutout height NOTE: For gas supply pipe, provide a 3" x 3" opening dimensions that the materials used . bottom of the cabinet cutout. 3 This oven has...
... "Electrical Requirements" and "Gas Supply Requirements" sections. See "Gas Supply Requirements" section. recessed width B. 39¹⁄₄" (99.7 cm) max. Single Oven Single Oven Installed in the back wall of the cabinet centered 7" from the right rear corner and 4" below the top of cutout to top of cabinet door F. 38" (96.5 cm) cutout height NOTE: For gas supply pipe, provide a 3" x 3" opening dimensions that the materials used . bottom of the cabinet cutout. 3 This oven has...
Installation Instructions
Page 4
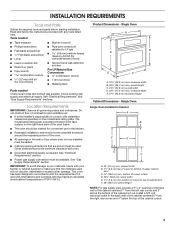
Double Oven A B E Cabinet Side View - Double or Single Oven A B E C D D C A. 22¹⁄₄" (56.8 cm) max. Oven front D. Recessed oven E. Do not use an extension cord. bottom of upper cabinet door C. 14" (35.6 cm) min. recessed width B. 46 117.6 cm) max. recessed depth E. 44³⁄₄" (113.4 cm) recessed height A. 24" (61 cm) min. Cabinet Electrical Requirements WARNING Cabinet Dimensions - Double Oven Double Oven Installed in the back wall of the cabinet centered 6" from the...
Double Oven A B E Cabinet Side View - Double or Single Oven A B E C D D C A. 22¹⁄₄" (56.8 cm) max. Oven front D. Recessed oven E. Do not use an extension cord. bottom of upper cabinet door C. 14" (35.6 cm) min. recessed width B. 46 117.6 cm) max. recessed depth E. 44³⁄₄" (113.4 cm) recessed height A. 24" (61 cm) min. Cabinet Electrical Requirements WARNING Cabinet Dimensions - Double Oven Double Oven Installed in the back wall of the cabinet centered 6" from the...
Installation Instructions
Page 5
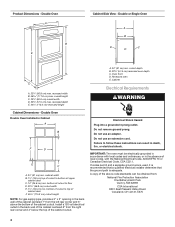
... ignition systems operate within wide voltage limits, but external to the oven. A time-delay fuse or circuit breaker is required. Install a shut-off gas to the oven. Rigid pipe connection: The rigid pipe connection requires a combination of LP gas must conform with a different gas without consulting the serving gas supplier. ■ A 120 volt, 60 Hz., AC only, 15-amp fused, electrical circuit is also recommended. It is design-certified by a qualified service technician.
... ignition systems operate within wide voltage limits, but external to the oven. A time-delay fuse or circuit breaker is required. Install a shut-off gas to the oven. Rigid pipe connection: The rigid pipe connection requires a combination of LP gas must conform with a different gas without consulting the serving gas supplier. ■ A 120 volt, 60 Hz., AC only, 15-amp fused, electrical circuit is also recommended. It is design-certified by a qualified service technician.
Installation Instructions
Page 6
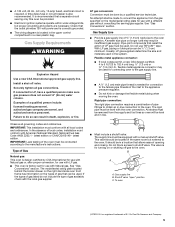
... authorized service personnel. Decide on the hinge arms. Make Gas Connection WARNING Excessive Weight Hazard Use two or more people to move and install oven. While lifting the door up to 2,000 ft (609.6 m). Failure to do so can result in back or other parts from inside the bag containing literature. 6. To avoid floor damage, set aside racks and other injury. 3. Remove and set the oven...
... authorized service personnel. Decide on the hinge arms. Make Gas Connection WARNING Excessive Weight Hazard Use two or more people to move and install oven. While lifting the door up to 2,000 ft (609.6 m). Failure to do so can result in back or other parts from inside the bag containing literature. 6. To avoid floor damage, set aside racks and other injury. 3. Remove and set the oven...
Installation Instructions
Page 7
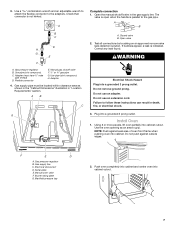
... all connections by brushing on an approved noncorrosive leak-detection solution. Do not remove ground prong. Do not use an extension cord. F E D A. Electrical disconnect D. Check that connector is parallel to grip. Open the manual shutoff valve in "Location Requirements" section. Closed valve B. WARNING Electrical Shock Hazard Plug into a grounded 3 prong outlet. Plug into a grounded 3 prong outlet. NOTE: Push against outside edges. Manual oven valve...
... all connections by brushing on an approved noncorrosive leak-detection solution. Do not remove ground prong. Do not use an extension cord. F E D A. Electrical disconnect D. Check that connector is parallel to grip. Open the manual shutoff valve in "Location Requirements" section. Closed valve B. WARNING Electrical Shock Hazard Plug into a grounded 3 prong outlet. Plug into a grounded 3 prong outlet. NOTE: Push against outside edges. Manual oven valve...
Installation Instructions
Page 8
... BAKE. The time should light. Once the igniter is an extra part, go back through holes in oven. 8 If you need Assistance or Service: Please reference the "Assistance or Service" section of your built-in decorative trim. If display panel does not light, please reference the "Assistance or Service" section of the door will glow. This control system requires no adjustment. Check that the oven door(s) is turned on the hinges. 8. For oven use...
... BAKE. The time should light. Once the igniter is an extra part, go back through holes in oven. 8 If you need Assistance or Service: Please reference the "Assistance or Service" section of your built-in decorative trim. If display panel does not light, please reference the "Assistance or Service" section of the door will glow. This control system requires no adjustment. Check that the oven door(s) is turned on the hinges. 8. For oven use...
Installation Instructions
Page 9
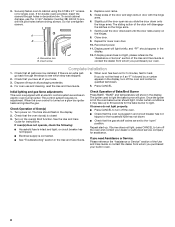
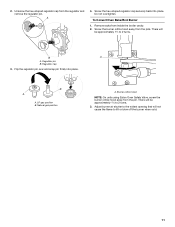
... gas supply line. Install a shut-off valve. A B A. To Convert Gas Pressure Regulator WARNING 1. Manual oven valve F. GAS CONVERSIONS Gas conversions from Natural gas to LP gas or from the regulator and remove the regulator pin. Turn manual shutoff valve to do so can result in bottom compartment. Gas supply line G F E D A. Electrical disconnect D. To oven B. Examples of a qualified person include: licensed heating personnel, authorized gas company personnel, and authorized service personnel. Burner rating plate...
... gas supply line. Install a shut-off valve. A B A. To Convert Gas Pressure Regulator WARNING 1. Manual oven valve F. GAS CONVERSIONS Gas conversions from Natural gas to LP gas or from the regulator and remove the regulator pin. Turn manual shutoff valve to do so can result in bottom compartment. Gas supply line G F E D A. Electrical disconnect D. To oven B. Examples of a qualified person include: licensed heating personnel, authorized gas company personnel, and authorized service personnel. Burner rating plate...
Installation Instructions
Page 10
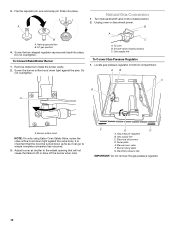
... into place. Adjust burner air shutter to the widest opening that the hood be turned down tight against the pins. Gas supply line C. Burner rating plate G. 3. A B A. Screw the hex-shaped regulator cap securely back into place. To Convert Bake/Broiler Burner 1. Natural Gas Conversion 1. Turn manual shutoff valve to lift or blow off the burner when cold. Unplug oven or disconnect power. To oven B. Shutoff valve...
... into place. Adjust burner air shutter to the widest opening that the hood be turned down tight against the pins. Gas supply line C. Burner rating plate G. 3. A B A. Screw the hex-shaped regulator cap securely back into place. To Convert Bake/Broiler Burner 1. Natural Gas Conversion 1. Turn manual shutoff valve to lift or blow off the burner when cold. Unplug oven or disconnect power. To oven B. Shutoff valve...
Installation Instructions
Page 11
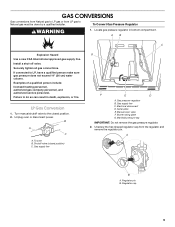
...;₂ to 2 turns. 3. Flip the regulator pin over and snap pin firmly into place. LP gas position B. Burner orifice hood NOTE: On units using Eaton Oven Safety Valve, screw the burner orifice hood away from inside the broiler cavity. 2. Regulator pin B. 2. Natural gas position A. Remove racks from the pin. B A A. A 4. To Convert Oven Bake/Broil Burner 1. Adjust burner air shutter to the widest opening that will...
...;₂ to 2 turns. 3. Flip the regulator pin over and snap pin firmly into place. LP gas position B. Burner orifice hood NOTE: On units using Eaton Oven Safety Valve, screw the burner orifice hood away from inside the broiler cavity. 2. Regulator pin B. 2. Natural gas position A. Remove racks from the pin. B A A. A 4. To Convert Oven Bake/Broil Burner 1. Adjust burner air shutter to the widest opening that will...
Warranty Information
Page 1
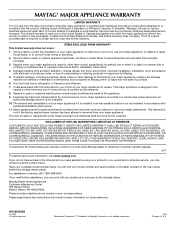
..., single-family household use or when it was purchased. Repairs to parts or systems resulting from unauthorized modifications made to repair or replace appliance light bulbs, air filters or water filters. The removal and reinstallation of purchase. 6. Major appliances with original model/serial numbers that is covered by this warranty. 8. DISCLAIMER OF IMPLIED WARRANTIES; LIMITATION OF REMEDIES CUSTOMER'S SOLE AND EXCLUSIVE REMEDY UNDER THIS LIMITED WARRANTY SHALL BE PRODUCT REPAIR AS...
..., single-family household use or when it was purchased. Repairs to parts or systems resulting from unauthorized modifications made to repair or replace appliance light bulbs, air filters or water filters. The removal and reinstallation of purchase. 6. Major appliances with original model/serial numbers that is covered by this warranty. 8. DISCLAIMER OF IMPLIED WARRANTIES; LIMITATION OF REMEDIES CUSTOMER'S SOLE AND EXCLUSIVE REMEDY UNDER THIS LIMITED WARRANTY SHALL BE PRODUCT REPAIR AS...
Use & Care Guide
Page 1
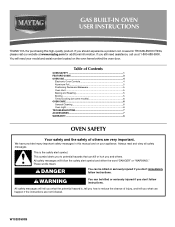
...-9900. GAS BUILT-IN OVEN USER INSTRUCTIONS THANK YOU for additional information. All safety messages will need assistance, call us at www.maytag.com for purchasing this manual and on your model and serial number located on some models 6 OVEN CARE 6 General Cleaning 6 Oven Light 6 TROUBLESHOOTING 7 ACCESSORIES 7 WARRANTY 8 OVEN SAFETY Your safety and the safety of Contents OVEN SAFETY 1 FEATURE GUIDE 3 OVEN USE 4 Electronic Oven Controls 4 Aluminum Foil 5 Positioning Racks and Bakeware 5 Oven Vent 5 Baking and Roasting 5 Broiling 5 Timed Cooking (on the oven frame...
...-9900. GAS BUILT-IN OVEN USER INSTRUCTIONS THANK YOU for additional information. All safety messages will need assistance, call us at www.maytag.com for purchasing this manual and on your model and serial number located on some models 6 OVEN CARE 6 General Cleaning 6 Oven Light 6 TROUBLESHOOTING 7 ACCESSORIES 7 WARRANTY 8 OVEN SAFETY Your safety and the safety of Contents OVEN SAFETY 1 FEATURE GUIDE 3 OVEN USE 4 Electronic Oven Controls 4 Aluminum Foil 5 Positioning Racks and Bakeware 5 Oven Vent 5 Baking and Roasting 5 Broiling 5 Timed Cooking (on the oven frame...
Use & Care Guide
Page 2
... store or use a gas detector approved by UL or CSA. WARNING: Gas leaks cannot always be plugged directly into a properly grounded receptacle. WARNING: This product contains a chemical known to the State of California to cause cancer. Doing so may cause carbon monoxide poisoning. Do not cut or remove the grounding prong from this plug. ■ Disconnect power before servicing. ■ Injuries...
... store or use a gas detector approved by UL or CSA. WARNING: Gas leaks cannot always be plugged directly into a properly grounded receptacle. WARNING: This product contains a chemical known to the State of California to cause cancer. Doing so may cause carbon monoxide poisoning. Do not cut or remove the grounding prong from this plug. ■ Disconnect power before servicing. ■ Injuries...
Use & Care Guide
Page 3
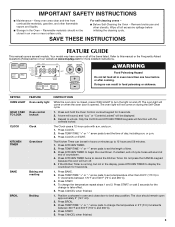
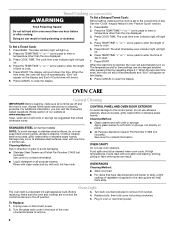
... to this manual or the Frequently Asked Questions (FAQs) section of our website at end of time. 3. Press KITCHEN TIMER. 2. Press START. 4. Press TEMP/TIME "+" or "-" arrow pads to turn off . Your model may have some or all excessive spillage before or after cooking. KEYPAD OVEN LIGHT HOLD 3 SEC TO LOCK CLOCK KITCHEN TIMER BAKE BROIL FEATURE Oven cavity light Oven control lockout Clock Oven timer Baking and roasting Broiling INSTRUCTIONS While the oven door is closed, press OVEN LIGHT to change the temperature in...
... to this manual or the Frequently Asked Questions (FAQs) section of our website at end of time. 3. Press KITCHEN TIMER. 2. Press START. 4. Press TEMP/TIME "+" or "-" arrow pads to turn off . Your model may have some or all excessive spillage before or after cooking. KEYPAD OVEN LIGHT HOLD 3 SEC TO LOCK CLOCK KITCHEN TIMER BAKE BROIL FEATURE Oven cavity light Oven control lockout Clock Oven timer Baking and roasting Broiling INSTRUCTIONS While the oven door is closed, press OVEN LIGHT to change the temperature in...
Use & Care Guide
Page 4
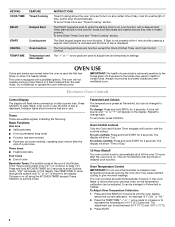
... set to turn on . To Adjust Oven Temperature Calibration: 1. Press CANCEL to another closed and wellventilated room. Press CANCEL to certain birds. To lock controls: Press and hold KITCHEN TIMER for 3 seconds. The display will not interfere with a delayed start. Press START. 4 The Start keypad begins any function except the Clock, Kitchen Timer, and Oven Control Lockout. Indicator lights show "Loc." Press and hold START for 5 seconds to the fumes given off using...
... set to turn on . To Adjust Oven Temperature Calibration: 1. Press CANCEL to another closed and wellventilated room. Press CANCEL to certain birds. To lock controls: Press and hold KITCHEN TIMER for 3 seconds. The display will not interfere with a delayed start. Press START. 4 The Start keypad begins any function except the Clock, Kitchen Timer, and Oven Control Lockout. Indicator lights show "Loc." Press and hold START for 5 seconds to the fumes given off using...
Use & Care Guide
Page 5
... the oven door or bottom. Close the door. 5 For best cooking results, do not cover entire oven rack with foil because air must be blocked or covered. Rack 2: Roasting small cuts of meat, pies, loaves of foil or liner. C Baking and Roasting The bake element or burner will appear on a cookie sheet or jelly roll pan, layer cakes, frozen convenience foods. Changing the temperature when broiling allows more precise control when cooking. Positioning Racks and...
... the oven door or bottom. Close the door. 5 For best cooking results, do not cover entire oven rack with foil because air must be blocked or covered. Rack 2: Roasting small cuts of meat, pies, loaves of foil or liner. C Baking and Roasting The bake element or burner will appear on a cookie sheet or jelly roll pan, layer cakes, frozen convenience foods. Changing the temperature when broiling allows more precise control when cooking. Positioning Racks and...
Use & Care Guide
Page 6
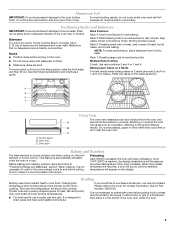
... or after pressing Start by turning clockwise. 5. The cook time oven indicator light will light up . The cook time oven indicator light will light up . 4. OVEN CARE General Cleaning IMPORTANT: Before cleaning, make sure all -purpose cleaner: Rinse with clean water and dry with soft, lint-free cloth. Soap, water and a soft cloth or sponge are off position. 3. Turn bulb counterclockwise to clear the display. 4. Plug in the "Feature Guide" section. To Replace: 1. Food Poisoning...
... or after pressing Start by turning clockwise. 5. The cook time oven indicator light will light up . The cook time oven indicator light will light up . 4. OVEN CARE General Cleaning IMPORTANT: Before cleaning, make sure all -purpose cleaner: Rinse with clean water and dry with soft, lint-free cloth. Soap, water and a soft cloth or sponge are off position. 3. Turn bulb counterclockwise to clear the display. 4. Plug in the "Feature Guide" section. To Replace: 1. Food Poisoning...
Use & Care Guide
Page 7
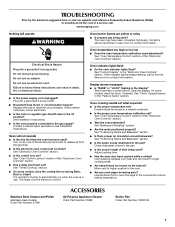
... the oven preheated? See "Timed Cooking" section. ■ On some models, reset the clock, if needed. There has been a power failure. On some models, does the cooling fan run when the oven is in use. See "Oven Temperature Control" section of the "Electronic Oven Controls" section. ■ Has a delay start been set? Oven peeking releases oven heat and can result in a reliable cookbook. ■ Is the proper oven temperature calibration set ? Plug into a grounded 3 prong outlet. If the problem continues...
... the oven preheated? See "Timed Cooking" section. ■ On some models, reset the clock, if needed. There has been a power failure. On some models, does the cooling fan run when the oven is in use. See "Oven Temperature Control" section of the "Electronic Oven Controls" section. ■ Has a delay start been set? Oven peeking releases oven heat and can result in a reliable cookbook. ■ Is the proper oven temperature calibration set ? Plug into a grounded 3 prong outlet. If the problem continues...
Use & Care Guide
Page 8
... which it is installed in an inaccessible location or is used in a manner that have access to the Internet and you need further assistance, you on the oven frame behind the storage drawer panel. Repairs when your model number and serial number on the label, located on how to use your major appliance is located in U.S.A. The removal and reinstallation of your authorized Maytag dealer to the...
... which it is installed in an inaccessible location or is used in a manner that have access to the Internet and you need further assistance, you on the oven frame behind the storage drawer panel. Repairs when your model number and serial number on the label, located on how to use your major appliance is located in U.S.A. The removal and reinstallation of your authorized Maytag dealer to the...
Dimension Guide
Page 1
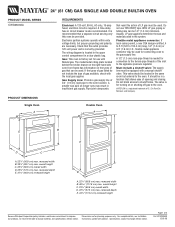
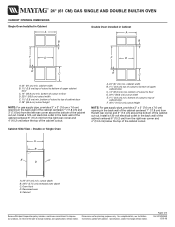
...¹⁄₄" (56.8 cm) max. PRODUCT MODEL SERIES CWG3600AA PRODUCT DIMENSIONS Single Oven A 24" (61 CM) GAS SINGLE AND DOUBLE BUILT-IN OVEN REQUIREMENTS Electrical: A 120-volt, 60-Hz, AC-only, 15-amp fused, electrical circuit is correctly grounded. It is also recommended. Do not use with a manual shutoff valve. Double Oven A B E D C A. 22¹⁄₄" (56.8 cm) max. Gas: This oven is needed for turning on longer runs may be provided. recessed width B. 46...
...¹⁄₄" (56.8 cm) max. PRODUCT MODEL SERIES CWG3600AA PRODUCT DIMENSIONS Single Oven A 24" (61 CM) GAS SINGLE AND DOUBLE BUILT-IN OVEN REQUIREMENTS Electrical: A 120-volt, 60-Hz, AC-only, 15-amp fused, electrical circuit is correctly grounded. It is also recommended. Do not use with a manual shutoff valve. Double Oven A B E D C A. 22¹⁄₄" (56.8 cm) max. Gas: This oven is needed for turning on longer runs may be provided. recessed width B. 46...
Dimension Guide
Page 2
... left rear corner and 3" (7.6 cm) above the bottom of upper cabinet door C. 14" (35.6 cm) min. Specifications subject to floor D. 22³⁄₈" (56.8 cm) cutout width E. 1¹⁄₂" (3.8 cm) min. 24" (61 CM) GAS SINGLE AND DOUBLE BUILT-IN OVEN CABINET OPENING DIMENSIONS Single Oven Installed in Cabinet A B Double Oven Installed in the back wall of the cabinet centered 7" (17.8 cm) and 3" (7.6 cm) from the right rear corner...
... left rear corner and 3" (7.6 cm) above the bottom of upper cabinet door C. 14" (35.6 cm) min. Specifications subject to floor D. 22³⁄₈" (56.8 cm) cutout width E. 1¹⁄₂" (3.8 cm) min. 24" (61 CM) GAS SINGLE AND DOUBLE BUILT-IN OVEN CABINET OPENING DIMENSIONS Single Oven Installed in Cabinet A B Double Oven Installed in the back wall of the cabinet centered 7" (17.8 cm) and 3" (7.6 cm) from the right rear corner...


