Installation Instructions
Page 8
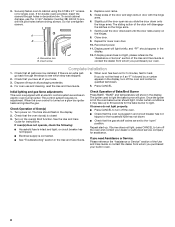
... x 2.1" screws (4 for single oven, 6 for lower oven door. 10. If you purchased your oven. Check Operation of Bake/Broil Burner Press BAKE. Display panel will glow. If there is connected. ■ See "Troubleshooting" section in the display. This control system requires no adjustment. Turn... on a glow bar igniter heats and ignites the gas. If burners do not feel for instructions. Do not overtighten screws. Repeat for double oven) provided. Complete Installation 1. Decorative trim B. Check that the gas shutoff valves...
... x 2.1" screws (4 for single oven, 6 for lower oven door. 10. If you purchased your oven. Check Operation of Bake/Broil Burner Press BAKE. Display panel will glow. If there is connected. ■ See "Troubleshooting" section in the display. This control system requires no adjustment. Turn... on a glow bar igniter heats and ignites the gas. If burners do not feel for instructions. Do not overtighten screws. Repeat for double oven) provided. Complete Installation 1. Decorative trim B. Check that the gas shutoff valves...
Dimension Guide
Page 2
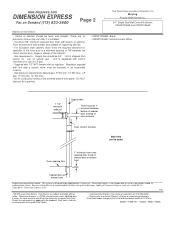
... cabinet. • Gas requirements: Supply line should be level and straight and capable of supporting 250 lbs. • For European style cabinets (flush front) the required clearance for combustion enters at the extreme bottom front panel. Because of the ...Black. • CWG3100AAE : Monochromatic White. 1 1/2" minimum wide rail Cabinet door There must be updated daily if necessary. Supplied with 1/2" NPT female inlet on Demand (775) 833-3600 Page 2 This Data Sheet Includes Information On Maytag • Product Model Number (s): • 24" Single Gas Wall Oven with bottom of ...
... cabinet. • Gas requirements: Supply line should be level and straight and capable of supporting 250 lbs. • For European style cabinets (flush front) the required clearance for combustion enters at the extreme bottom front panel. Because of the ...Black. • CWG3100AAE : Monochromatic White. 1 1/2" minimum wide rail Cabinet door There must be updated daily if necessary. Supplied with 1/2" NPT female inlet on Demand (775) 833-3600 Page 2 This Data Sheet Includes Information On Maytag • Product Model Number (s): • 24" Single Gas Wall Oven with bottom of ...
Use & Care Guide
Page 5
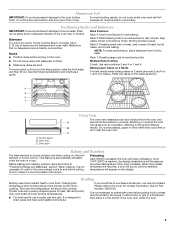
...If you would like to "Positioning Racks and Bakeware" section. Close the door. 5 Preheating After START is in the center of the oven increases. Control panel B. Position food on grid in a broiler pan, then place it out to end before putting food in unless recommended in the recipe. ... Rack 4: Use for Part Number 12500100. Broiling chicken pieces. Rack 2: Roasting small cuts of meat, pies, loaves of space around bakeware and oven walls. To move freely. Baking Layer Cakes on 2 Racks For best results when baking cakes on ; C Baking and Roasting The bake element or ...
...If you would like to "Positioning Racks and Bakeware" section. Close the door. 5 Preheating After START is in the center of the oven increases. Control panel B. Position food on grid in a broiler pan, then place it out to end before putting food in unless recommended in the recipe. ... Rack 4: Use for Part Number 12500100. Broiling chicken pieces. Rack 2: Roasting small cuts of meat, pies, loaves of space around bakeware and oven walls. To move freely. Baking Layer Cakes on 2 Racks For best results when baking cakes on ; C Baking and Roasting The bake element or ...
Use & Care Guide
Page 6
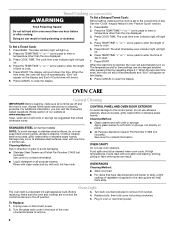
...The cook time oven indicator light ... on panel. At...oven or reconnect power. OVEN CAVITY Do not use oven...oven...oven will appear on the display. 8. NOTE: To avoid damage to the control panel...the oven counterclockwise...controls are harder to slide, a light coating of time to start. 7. OVEN...oven...oven more than one displayed. 3. Before replacing, make sure the oven and cooktop are cool and the control knobs are suggested first unless otherwise noted. The cook time oven...oven indicator light will automatically turn on. Oven Light The oven light is reached, the oven...CONTROL PANEL AND OVEN...
...The cook time oven indicator light ... on panel. At...oven or reconnect power. OVEN CAVITY Do not use oven...oven...oven will appear on the display. 8. NOTE: To avoid damage to the control panel...the oven counterclockwise...controls are harder to slide, a light coating of time to start. 7. OVEN...oven...oven more than one displayed. 3. Before replacing, make sure the oven and cooktop are cool and the control knobs are suggested first unless otherwise noted. The cook time oven...oven indicator light will automatically turn on. Oven Light The oven light is reached, the oven...CONTROL PANEL AND OVEN...


