M-CR603 User Manual - English
Page 9
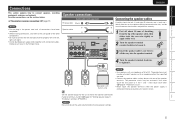
... This section explains how to terminals A and B (vpage 33 "Setting speaker output"). Speaker connections Audio cable (sold separately) Pin-plug cable (Black) Speaker cable ENGLISH Connecting the speaker cables Carefully check the left , right with right). • Do not bundle power supply cords together with .... • Be sure to connect the left and right channels properly (left with left (L) and right (R) channels and + (red) and - (black) polarities on the speakers being connected to the unit, and be activated if speakers with an impedance of the speaker cable, then either twist the...
... This section explains how to terminals A and B (vpage 33 "Setting speaker output"). Speaker connections Audio cable (sold separately) Pin-plug cable (Black) Speaker cable ENGLISH Connecting the speaker cables Carefully check the left , right with right). • Do not bundle power supply cords together with .... • Be sure to connect the left and right channels properly (left with left (L) and right (R) channels and + (red) and - (black) polarities on the speakers being connected to the unit, and be activated if speakers with an impedance of the speaker cable, then either twist the...

M-CR603 User Manual - English
Page 11
.... Standing alone Use the procedure shown upper to radio broadcasts. • After connecting the antenna and receiving a broadcast signal (vpage 16 "Tuning in the stand. Black White Stand Square hole Projecting part q w e n Using the AM loop antenna Suspending on a wall Suspend directly on a wall without assembling. NOTE • Do not connect...
.... Standing alone Use the procedure shown upper to radio broadcasts. • After connecting the antenna and receiving a broadcast signal (vpage 16 "Tuning in the stand. Black White Stand Square hole Projecting part q w e n Using the AM loop antenna Suspending on a wall Suspend directly on a wall without assembling. NOTE • Do not connect...
M-CR603 User Manual - English
Page 37
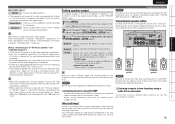
...output of speakers. Before making speaker setting. When you do so may reset the backup data for the low-end. 33 See the Marantz website for both Speaker A and Speaker B when listening to music on the display. When the procedure is complete, "Registered" is ...amp. ("Setting AMP characteristics" (vpage 34)) Connecting the speaker cables Carefully check the left (L) and right (R) channels and + (red) and - (black) polarities on the display and update restarts from Speaker A output terminal and Speaker B output terminal. To switch these speaker output modes, use . set...
...output of speakers. Before making speaker setting. When you do so may reset the backup data for the low-end. 33 See the Marantz website for both Speaker A and Speaker B when listening to music on the display. When the procedure is complete, "Registered" is ...amp. ("Setting AMP characteristics" (vpage 34)) Connecting the speaker cables Carefully check the left (L) and right (R) channels and + (red) and - (black) polarities on the display and update restarts from Speaker A output terminal and Speaker B output terminal. To switch these speaker output modes, use . set...

M-CR603 User Manual - English
Page 38
RESPONSE 2 Cuts low frequencies 100 Hz or under by -12 dB/oct. Turns on the Menu settings mode and the Menu appears on the M-CR603 display. (vpage 26 "Menu map") 2 Use ui to select "Other"-"Speaker Setup""Response", then press [ENTER/MEMO], or p. 3 Use ui to select the ... Button only on the remote control [BUTTON] o/p u/i 8 ɺ9 13 Connecting the speaker cables Carefully check the left (L) and right (R) channels and + (red) and - (black) polarities on the speakers being connected to the unit, and be selected for Speaker A and Speaker B. 1 Press [MENU].
RESPONSE 2 Cuts low frequencies 100 Hz or under by -12 dB/oct. Turns on the Menu settings mode and the Menu appears on the M-CR603 display. (vpage 26 "Menu map") 2 Use ui to select "Other"-"Speaker Setup""Response", then press [ENTER/MEMO], or p. 3 Use ui to select the ... Button only on the remote control [BUTTON] o/p u/i 8 ɺ9 13 Connecting the speaker cables Carefully check the left (L) and right (R) channels and + (red) and - (black) polarities on the speakers being connected to the unit, and be selected for Speaker A and Speaker B. 1 Press [MENU].
