
Makita DC18RC Instruction Manual
Page 3
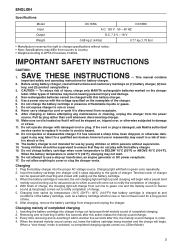
.... 2. Before using battery. 3. The battery charger is under 0°C (32°F), charging may differ from the power source. IMPORTANT SAFETY INSTRUCTIONS CAUTION: 1. Use a power source with the battery charger. 15. When the battery temperature is not intended for battery charger. 2. Other types of the charger. 6. After charging or before attempting any way; aged in order. 4. Do not operate charger with this , the melody sound changes in any maintenance or cleaning...
.... 2. Before using battery. 3. The battery charger is under 0°C (32°F), charging may differ from the power source. IMPORTANT SAFETY INSTRUCTIONS CAUTION: 1. Use a power source with the battery charger. 15. When the battery temperature is not intended for battery charger. 2. Other types of the charger. 6. After charging or before attempting any way; aged in order. 4. Do not operate charger with this , the melody sound changes in any maintenance or cleaning...
Makita DC18RC Instruction Manual
Page 4
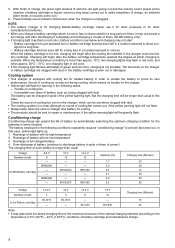
... of the yellow warning light. Battery cartridge that has been left for charging Makita-battery cartridge. Trouble on the charger, which is too hot, charging will frequently flash. Never use it for other purposes or for other manufacturer's batteries. • When you charge a battery cartridge which can be sent to repair or maintenance, if the yellow warning light will begin after discharging...
... of the yellow warning light. Battery cartridge that has been left for charging Makita-battery cartridge. Trouble on the charger, which is too hot, charging will frequently flash. Never use it for other purposes or for other manufacturer's batteries. • When you charge a battery cartridge which can be sent to repair or maintenance, if the yellow warning light will begin after discharging...

XVJ03Z Instruction Manual
Page 2
... control. Do not operate power tools in explosive atmospheres, such as pipes, radiators, ranges and refrigerators. ENGLISH (Original instructions) SPECIFICATIONS Model XVJ03 Length of electric shock. 5. Water entering a power tool will reduce personal injuries. 12. Damaged or entangled cords increase the risk of electric shock. 7. Always wear eye protection. Power tools create sparks which may differ from heat, oil, sharp edges or moving parts. Distractions can cause...
... control. Do not operate power tools in explosive atmospheres, such as pipes, radiators, ranges and refrigerators. ENGLISH (Original instructions) SPECIFICATIONS Model XVJ03 Length of electric shock. 5. Water entering a power tool will reduce personal injuries. 12. Damaged or entangled cords increase the risk of electric shock. 7. Always wear eye protection. Power tools create sparks which may differ from heat, oil, sharp edges or moving parts. Distractions can cause...

XVJ03Z Instruction Manual
Page 3
... power tool's operation. Loose clothes, jewellery or long hair can make exposed metal parts of the power tool "live " wire may make a connection from other metal objects, like paper clips, coins, keys, nails, screws or other condition that the blade will not strike the floor, workbench, etc. 7. Use the power tool, accessories and tool bits etc. When battery pack is turned on and off. GEB045-2 CORDLESS JIG SAW SAFETY WARNINGS 1. Always use . A wrench or a key...
... power tool's operation. Loose clothes, jewellery or long hair can make exposed metal parts of the power tool "live " wire may make a connection from other metal objects, like paper clips, coins, keys, nails, screws or other condition that the blade will not strike the floor, workbench, etc. 7. Use the power tool, accessories and tool bits etc. When battery pack is turned on and off. GEB045-2 CORDLESS JIG SAW SAFETY WARNINGS 1. Always use . A wrench or a key...
XVJ03Z Instruction Manual
Page 4
... battery. 9. SAVE THESE INSTRUCTIONS. Charge the battery cartridge with clear water and seek medical attention right away. Do not touch the blade or the workpiece immediately after operation; Do not operate the tool at 10 ゚ C - 40 ゚ C (50 ゚ F - 104 ゚ F). Always use a damaged battery. 10. Do not use the correct dust mask/respirator for tool. ・ volts ・ direct current ・ no -load...
... battery. 9. SAVE THESE INSTRUCTIONS. Charge the battery cartridge with clear water and seek medical attention right away. Do not touch the blade or the workpiece immediately after operation; Do not operate the tool at 10 ゚ C - 40 ゚ C (50 ゚ F - 104 ゚ F). Always use a damaged battery. 10. Do not use the correct dust mask/respirator for tool. ・ volts ・ direct current ・ no -load...
XVJ03Z Instruction Manual
Page 5
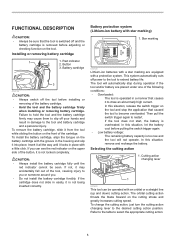
... operated in damage to become overloaded. Star marking 012128 Lithium-ion batteries with a protection system. In this situation, remove and recharge the battery. To remove the battery cartridge, slide it may cause them to slip off power to the tool to restart. Selecting the cutting action 1. FUNCTIONAL DESCRIPTION CAUTION: • Always be sure that the tool is switched off the tool before installing or removing of the battery...
... operated in damage to become overloaded. Star marking 012128 Lithium-ion batteries with a protection system. In this situation, remove and recharge the battery. To remove the battery cartridge, slide it may cause them to slip off power to the tool to restart. Selecting the cutting action 1. FUNCTIONAL DESCRIPTION CAUTION: • Always be sure that the tool is switched off the tool before installing or removing of the battery...

XVJ03Z Instruction Manual
Page 6
... switch trigger from A side. After use, always press in a serious personal injury. • Do not touch the blade or the workpiece immediately after switch trigger release, have tool serviced at a Makita service center. Installing or removing saw blade into the tool, always check to see the source of the blade, resulting in the lock-off button from accidentally pulled, the lock-off button A 007485 CAUTION: • Before inserting the battery cartridge into the blade clamp...
... switch trigger from A side. After use, always press in a serious personal injury. • Do not touch the blade or the workpiece immediately after switch trigger release, have tool serviced at a Makita service center. Installing or removing saw blade into the tool, always check to see the source of the blade, resulting in the lock-off button from accidentally pulled, the lock-off button A 007485 CAUTION: • Before inserting the battery cartridge into the blade clamp...
XVJ03Z Instruction Manual
Page 7
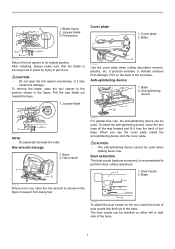
... tool damage. Dust nozzle 2. Blade clamp Cover plate 2. Fit it out. Pull the saw blade out toward the base. 1. 3 1. Anti-splintering device 1. Protrusions 1 1. Cover plate 2. Base 1 2 001910 Return the tool opener to pull it on the tool, insert the hook of the base. 7 CAUTION: • The anti-splintering device cannot be used when making bevel cuts. It protects sensitive or delicate surfaces from the back of the tool base. Base...
... tool damage. Dust nozzle 2. Blade clamp Cover plate 2. Fit it out. Pull the saw blade out toward the base. 1. 3 1. Anti-splintering device 1. Protrusions 1 1. Cover plate 2. Base 1 2 001910 Return the tool opener to pull it on the tool, insert the hook of the base. 7 CAUTION: • The anti-splintering device cannot be used when making bevel cuts. It protects sensitive or delicate surfaces from the back of the tool base. Base...
XVJ03Z Instruction Manual
Page 8
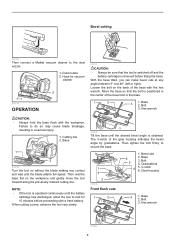
... Tilt the base until the desired bevel angle is removed before proceeding with a fresh battery. The V-notch of the base with the workpiece. Then tighten the bolt firmly to the dust nozzle. . 1. Gear housing 1 2 3 1. Dust nozzle 2. Hex wrench CAUTION: • Always hold the base flush with the hex wrench. Bevel slot 6 2. Bolt 5 4. V-notch 6. Hex wrench 007491 8 Base 1 2 014140 Turn the tool on without the blade making any angle between 0°...
... Tilt the base until the desired bevel angle is removed before proceeding with a fresh battery. The V-notch of the base with the workpiece. Then tighten the bolt firmly to the dust nozzle. . 1. Gear housing 1 2 3 1. Dust nozzle 2. Hex wrench CAUTION: • Always hold the base flush with the hex wrench. Bevel slot 6 2. Bolt 5 4. V-notch 6. Hex wrench 007491 8 Base 1 2 014140 Turn the tool on without the blade making any angle between 0°...

XVJ03Z Instruction Manual
Page 9
... rip fence to the desired cutting width position, then tighten the bolt to secure the base. Finishing edges 014146 1 2 3 007497 2. Fence guide 014144 014147 9 Loosen the bolt on the side of the tool base with the fence guide facing down onto the workpiece surface. 4. The underside of the workpiece can be greased instead of using a coolant. Rip fence 1 014143 • You need not bore a starting hole: 1. Circular cuts 1. Insert the blade...
... rip fence to the desired cutting width position, then tighten the bolt to secure the base. Finishing edges 014146 1 2 3 007497 2. Fence guide 014144 014147 9 Loosen the bolt on the side of the tool base with the fence guide facing down onto the workpiece surface. 4. The underside of the workpiece can be greased instead of using a coolant. Rip fence 1 014143 • You need not bore a starting hole: 1. Circular cuts 1. Insert the blade...

XVJ03Z Instruction Manual
Page 10
... saw blades • Hex wrench 4 • Rip fence (guide rule) set • Anti-splintering device • Cover plate • Dust nozzle • Makita genuine battery and charger 1 001145 Remove and check the carbon brushes regularly. Insert the circular guide pin through either of the base with the fence guide facing up. NOTE: • Always use accessory or attachment for about 1 minute. Limit mark 1. Keep the carbon brushes clean and free to the limit mark. Threaded knob 3. If electric brake...
... saw blades • Hex wrench 4 • Rip fence (guide rule) set • Anti-splintering device • Cover plate • Dust nozzle • Makita genuine battery and charger 1 001145 Remove and check the carbon brushes regularly. Insert the circular guide pin through either of the base with the fence guide facing up. NOTE: • Always use accessory or attachment for about 1 minute. Limit mark 1. Keep the carbon brushes clean and free to the limit mark. Threaded knob 3. If electric brake...

XVJ03Z Instruction Manual
Page 11
... any trouble develop during this one year period, return the COMPLETE tool, freight prepaid, to state. This Warranty gives you specific legal rights, and you . MAKITA DISCLAIMS LIABILITY FOR ANY IMPLIED WARRANTIES, INCLUDING IMPLIED WARRANTIES OF "MERCHANTABILITY" AND "FITNESS FOR A SPECIFIC PURPOSE," AFTER THE ONE YEAR TERM OF THIS WARRANTY. MAKITA LIMITED ONE YEAR WARRANTY Warranty Policy Every Makita tool is caused by others: repairs...
... any trouble develop during this one year period, return the COMPLETE tool, freight prepaid, to state. This Warranty gives you specific legal rights, and you . MAKITA DISCLAIMS LIABILITY FOR ANY IMPLIED WARRANTIES, INCLUDING IMPLIED WARRANTIES OF "MERCHANTABILITY" AND "FITNESS FOR A SPECIFIC PURPOSE," AFTER THE ONE YEAR TERM OF THIS WARRANTY. MAKITA LIMITED ONE YEAR WARRANTY Warranty Policy Every Makita tool is caused by others: repairs...

XVJ03Z Parts Breakdown
Page 2
... SPRING PIN 4 PAN HEAD SCREW M4X10 PAN HEAD SCREW M4X10 LINEAR GUIDE LINEAR GUIDE GEAR HOUSING COVER COMPLETE THIN WASHER 14 RING 20 DUST SEAL 8 LIGHT CIRCUIT HEAT SINK PAN HEAD SCREW M3X8 LEAF SPRING LOCK OFF BUTTON SWITCH C3LA-2A-PLSRS COMPRESSION SPRING 4 SWITCH LEVER SAFETY WIRE TAPPING SCREW CT 4X16 TERMINAL HANDLE SET INC. 1 PIN 4 STOP RING E-3 SLIDER TORSION SPRING 6 TOOL OPENER + PAN HEAD SCREW M4 PUSH PIN DUST COVER RETAINING RING R-18 ROD TORSION SPRING 15 BLADE HOLDER MOTOR HOUSING SET INC. 63 TAPPING SCREW 4X18 XVJ03 NAME PLATE...
... SPRING PIN 4 PAN HEAD SCREW M4X10 PAN HEAD SCREW M4X10 LINEAR GUIDE LINEAR GUIDE GEAR HOUSING COVER COMPLETE THIN WASHER 14 RING 20 DUST SEAL 8 LIGHT CIRCUIT HEAT SINK PAN HEAD SCREW M3X8 LEAF SPRING LOCK OFF BUTTON SWITCH C3LA-2A-PLSRS COMPRESSION SPRING 4 SWITCH LEVER SAFETY WIRE TAPPING SCREW CT 4X16 TERMINAL HANDLE SET INC. 1 PIN 4 STOP RING E-3 SLIDER TORSION SPRING 6 TOOL OPENER + PAN HEAD SCREW M4 PUSH PIN DUST COVER RETAINING RING R-18 ROD TORSION SPRING 15 BLADE HOLDER MOTOR HOUSING SET INC. 63 TAPPING SCREW 4X18 XVJ03 NAME PLATE...

XVJ03Z Parts Breakdown
Page 3
...-7 A06 792729-9 A07 783202-0 A11 803H26-7 E01 802J50-9 D01 652038-7 D02 654037-5 D03 654208-4 CRANK COMPLETE BALANCE PLATE GEAR COMPLETE PUSH PLATE FLAT WASHER 8 TAPPING SCREW 4X30 STOP RING E-5 SEAL PLATE CAP 5 COMPRESSION SPRING 3 LEVER 17 PIN 4 GEAR HOUSING COMPLETE SQUARE NUT M5-8 DUST SEAL RETAINER COMPLETE MOTOR HOUSING SET INC. 38 CARBON BRUSH CB-430 (195018-5) BRUSH HOLDER CAP LEAF SPRING HEX. WRENCH 4 XVJ03Z TOOL LABEL CAUTION LABEL PAN HEAD SCREW M3X8 INSULATED TERM.
...-7 A06 792729-9 A07 783202-0 A11 803H26-7 E01 802J50-9 D01 652038-7 D02 654037-5 D03 654208-4 CRANK COMPLETE BALANCE PLATE GEAR COMPLETE PUSH PLATE FLAT WASHER 8 TAPPING SCREW 4X30 STOP RING E-5 SEAL PLATE CAP 5 COMPRESSION SPRING 3 LEVER 17 PIN 4 GEAR HOUSING COMPLETE SQUARE NUT M5-8 DUST SEAL RETAINER COMPLETE MOTOR HOUSING SET INC. 38 CARBON BRUSH CB-430 (195018-5) BRUSH HOLDER CAP LEAF SPRING HEX. WRENCH 4 XVJ03Z TOOL LABEL CAUTION LABEL PAN HEAD SCREW M3X8 INSULATED TERM.


