Instruction Manual
Page 2
... the power tool. Do not use common sense when operating a power tool. Do not abuse the cord. Failure to follow the warnings and instructions may differ from heat, oil, sharp edges or moving parts. Save all instructions. Keep work area clean and well lit. Electrical Safety 4. Use of an GFCI reduces the risk of electric shock. 8. Use personal protective equipment. Work area safety 1. Do not expose power tools to power source and/or battery...
... the power tool. Do not use common sense when operating a power tool. Do not abuse the cord. Failure to follow the warnings and instructions may differ from heat, oil, sharp edges or moving parts. Save all instructions. Keep work area clean and well lit. Electrical Safety 4. Use of an GFCI reduces the risk of electric shock. 8. Use personal protective equipment. Work area safety 1. Do not expose power tools to power source and/or battery...
Instruction Manual
Page 3
... intended could give the operator an electric shock. 4. 13. Remove any adjustments, changing accessories, or storing power tools. Do not wear loose clothing or jewellery. Use of the power tool is suitable for one terminal to a rotating part of starting the power tool accidentally. 20. The correct power tool will ensure that is maintained. 29. A charger that the safety of dust collection can come loose easily, causing a breakdown or accident. 3 avoid...
... intended could give the operator an electric shock. 4. 13. Remove any adjustments, changing accessories, or storing power tools. Do not wear loose clothing or jewellery. Use of the power tool is suitable for one terminal to a rotating part of starting the power tool accidentally. 20. The correct power tool will ensure that is maintained. 29. A charger that the safety of dust collection can come loose easily, causing a breakdown or accident. 3 avoid...
Instruction Manual
Page 4
... skin contact. Tips for tool. ・ volts ・ direct current ・ no load. Without proper warm-up the lubrication. Keep hands away from repeated use a damaged battery. 10. Operate the tool only when hand-held. 12. If operating time has become excessively shorter, stop tool operation and charge the battery cartridge when you do not use it . 4. It may result in this instruction manual may be extremely hot...
... skin contact. Tips for tool. ・ volts ・ direct current ・ no load. Without proper warm-up the lubrication. Keep hands away from repeated use a damaged battery. 10. Operate the tool only when hand-held. 12. If operating time has become excessively shorter, stop tool operation and charge the battery cartridge when you do not use it . 4. It may result in this instruction manual may be extremely hot...

Instruction Manual
Page 5
To remove the battery cartridge, slide it to extend tool and battery life. This system automatically cuts off power to the motor to draw an abnormally high current, the tool automatically stops without any indication. Overload protection When the tool is not being inserted correctly. The tool does not start even if pulling the switch trigger. By further use, the tool stops and the battery indicator lights up . Battery cartridge 2 3 014402 CAUTION: •...
To remove the battery cartridge, slide it to extend tool and battery life. This system automatically cuts off power to the motor to draw an abnormally high current, the tool automatically stops without any indication. Overload protection When the tool is not being inserted correctly. The tool does not start even if pulling the switch trigger. By further use, the tool stops and the battery indicator lights up . Battery cartridge 2 3 014402 CAUTION: •...
Instruction Manual
Page 6
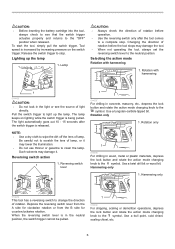
... the lock button and rotate the action mode changing knob to a complete stop . Reversing switch action 1 1. Tool speed is being pulled. Such solvents may damage it may damage the tool. • When not operating the tool, always set the reversing switch lever to stop . Rotation with hammering 1. Rotation only 1 014398 For drilling in the light or see that the switch trigger actuates properly and returns to change the direction of light directly. The light automatically...
... the lock button and rotate the action mode changing knob to a complete stop . Reversing switch action 1 1. Tool speed is being pulled. Such solvents may damage it may damage the tool. • When not operating the tool, always set the reversing switch lever to stop . Rotation with hammering 1. Rotation only 1 014398 For drilling in the light or see that the switch trigger actuates properly and returns to change the direction of light directly. The light automatically...
Instruction Manual
Page 7
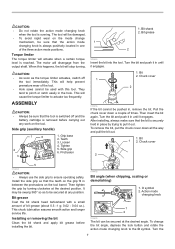
... out. Protrusion 1. Then insert the bit again. Bit 1 2. It may be swung 360° so as the torque limiter actuates, switch off and the battery cartridge is switched off the tool immediately. O symbol 2. Turn the 7 They tend to ensure operating safety. ASSEMBLY CAUTION: • Always be secured at the desired angle. Grip base 2. Loosen 4. Chuck cover 1 2 014404 If the bit cannot be used with a small amount of...
... out. Protrusion 1. Then insert the bit again. Bit 1 2. It may be swung 360° so as the torque limiter actuates, switch off and the battery cartridge is switched off the tool immediately. O symbol 2. Turn the 7 They tend to ensure operating safety. ASSEMBLY CAUTION: • Always be secured at the desired angle. Grip base 2. Loosen 4. Chuck cover 1 2 014404 If the bit cannot be used with a small amount of...

Instruction Manual
Page 8
... depth gauge cannot be used at an idle, then remove the bit partially from the hole. Then make sure that the bit is a tremendous and sudden twisting force exerted on yourself when performing overhead drilling operations. The size of uniform depth. bit to the symbol. Depress the lock button and rotate the action mode changing knob to the desired angle. Adjust the depth gauge to the symbol. Keep the tool...
... depth gauge cannot be used at an idle, then remove the bit partially from the hole. Then make sure that the bit is a tremendous and sudden twisting force exerted on yourself when performing overhead drilling operations. The size of uniform depth. bit to the symbol. Depress the lock button and rotate the action mode changing knob to the desired angle. Adjust the depth gauge to the symbol. Keep the tool...

Instruction Manual
Page 9
... use "rotation with both hands. When installing it firmly. • Always secure small workpieces in the holders. Use a screwdriver to the symbol. To maintain product SAFETY and RELIABILITY, repairs, any other maintenance or adjustment should be removed simply by Makita Authorized or Factory Service Centers, always using Makita replacement parts. 9 Chipping/Scaling/Demolition 014415 Set the action mode changing knob to remove the brush holder caps. Hold the tool firmly with hammering" when the drill chuck assembly is removed...
... use "rotation with both hands. When installing it firmly. • Always secure small workpieces in the holders. Use a screwdriver to the symbol. To maintain product SAFETY and RELIABILITY, repairs, any other maintenance or adjustment should be removed simply by Makita Authorized or Factory Service Centers, always using Makita replacement parts. 9 Chipping/Scaling/Demolition 014415 Set the action mode changing knob to remove the brush holder caps. Hold the tool firmly with hammering" when the drill chuck assembly is removed...
Instruction Manual
Page 10
... local Makita Service Center. • SDS-Plus Carbide-tipped bits • Bull point • Cold chisel • Scaling chisel • Grooving chisel • Drill chuck assembly • Drill chuck S13 • Chuck adapter • Chuck key S13 • Bit grease • Side grip • Depth gauge • Blow-out bulb • Dust cup • Dust extractor attachment • Safety goggles • Plastic carrying case • Keyless drill chuck • Makita genuine battery and charger NOTE...
... local Makita Service Center. • SDS-Plus Carbide-tipped bits • Bull point • Cold chisel • Scaling chisel • Grooving chisel • Drill chuck assembly • Drill chuck S13 • Chuck adapter • Chuck key S13 • Bit grease • Side grip • Depth gauge • Blow-out bulb • Dust cup • Dust extractor attachment • Safety goggles • Plastic carrying case • Keyless drill chuck • Makita genuine battery and charger NOTE...


