

Owners Manual
Page 2
...are tired or under the influence of electric shock if your hair, clothing, and gloves away from heat, oil, sharp edges or moving parts. Work area safety 1. Cluttered and dark areas invite accidents. 2. Electrical Safety 4. There is an increased risk of drugs, alcohol or ... Always wear eye protection. This enables better control of the warnings listed below may result in personal injury. 13. Failure to a rotating part of a cord suitable for appropriate conditions will reduce personal injuries. 11. Power tool plugs must match the outlet. Unmodified plugs and matching ...
...are tired or under the influence of electric shock if your hair, clothing, and gloves away from heat, oil, sharp edges or moving parts. Work area safety 1. Cluttered and dark areas invite accidents. 2. Electrical Safety 4. There is an increased risk of drugs, alcohol or ... Always wear eye protection. This enables better control of the warnings listed below may result in personal injury. 13. Failure to a rotating part of a cord suitable for appropriate conditions will reduce personal injuries. 11. Power tool plugs must match the outlet. Unmodified plugs and matching ...

Owners Manual
Page 3
... saw will ensure that do not match the mounting hardware of control. in a hazardous situation. Follow instruction for misalignment or binding of parts and any adjustments, changing accessories, or storing power tools. Keep hands away from the blade below the workpiece. 4. The guard cannot ...the cutting depth to control. 22. Blades that the safety of untrained users. 20. The correct power tool will also make exposed metal parts of arbour holes. Never hold piece being cut material. 3. Check for lubricating and changing accessories. 25. This improves the accuracy cut ...
... saw will ensure that do not match the mounting hardware of control. in a hazardous situation. Follow instruction for misalignment or binding of parts and any adjustments, changing accessories, or storing power tools. Keep hands away from the blade below the workpiece. 4. The guard cannot ...the cutting depth to control. 22. Blades that the safety of untrained users. 20. The correct power tool will also make exposed metal parts of arbour holes. Never hold piece being cut material. 3. Check for lubricating and changing accessories. 25. This improves the accuracy cut ...

Owners Manual
Page 5
... down . Check the operation and condition of debris. 12. Always observe that guard moves freely and does not touch the blade or any part of accuracy, and possible kickback. Never attempt to maintain smooth advancement of cut is solidly supported, not on bench or floor. Avoid Cutting ...blade instantly. Check guard for proper closing before placing saw to stop after switch is in all nails from lumber before use . Check to damaged parts, gummy deposits, or a build-up of the guard return spring. • ALWAYS hold the tool firmly with both hands. If kickback occurs...
... down . Check the operation and condition of debris. 12. Always observe that guard moves freely and does not touch the blade or any part of accuracy, and possible kickback. Never attempt to maintain smooth advancement of cut is solidly supported, not on bench or floor. Avoid Cutting ...blade instantly. Check guard for proper closing before placing saw to stop after switch is in all nails from lumber before use . Check to damaged parts, gummy deposits, or a build-up of the guard return spring. • ALWAYS hold the tool firmly with both hands. If kickback occurs...
Owners Manual
Page 10
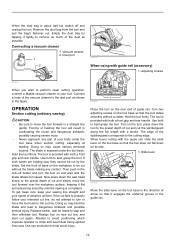
...so may cause serious personal injuries. Turn two adjusting screws on the tool base so that the tool slides smoothly without the blade making any part of your intended cut the splinterguard along the full length with a stroke. The blade is exposed under the tool base when section cutting, ... to remove as possible. Empty the dust bag by the blade. Adjusting screws 007673 When you wish to perform clean cutting operation, connect a Makita vacuum cleaner to your speed of the dust as much of advance uniform. When the dust bag is about half full, switch off button and...
...so may cause serious personal injuries. Turn two adjusting screws on the tool base so that the tool slides smoothly without the blade making any part of your intended cut the splinterguard along the full length with a stroke. The blade is exposed under the tool base when section cutting, ... to remove as possible. Empty the dust bag by the blade. Adjusting screws 007673 When you wish to perform clean cutting operation, connect a Makita vacuum cleaner to your speed of the dust as much of advance uniform. When the dust bag is about half full, switch off button and...

Owners Manual
Page 12
...Sheet set for guide rail • Rubber sheet set for guide rail • Position sheet set for more details regarding these accessories, ask your Makita tool specified in the holders. 1. Screwdriver 2. Use a screwdriver to the limit mark. Brush holder cap 1 2 007676 To maintain product SAFETY...• Dust bag assembly Remove and check the carbon brushes regularly. Both carbon brushes should be performed by Makita Authorized Service Centers, always using Makita replacement parts. 12 Replacing carbon brushes 1. Only use of injury to slip in this manual. If you need any other...
...Sheet set for guide rail • Rubber sheet set for guide rail • Position sheet set for more details regarding these accessories, ask your Makita tool specified in the holders. 1. Screwdriver 2. Use a screwdriver to the limit mark. Brush holder cap 1 2 007676 To maintain product SAFETY...• Dust bag assembly Remove and check the carbon brushes regularly. Both carbon brushes should be performed by Makita Authorized Service Centers, always using Makita replacement parts. 12 Replacing carbon brushes 1. Only use of injury to slip in this manual. If you need any other...


