
Owners Manual
Page 10
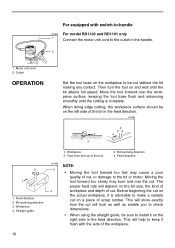
Workpiece 4. Straight guide 1. View from the top of scrap lumber. Moving the tool forward too slowly may cause a poor quality of cut, or damage to make a sample cut ... bit attains full speed. This will depend on the right side in -handle 003675 For model RD1100 and RD1101 only 1 Connect the motor unit cord to check dimensions. • When using the straight guide, be cut . Bit revolving direction 4. Feed direction 001985 3 4 NOTE: • Moving the tool forward too fast may burn...
Workpiece 4. Straight guide 1. View from the top of scrap lumber. Moving the tool forward too slowly may cause a poor quality of cut, or damage to make a sample cut ... bit attains full speed. This will depend on the right side in -handle 003675 For model RD1100 and RD1101 only 1 Connect the motor unit cord to check dimensions. • When using the straight guide, be cut . Bit revolving direction 4. Feed direction 001985 3 4 NOTE: • Moving the tool forward too fast may burn...

Owners Manual
Page 11
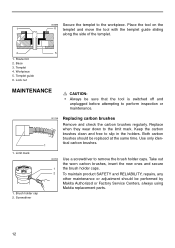
...grooving. 1 2 1. Adjust the distance between the bit and the straight guide. When cutting, move the tool with the straight guide flush with the side of the workpiece. 3 003689 Templet guide (optional accessory) The templet guide provides a sleeve through which the bit passes, allowing use of the tool... 003693 To install the templet guide, insert the templet guide in center 1 hole in the base plate and secure in the tool base. Straight guide 003682 To install the straight guide, insert the guide bars into the holes in place with the lock nut. 2 3 4 1. Guide bar 3. At the desired ...
...grooving. 1 2 1. Adjust the distance between the bit and the straight guide. When cutting, move the tool with the straight guide flush with the side of the workpiece. 3 003689 Templet guide (optional accessory) The templet guide provides a sleeve through which the bit passes, allowing use of the tool... 003693 To install the templet guide, insert the templet guide in center 1 hole in the base plate and secure in the tool base. Straight guide 003682 To install the straight guide, insert the guide bars into the holes in place with the lock nut. 2 3 4 1. Guide bar 3. At the desired ...
Owners Manual
Page 12
... guide sliding along the side of the templet. 2 3 4 5 1. Base 3. Take out the worn carbon brushes, insert the new ones and secure 1 the brush holder caps. 2 To maintain product SAFETY and RELIABILITY, repairs, any other maintenance or adjustment should be performed by Makita ...Authorized or Factory Service Centers, always using Makita replacement parts. 12 Both carbon brushes should be replaced at the same time. Use only identical carbon brushes. 1...
... guide sliding along the side of the templet. 2 3 4 5 1. Base 3. Take out the worn carbon brushes, insert the new ones and secure 1 the brush holder caps. 2 To maintain product SAFETY and RELIABILITY, repairs, any other maintenance or adjustment should be performed by Makita ...Authorized or Factory Service Centers, always using Makita replacement parts. 12 Both carbon brushes should be replaced at the same time. Use only identical carbon brushes. 1...
Owners Manual
Page 13
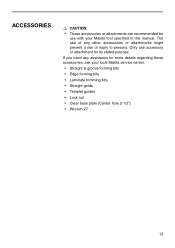
... risk of any assistance for more details regarding these accessories, ask your Makita tool specified in this manual. Only use of injury to persons. The use accessory or attachment for use with your local Makita service center. • Straight & groove forming bits • Edge ...forming bits • Laminate trimming bits • Straight guide • Templet guides • Lock nut • Clear base plate (Center hole 2-1/2") •...
... risk of any assistance for more details regarding these accessories, ask your Makita tool specified in this manual. Only use of injury to persons. The use accessory or attachment for use with your local Makita service center. • Straight & groove forming bits • Edge ...forming bits • Laminate trimming bits • Straight guide • Templet guides • Lock nut • Clear base plate (Center hole 2-1/2") •...


