Owners Manual
Page 2
... on invites accidents. 2 Damaged or entangled cords increase the risk of inattention while operating power tools may differ from heat, oil, sharp edges or moving parts. Personal Safety 10. A moment of electric shock. 8. Carrying power tools with earthed or grounded surfaces such as in the warnings refers to rain or wet...
... on invites accidents. 2 Damaged or entangled cords increase the risk of inattention while operating power tools may differ from heat, oil, sharp edges or moving parts. Personal Safety 10. A moment of electric shock. 8. Carrying power tools with earthed or grounded surfaces such as in the warnings refers to rain or wet...
Owners Manual
Page 3
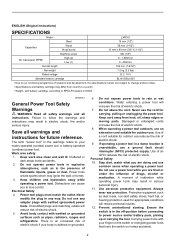
...power tool. Use the power tool, accessories and tool bits etc. This will ensure that can be caught in the hands of moving parts. Follow instruction for your application. USB102-1 CORDLESS DRILL SAFETY WARNINGS 1. Do not touch the drill bit or the workpiece immediately after operation...binding of untrained users. 21. Battery tool use and care 17. avoid contact. Fasteners contacting a "live" wire may make exposed metal parts of the power tool may contact hidden wiring or its own cord. Dress properly. If devices are connected and properly used with the charger...
...power tool. Use the power tool, accessories and tool bits etc. This will ensure that can be caught in the hands of moving parts. Follow instruction for your application. USB102-1 CORDLESS DRILL SAFETY WARNINGS 1. Do not touch the drill bit or the workpiece immediately after operation...binding of untrained users. 21. Battery tool use and care 17. avoid contact. Fasteners contacting a "live" wire may make exposed metal parts of the power tool may contact hidden wiring or its own cord. Dress properly. If devices are connected and properly used with the charger...
Owners Manual
Page 4
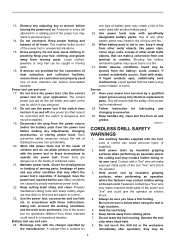
...subject product. Let a hot battery cartridge cool down before insertion or removal of your eyesight. 5. If electrolyte gets into place. Red part 1 2. Always insert it all instructions and cautionary markings on the battery cartridge with the groove in a fire. 8. Always stop operating...immediately. If operating time has become excessively shorter, stop tool operation and charge the battery cartridge when you can see the red part on the tool. SAVE THESE INSTRUCTIONS. Installing or removing battery cartridge 1. extremely hot and could burn your eyes, rinse them...
...subject product. Let a hot battery cartridge cool down before insertion or removal of your eyesight. 5. If electrolyte gets into place. Red part 1 2. Always insert it all instructions and cautionary markings on the battery cartridge with the groove in a fire. 8. Always stop operating...immediately. If operating time has become excessively shorter, stop tool operation and charge the battery cartridge when you can see the red part on the tool. SAVE THESE INSTRUCTIONS. Installing or removing battery cartridge 1. extremely hot and could burn your eyes, rinse them...
Owners Manual
Page 6
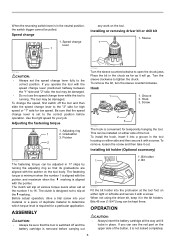
... before operation. Graduation 3. Screw 2 3 011368 The hook is convenient for low speed. Installing bit holder (Optional accessory) 011365 The fastening torque can see the red part on the upper side of the button, it out. The clutch will go. Bit 2 011367 Fit the bit holder into the protrusion at the marking...
... before operation. Graduation 3. Screw 2 3 011368 The hook is convenient for low speed. Installing bit holder (Optional accessory) 011365 The fastening torque can see the red part on the upper side of the button, it out. The clutch will go. Bit 2 011367 Fit the bit holder into the protrusion at the marking...
Owners Manual
Page 7
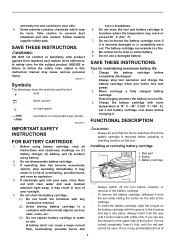
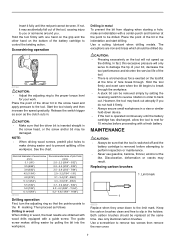
... in the indentation and start drilling. Limit mark 1 006258 Replace when they wear down device. • If the tool is operated continuously until the red part cannot be sure that the pointer points to the marking. Use only identical carbon brushes. Release the switch trigger as soon as follows. The exceptions...
... in the indentation and start drilling. Limit mark 1 006258 Replace when they wear down device. • If the tool is operated continuously until the red part cannot be sure that the pointer points to the marking. Use only identical carbon brushes. Release the switch trigger as soon as follows. The exceptions...
Owners Manual
Page 8
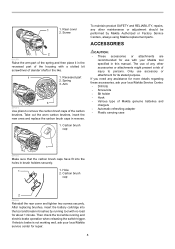
... to persons. Hole 2. ACCESSORIES 2 011370 Raise the arm part of the spring and then place it in brush holders securely. 1 1. Recessed part 2. Spring 3. The use accessory or attachment for more details regarding these accessories, ask your local Makita Service Center. • Drill bits • Screw bits ... 011372 Make sure that the carbon brush caps have fit into the tool and break in brushes by Makita Authorized or Factory Service Centers, always using Makita replacement parts. If you need any assistance for its stated purpose. 1 1. Take out the worn carbon brushes...
... to persons. Hole 2. ACCESSORIES 2 011370 Raise the arm part of the spring and then place it in brush holders securely. 1 1. Recessed part 2. Spring 3. The use accessory or attachment for more details regarding these accessories, ask your local Makita Service Center. • Drill bits • Screw bits ... 011372 Make sure that the carbon brush caps have fit into the tool and break in brushes by Makita Authorized or Factory Service Centers, always using Makita replacement parts. If you need any assistance for its stated purpose. 1 1. Take out the worn carbon brushes...
Parts Breakdown
Page 2
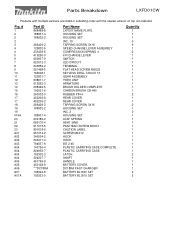
Parts Breakdown LXFD01CW Products with multiple versions are listed in subsiding order with the newest version on top not indented Fig. # 1 2 2 2 3 4 4 5 6 7 8 9 10 11 12 13 14 15 16 17 17 18 19 19 019A 20 21 22 23 A01 A02 A02 A03 A04 A04 A04 A04 A04 A05 A06 A07 A07A Part...-4 232182-2 689170-4 911013-5 891618-6 251314-2 346034-2 346317-0 784637-8 140756-4 824953-7 162302-3 324207-7 451749-9 450128-8 ***DC18RA 195324-8 195323-0 Part Name LXFD01 NAME PLATE HOUSING SET HOUSING SET INC. 19 TAPPING SCREW 3X16 SPEED CHANGE LEVER ASSEMBLY COMPRESSION SPRING 4 F/R CHANGE LEVER SWITCH LED CIRCUIT...
Parts Breakdown LXFD01CW Products with multiple versions are listed in subsiding order with the newest version on top not indented Fig. # 1 2 2 2 3 4 4 5 6 7 8 9 10 11 12 13 14 15 16 17 17 18 19 19 019A 20 21 22 23 A01 A02 A02 A03 A04 A04 A04 A04 A04 A05 A06 A07 A07A Part...-4 232182-2 689170-4 911013-5 891618-6 251314-2 346034-2 346317-0 784637-8 140756-4 824953-7 162302-3 324207-7 451749-9 450128-8 ***DC18RA 195324-8 195323-0 Part Name LXFD01 NAME PLATE HOUSING SET HOUSING SET INC. 19 TAPPING SCREW 3X16 SPEED CHANGE LEVER ASSEMBLY COMPRESSION SPRING 4 F/R CHANGE LEVER SWITCH LED CIRCUIT...


