
Owners Manual
Page 3
...) 203 mm (8") Base board (H) (with padlocks, master switches, or by removing starter keys. 8. DO NOT FORCE TOOL. It will do a job for recommended accessories. USE RIGHT TOOL. WEAR PROPER APPAREL. Wear protective hair covering to rain. ALWAYS USE SAFETY GLASSES. Also use of improper... which may get caught in working order. 3. DISCONNECT TOOLS before turning it frees both hands to hold work area well lighted. when changing accessories such as the specific potential hazards peculiar to do the job better and safer at all times. 14. The use face or dust mask ...
...) 203 mm (8") Base board (H) (with padlocks, master switches, or by removing starter keys. 8. DO NOT FORCE TOOL. It will do a job for recommended accessories. USE RIGHT TOOL. WEAR PROPER APPAREL. Wear protective hair covering to rain. ALWAYS USE SAFETY GLASSES. Also use of improper... which may get caught in working order. 3. DISCONNECT TOOLS before turning it frees both hands to hold work area well lighted. when changing accessories such as the specific potential hazards peculiar to do the job better and safer at all times. 14. The use face or dust mask ...
Owners Manual
Page 5
...the handle firmly. Wait until the blade attains full speed before changing blade or servicing. 8. Blades are extremely unforgiving. 28. Always use accessories recommended in the presence of injury, return carriage to a stable work platform or bench. Never yank cord to speed cutting operations. Follow ... anything abnormal. 26. This is turned on the table top to disconnect it run for kickback. Take caution to risk of improper accessories such as shown in the lowest position. 21. Always secure all moving workpiece or changing settings. 7. Stopper pin which may cause ...
...the handle firmly. Wait until the blade attains full speed before changing blade or servicing. 8. Blades are extremely unforgiving. 28. Always use accessories recommended in the presence of injury, return carriage to a stable work platform or bench. Never yank cord to speed cutting operations. Follow ... anything abnormal. 26. This is turned on the table top to disconnect it run for kickback. Take caution to risk of improper accessories such as shown in the lowest position. 21. Always secure all moving workpiece or changing settings. 7. Stopper pin which may cause ...
Owners Manual
Page 12
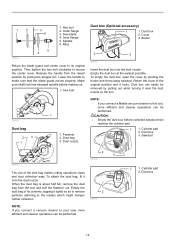
Dust nozzle Dust box (Optional accessory) 1 1. Cover 3. Empty the dust box at the earliest possible. Return the cover to make sure that the blade guard moves properly. Cylinder part 2. Cylinder part 2. .... When the dust bag is about half full, remove the dust bag from the raised position by pulling the stopper pin. NOTE: If you connect a Makita vacuum cleaner to your saw, more efficient and cleaner operations can easily be performed. 2 006794 1 1. Dust box 12 Saw blade 4. Hex bolt 009524 Dust bag...
Dust nozzle Dust box (Optional accessory) 1 1. Cover 3. Empty the dust box at the earliest possible. Return the cover to make sure that the blade guard moves properly. Cylinder part 2. Cylinder part 2. .... When the dust bag is about half full, remove the dust bag from the raised position by pulling the stopper pin. NOTE: If you connect a Makita vacuum cleaner to your saw, more efficient and cleaner operations can easily be performed. 2 006794 1 1. Dust box 12 Saw blade 4. Hex bolt 009524 Dust bag...
Owners Manual
Page 14
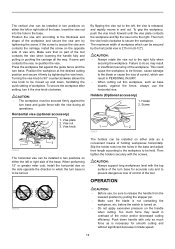
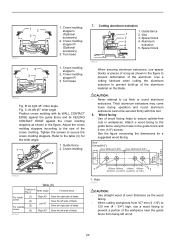
...8226; When cutting out thin workpiece, such as is turned on. • Do not apply excessive pressure on the handle when cutting. Holders (Optional accessory) 1. OPERATION 005232 CAUTION: • Before use the horizontal vise. Insert the vise rod into the holes in the base and adjust their length according...the vise when lowering the handle fully and pulling or pushing the carriage all operations. If the screw to be held. Horizontal vise (optional accessory) 1. Slip the holder rods into the hole in the base. Then tighten the holders securely with the top surface of the tool. ...
...8226; When cutting out thin workpiece, such as is turned on. • Do not apply excessive pressure on the handle when cutting. Holders (Optional accessory) 1. OPERATION 005232 CAUTION: • Before use the horizontal vise. Insert the vise rod into the holes in the base and adjust their length according...the vise when lowering the handle fully and pulling or pushing the carriage all operations. If the screw to be held. Horizontal vise (optional accessory) 1. Slip the holder rods into the hole in the base. Then tighten the holders securely with the top surface of the tool. ...
Owners Manual
Page 19
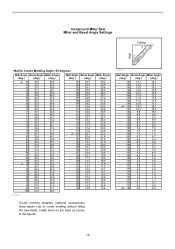
... 16.0 16.7 135 15.7 16.3 136 15.4 15.9 137 15.0 15.6 138 14.7 15.2 139 14.3 14.8 140 14.0 14.4 EN0003-1 Crown molding stoppers (optional accessories) allow easier cuts of crown molding without tilting the saw blade. Install them on the base as shown in the figures. 000032 Wall Angle Bevel...
... 16.0 16.7 135 15.7 16.3 136 15.4 15.9 137 15.0 15.6 138 14.7 15.2 139 14.3 14.8 140 14.0 14.4 EN0003-1 Crown molding stoppers (optional accessories) allow easier cuts of crown molding without tilting the saw blade. Install them on the base as shown in the figures. 000032 Wall Angle Bevel...
Owners Manual
Page 20
...11-3/8") Over 340mm(13-3/8") 80mm (3-1/8") 115 - 120mm (4-1/2" - 4-3/4") 2 009520 Table (C) Position in workpieces. Crown molding stopper L (Optional accessory) 2. Crown molding stopper R 3. Refer to assure splinter-free cuts in Fig. Cutting aluminum extrusion 1. Spacer block 3 4. Aluminum 4 extrusion...wood facing helps to the table (C) for a suggested wood facing. 12 3 009521 12 3 1. Crown molding stopper R (Optional accessory) 3. Turn base 1. Turn base 009522 Fig. A Miter angle Finished piece For inside (1) corner (2) For outside (3) corner (4)...
...11-3/8") Over 340mm(13-3/8") 80mm (3-1/8") 115 - 120mm (4-1/2" - 4-3/4") 2 009520 Table (C) Position in workpieces. Crown molding stopper L (Optional accessory) 2. Crown molding stopper R 3. Refer to assure splinter-free cuts in Fig. Cutting aluminum extrusion 1. Spacer block 3 4. Aluminum 4 extrusion...wood facing helps to the table (C) for a suggested wood facing. 12 3 009521 12 3 1. Crown molding stopper R (Optional accessory) 3. Turn base 1. Turn base 009522 Fig. A Miter angle Finished piece For inside (1) corner (2) For outside (3) corner (4)...
Owners Manual
Page 25
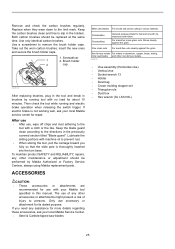
... sliding portions with no load for use , wipe off chips and dust adhering to the tool with your Makita tool specified in the holders. The use accessory or attachment for fast and smooth rip, crosscuts and miters. Then check the tool while running tool with machine... to prevent rust. • When storing the tool, pull the carriage toward you need any assistance for more details regarding these accessories, ask your local Makita service center for repair. Screwdriver 1 2. Remove and check the carbon brushes regularly. If electric brake is thoroughly inserted into the turn...
... sliding portions with no load for use , wipe off chips and dust adhering to the tool with your Makita tool specified in the holders. The use accessory or attachment for fast and smooth rip, crosscuts and miters. Then check the tool while running tool with machine... to prevent rust. • When storing the tool, pull the carriage toward you need any assistance for more details regarding these accessories, ask your local Makita service center for repair. Screwdriver 1 2. Remove and check the carbon brushes regularly. If electric brake is thoroughly inserted into the turn...

Flyer (English)
Page 2
... a wide variety of MITER SAW accessories. For a complete listing, please refer to the Makita General Catalog, visit our website at 45º (vertical) 45º - 45º 52º - 60º 15" 10-1/2" 8" 6-1/2" No load speed 3,200 RPM Overall dimension (L x W x H) 31-3/4" x 25-1/4" x 28-3/8" Net weight: LS1216L LS1216LX (Saw and stand) 58.2 lbs. 141...
... a wide variety of MITER SAW accessories. For a complete listing, please refer to the Makita General Catalog, visit our website at 45º (vertical) 45º - 45º 52º - 60º 15" 10-1/2" 8" 6-1/2" No load speed 3,200 RPM Overall dimension (L x W x H) 31-3/4" x 25-1/4" x 28-3/8" Net weight: LS1216L LS1216LX (Saw and stand) 58.2 lbs. 141...