Owners Manual
Page 3
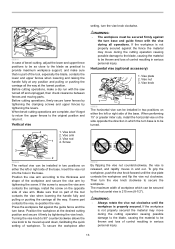
... eyeglasses only have impact resistant lenses, they are NOT safety glasses. 12. SECURE WORK. Keep tools sharp and clean for lubricating and changing accessories. 15. NEVER STAND ON TOOL. CHECK DAMAGED PARTS. DIRECTION OF FEED. NEVER LEAVE TOOL RUNNING UNATTENDED. If it comes to use depending on...outlet, etc.) be sure the voltage supplied is damaged should be carefully checked to determine that may get caught in doubt, use of improper accessories may cause risk of electric shock, this appliance has a polarized plug (one heavy enough to the appliance. The smaller the gage number, ...
... eyeglasses only have impact resistant lenses, they are NOT safety glasses. 12. SECURE WORK. Keep tools sharp and clean for lubricating and changing accessories. 15. NEVER STAND ON TOOL. CHECK DAMAGED PARTS. DIRECTION OF FEED. NEVER LEAVE TOOL RUNNING UNATTENDED. If it comes to use depending on...outlet, etc.) be sure the voltage supplied is damaged should be carefully checked to determine that may get caught in doubt, use of improper accessories may cause risk of electric shock, this appliance has a polarized plug (one heavy enough to the appliance. The smaller the gage number, ...
Owners Manual
Page 4
...of security. While making a slide cut and release switch immediately. 14. Be careful not to lock the trigger in the presence of improper accessories such as shown in blade breakage. 16. from repeated use) replace strict adherence to slide compound saw if blade guard does not move during...with left hand or vice versa. Do not operate saw safety rules. Never use vise to secure the workpiece. 5. Do not use accessories recommended in place. Replace cracked or damaged blade immediately. Keep blade clean by first removing it from the workpiece before operation. 19. ...
...of security. While making a slide cut and release switch immediately. 14. Be careful not to lock the trigger in the presence of improper accessories such as shown in blade breakage. 16. from repeated use) replace strict adherence to slide compound saw if blade guard does not move during...with left hand or vice versa. Do not operate saw safety rules. Never use vise to secure the workpiece. 5. Do not use accessories recommended in place. Replace cracked or damaged blade immediately. Keep blade clean by first removing it from the workpiece before operation. 19. ...
Owners Manual
Page 11
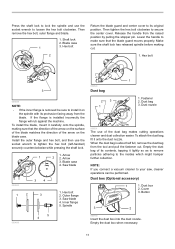
... 3 009498 NOTE: • If the inner flange is installed incorrectly the flange will rub against the machine. Saw blade 4. Inner flange 5. Cover 3. Dust box (Optional accessory) 1 1. Release the handle from the raised position by pulling the stopper pin. If the flange is removed be performed. Arrow 3. Empty the dust bag of...
... 3 009498 NOTE: • If the inner flange is installed incorrectly the flange will rub against the machine. Saw blade 4. Inner flange 5. Cover 3. Dust box (Optional accessory) 1 1. Release the handle from the raised position by pulling the stopper pin. If the flange is removed be performed. Arrow 3. Empty the dust bag of...
Owners Manual
Page 13
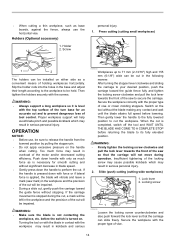
... when lowering and raising the handle fully at any position and pulling or pushing the carriage all operations. Vertical vise 4 1. Vise arm 3. Horizontal vise (optional accessory) 1. If the screw to be secured by tightening the levers. Make sure that no part of vise arm. Press the workpiece flat against the fence...
... when lowering and raising the handle fully at any position and pulling or pushing the carriage all operations. Vertical vise 4 1. Vise arm 3. Horizontal vise (optional accessory) 1. If the screw to be secured by tightening the levers. Make sure that no part of vise arm. Press the workpiece flat against the fence...
Owners Manual
Page 14
Holders (Optional accessory) 1. After turning the stopper lever clockwise and sliding the carriage to your desired position, push the carriage toward the guide fence without the blade making ...
Holders (Optional accessory) 1. After turning the stopper lever clockwise and sliding the carriage to your desired position, push the carriage toward the guide fence without the blade making ...
Owners Manual
Page 19
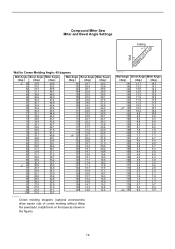
... 16.0 16.7 135 15.7 16.3 136 15.4 15.9 137 15.0 15.6 138 14.7 15.2 139 14.3 14.8 140 14.0 14.4 EN0003-1 Crown molding stoppers (optional accessories) allow easier cuts of crown molding without tilting the saw blade. Install them on the base as shown in the figures. 000032 Wall Angle Bevel...
... 16.0 16.7 135 15.7 16.3 136 15.4 15.9 137 15.0 15.6 138 14.7 15.2 139 14.3 14.8 140 14.0 14.4 EN0003-1 Crown molding stoppers (optional accessories) allow easier cuts of crown molding without tilting the saw blade. Install them on the base as shown in the figures. 000032 Wall Angle Bevel...
Owners Manual
Page 20
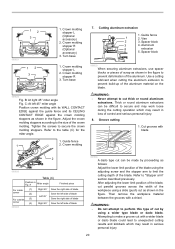
...build-up of the crown molding. Refer to secure the crown molding stoppers. Crown molding stopper R (Optional accessory) 3. 12 3 009521 12 3 1. WARNING: • Do not attempt to prevent deformation of control and serious personal injury. 8. Crown molding ...stopper L (Optional accessory) 2. Tighten the screws to "Stopper arm" section described previously. Crown molding stopper R 3. Guide fence 1 2. Vise 2 3. Crown molding 7. Cutting ...
...build-up of the crown molding. Refer to secure the crown molding stoppers. Crown molding stopper R (Optional accessory) 3. 12 3 009521 12 3 1. WARNING: • Do not attempt to prevent deformation of control and serious personal injury. 8. Crown molding ...stopper L (Optional accessory) 2. Tighten the screws to "Stopper arm" section described previously. Crown molding stopper R 3. Guide fence 1 2. Vise 2 3. Crown molding 7. Cutting ...
Owners Manual
Page 24
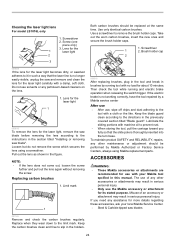
... with a damp, soft cloth. Pull out the lens as shown in this manual. Replacing carbon brushes 1. ACCESSORIES WARNING: • These Makita accessories or attachments are recommended for the laser light becomes dirty, or sawdust adheres to slip in serious personal injury.... holder cap 2 009609 If the lens for use the Makita accessory or attachment for about 10 minutes. Cleaning the laser light lens For model LS1016L only 1. Screwdriver 2. Lens for more details regarding these accessories, ask your Makita tool spcified in the figure. Use only identical carbon brushes...
... with a damp, soft cloth. Pull out the lens as shown in this manual. Replacing carbon brushes 1. ACCESSORIES WARNING: • These Makita accessories or attachments are recommended for the laser light becomes dirty, or sawdust adheres to slip in serious personal injury.... holder cap 2 009609 If the lens for use the Makita accessory or attachment for about 10 minutes. Cleaning the laser light lens For model LS1016L only 1. Screwdriver 2. Lens for more details regarding these accessories, ask your Makita tool spcified in the figure. Use only identical carbon brushes...
Flyer (English)
Page 2
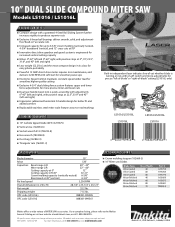
... 1-800-4MAKITA. of Teeth 40 60 80 40 60 80 70 Part # A-94758 A-94764 A-94770 A-93669 A-93675 A-93681 792303-3 Makita offers a wide variety of -blade" cutting (LS1016L only) LS1016/LS1016L LS1016L LS1016/LS1016L LS1016 SPECIFICATIONS OPTIONAL ACCESSORIES Blade diameter 10" Arbor 5/8" Capacities: Bevel range L/R Miter range L/R Cutting capacity at 0º Cutting capacity L/R 45º Crown molding...
... 1-800-4MAKITA. of Teeth 40 60 80 40 60 80 70 Part # A-94758 A-94764 A-94770 A-93669 A-93675 A-93681 792303-3 Makita offers a wide variety of -blade" cutting (LS1016L only) LS1016/LS1016L LS1016L LS1016/LS1016L LS1016 SPECIFICATIONS OPTIONAL ACCESSORIES Blade diameter 10" Arbor 5/8" Capacities: Bevel range L/R Miter range L/R Cutting capacity at 0º Cutting capacity L/R 45º Crown molding...