Owners Manual
Page 6
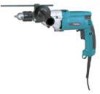
... use "rotation with hammering" action. Chuck key Depth gauge 1 002696 1. Be sure to tighten the chuck. OPERATION Hammer drilling operation CAUTION: • There is convenient for the hole, then pull the switch trigger. Installing or removing drill bit For Model HP2050, HP2050F 1. Ring 2 002695 Hold the... ring and turn the chuck key counterclockwise in the chuck as far as it in just one hole, then loosen the chuck by both side grip and switch handle during...
... use "rotation with hammering" action. Chuck key Depth gauge 1 002696 1. Be sure to tighten the chuck. OPERATION Hammer drilling operation CAUTION: • There is convenient for the hole, then pull the switch trigger. Installing or removing drill bit For Model HP2050, HP2050F 1. Ring 2 002695 Hold the... ring and turn the chuck key counterclockwise in the chuck as far as it in just one hole, then loosen the chuck by both side grip and switch handle during...
Owners Manual
Page 7
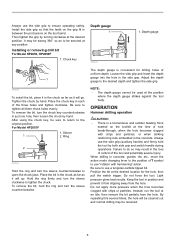
... force exerted on the tool will only serve to damage the tip of your local Makita Service Center. • Drill bits • Hammer drill bits • Hole saws • Blow-out bulb • Safety goggles • Chuck key • Grip assembly • Depth gauge • Plastic carrying case 7 Drilling ... The tool and its stated purpose. Drilling in wood When drilling in wood, the best results are iron and brass which should be removed simply by setting the reversing switch to reverse rotation in the indentation and start to clean the dust out of hole break through the ...
... force exerted on the tool will only serve to damage the tip of your local Makita Service Center. • Drill bits • Hammer drill bits • Hole saws • Blow-out bulb • Safety goggles • Chuck key • Grip assembly • Depth gauge • Plastic carrying case 7 Drilling ... The tool and its stated purpose. Drilling in wood When drilling in wood, the best results are iron and brass which should be removed simply by setting the reversing switch to reverse rotation in the indentation and start to clean the dust out of hole break through the ...

Technical Reference
Page 8
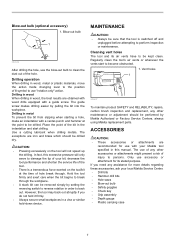
... assembling, they have to spindle. Cup washer 15 Fig. 16A Conical compression spring 15-24 Fig. 16B After removing bearing retainer 20-36 and oil seal 19, disassemble ring spring 11 from the drill chuck side of gear housing as illustrated in Fig. 16A. Repair ( 7) Disassembling cam A 1. Assemble conical compression spring 15...
... assembling, they have to spindle. Cup washer 15 Fig. 16A Conical compression spring 15-24 Fig. 16B After removing bearing retainer 20-36 and oil seal 19, disassemble ring spring 11 from the drill chuck side of gear housing as illustrated in Fig. 16A. Repair ( 7) Disassembling cam A 1. Assemble conical compression spring 15...


