Owners Manual
Page 2
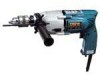
... benches and dark areas invite accidents. 2. Distractions can cause you to follow all instructions. SAVE THESE INSTRUCTIONS Work Area 1. Power tools create sparks which may differ from country to country. Keep your work area clean and well lit. Failure to lose control. Keep...RULES USA002-2 (For All Tools) WARNING: Read and understand all instructions listed below, may result in the presence of flammable liquids, gases, or dust. SPECIFICATIONS Model Speed Concrete Capacities Steel Wood No load speed (RPM) Blows per minute Overall length Net weight HP2010N High Low 13 mm ...
... benches and dark areas invite accidents. 2. Distractions can cause you to follow all instructions. SAVE THESE INSTRUCTIONS Work Area 1. Power tools create sparks which may differ from country to country. Keep your work area clean and well lit. Failure to lose control. Keep...RULES USA002-2 (For All Tools) WARNING: Read and understand all instructions listed below, may result in the presence of flammable liquids, gases, or dust. SPECIFICATIONS Model Speed Concrete Capacities Steel Wood No load speed (RPM) Blows per minute Overall length Net weight HP2010N High Low 13 mm ...
Owners Manual
Page 3
...the cord. Keep cord away from moving parts. A moment of children and other practical way to secure and support the workpiece to carry the tools or pull the plug from the power source before making any way. A wrench or a key that cannot be caught in the outlet, ... cord marked "W-A" or "W". Do not wear loose clothing or jewelry. Holding the work by hand or against your application. Avoid accidental starting the tool accidentally. 19. Replace damaged cords immediately. Stay alert, watch what you are NOT eye protection. Loose clothes, jewelry, or long hair can be...
...the cord. Keep cord away from moving parts. A moment of children and other practical way to secure and support the workpiece to carry the tools or pull the plug from the power source before making any way. A wrench or a key that cannot be caught in the outlet, ... cord marked "W-A" or "W". Do not wear loose clothing or jewelry. Holding the work by hand or against your application. Avoid accidental starting the tool accidentally. 19. Replace damaged cords immediately. Stay alert, watch what you are NOT eye protection. Loose clothes, jewelry, or long hair can be...
Owners Manual
Page 4
... your extension cord is below when using an extension cord, be performed only by insulated gripping surfaces when performing an operation where the cutting tool may become hazardous when used on cord length and nameplate ampere rating. AWG 18 16 16 14 18 16 14 12 16 16 14 ...12 14 12 Not Recommended SPECIFIC SAFETY RULES USB002-2 DO NOT let comfort or familiarity with both hands. Hold the tool firmly with product (gained from repeated use the next heavier gage. Use only accessories that may create a risk of injury. 24. SERVICE 23. When...
... your extension cord is below when using an extension cord, be performed only by insulated gripping surfaces when performing an operation where the cutting tool may become hazardous when used on cord length and nameplate ampere rating. AWG 18 16 16 14 18 16 14 12 16 16 14 ...12 14 12 Not Recommended SPECIFIC SAFETY RULES USB002-2 DO NOT let comfort or familiarity with both hands. Hold the tool firmly with product (gained from repeated use the next heavier gage. Use only accessories that may create a risk of injury. 24. SERVICE 23. When...
Owners Manual
Page 5
Take caution to follow the safety rules stated in this instruction manual may cause serious personal injury. 5 SAVE THESE INSTRUCTIONS WARNING: MISUSE or failure to prevent dust inhalation and skin contact. Some material contains chemicals which may be toxic. Do not touch the bit or the workpiece immediately after operation; they may be extremely hot and could burn your skin. 7. Do not leave the tool running. Operate the tool only when hand-held. 6. Follow material supplier safety data. 4. Keep hands away from rotating parts. 5.
Take caution to follow the safety rules stated in this instruction manual may cause serious personal injury. 5 SAVE THESE INSTRUCTIONS WARNING: MISUSE or failure to prevent dust inhalation and skin contact. Some material contains chemicals which may be toxic. Do not touch the bit or the workpiece immediately after operation; they may be extremely hot and could burn your skin. 7. Do not leave the tool running. Operate the tool only when hand-held. 6. Follow material supplier safety data. 4. Keep hands away from rotating parts. 5.
Owners Manual
Page 6
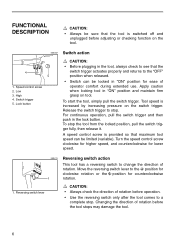
... release it. High 4. Switch trigger 5. Changing the direction of rotation before operation. • Use the reversing switch only after the tool comes to stop . For continuous operation, pull the switch trigger and then push in "ON" position for counterclockwise rotation. 1. Speed control... screw 2. Lock button 002457 5 Switch action CAUTION: • Before plugging in the tool, always check to see that the switch trigger actuates properly and returns to the position for clockwise rotation or the position for ease ...
... release it. High 4. Switch trigger 5. Changing the direction of rotation before operation. • Use the reversing switch only after the tool comes to stop . For continuous operation, pull the switch trigger and then push in "ON" position for counterclockwise rotation. 1. Speed control... screw 2. Lock button 002457 5 Switch action CAUTION: • Before plugging in the tool, always check to see that the switch trigger actuates properly and returns to the position for clockwise rotation or the position for ease ...
Owners Manual
Page 7
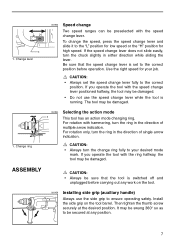
...auxiliary handle) Always use the speed change lever and slide it to be damaged. To change the speed, press the speed change lever while the tool is set the speed change ring fully to the correct position. CAUTION: • Always turn the ring in the direction of single arrow indication.... If you operate the tool with hammering, turn the chuck slightly in either direction while sliding the lever. Then tighten the thumb screw securely at any work on the...
...auxiliary handle) Always use the speed change lever and slide it to be damaged. To change the speed, press the speed change lever while the tool is set the speed change ring fully to the correct position. CAUTION: • Always turn the ring in the direction of single arrow indication.... If you operate the tool with hammering, turn the chuck slightly in either direction while sliding the lever. Then tighten the thumb screw securely at any work on the...
Owners Manual
Page 8
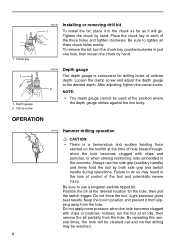
...three chuck holes evenly. After adjusting, tighten the clamp screw. Position the bit at the position where the depth gauge strikes against the tool body. Do not apply more pressure when the hole becomes clogged with chips and particles, or when striking reinforcing rods embedded in position ... it in the loss of control of hole break-through, when the hole becomes clogged with chips or particles. Instead, run the tool at the time of the tool and potentially severe injury. Depth gauge 2. By repeating this several times, the hole will go. 1. Chuck key 002435 1 Installing...
...three chuck holes evenly. After adjusting, tighten the clamp screw. Position the bit at the position where the depth gauge strikes against the tool body. Do not apply more pressure when the hole becomes clogged with chips and particles, or when striking reinforcing rods embedded in position ... it in the loss of control of hole break-through, when the hole becomes clogged with chips or particles. Instead, run the tool at the time of the tool and potentially severe injury. Depth gauge 2. By repeating this several times, the hole will go. 1. Chuck key 002435 1 Installing...
Owners Manual
Page 9
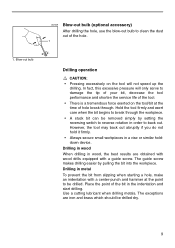
... at the time of hole break through the workpiece. • A stuck bit can be removed simply by pulling the bit into the workpiece. However, the tool may back out abruptly if you do not hold it firmly. • Always secure small workpieces in the indentation and start drilling. Drilling in metal... drilling the hole, use the blow-out bulb to damage the tip of your bit, decrease the tool performance and shorten the service life of the tool. • There is a tremendous force exerted on the tool will only serve to clean the dust out of the bit in a vise or similar holddown device...
... at the time of hole break through the workpiece. • A stuck bit can be removed simply by pulling the bit into the workpiece. However, the tool may back out abruptly if you do not hold it firmly. • Always secure small workpieces in the indentation and start drilling. Drilling in metal... drilling the hole, use the blow-out bulb to damage the tip of your bit, decrease the tool performance and shorten the service life of the tool. • There is a tremendous force exerted on the tool will only serve to clean the dust out of the bit in a vise or similar holddown device...
Owners Manual
Page 10
... or Factory Service Centers, always using Makita replacement parts. If you need any other accessories or attachments might present a risk of any other maintenance or adjustment should be sure that the tool is switched off and unplugged before attempting to persons. To maintain ...product SAFETY and RELIABILITY, repairs, carbon brush inspection and replacement, any assistance for more details regarding these accessories, ask your Makita tool specified in this manual.
... or Factory Service Centers, always using Makita replacement parts. If you need any other accessories or attachments might present a risk of any other maintenance or adjustment should be sure that the tool is switched off and unplugged before attempting to persons. To maintain ...product SAFETY and RELIABILITY, repairs, carbon brush inspection and replacement, any assistance for more details regarding these accessories, ask your Makita tool specified in this manual.
Owners Manual
Page 14
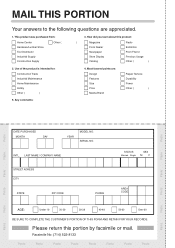
MAIL THIS PORTION Your answers to the following questions are : Design Features Size Price Makita Brand Repair Service Durability Power Other ( ) 5. This product was purchased from: Home Center Hardware/Lumber Store Tool Distributor Industrial Supply Construction Supply Other ( 3. Most favored points are appreciated. 1. LAST NAME / COMPANY NAME STREET ADRESS CITY STATE ZIP CODE...
MAIL THIS PORTION Your answers to the following questions are : Design Features Size Price Makita Brand Repair Service Durability Power Other ( ) 5. This product was purchased from: Home Center Hardware/Lumber Store Tool Distributor Industrial Supply Construction Supply Other ( 3. Most favored points are appreciated. 1. LAST NAME / COMPANY NAME STREET ADRESS CITY STATE ZIP CODE...
Owners Manual
Page 15
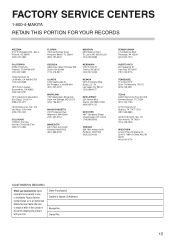
...MARYLAND 7397 Washington Boulevard, Suite 104 Elkridge, MD 21075 (410) 796-4401 MASSACHUSETTS 232 Providence Hwy. Be sure to attach a letter to an Authorized Makita Service Center. Westwood, MA 02090 (781) 461-9754 MINNESOTA 6427 Penn Ave. Dayton, NJ 08810-1539 (609) 655-1212 NEW YORK 4917 Genessee... WI 53227 (414) 541-4776 CUSTOMER'S RECORD When you need service: Send complete tool (prepaid) to one of the Makita Factory Service Centers listed, or to the outside of the carton detailing the problem with your tool. Suile 170 Nashville, TN 372 (615) 248-3321 TEXAS 12801 Stemmons Fwy Ste....
...MARYLAND 7397 Washington Boulevard, Suite 104 Elkridge, MD 21075 (410) 796-4401 MASSACHUSETTS 232 Providence Hwy. Be sure to attach a letter to an Authorized Makita Service Center. Westwood, MA 02090 (781) 461-9754 MINNESOTA 6427 Penn Ave. Dayton, NJ 08810-1539 (609) 655-1212 NEW YORK 4917 Genessee... WI 53227 (414) 541-4776 CUSTOMER'S RECORD When you need service: Send complete tool (prepaid) to one of the Makita Factory Service Centers listed, or to the outside of the carton detailing the problem with your tool. Suile 170 Nashville, TN 372 (615) 248-3321 TEXAS 12801 Stemmons Fwy Ste....
Owners Manual
Page 16
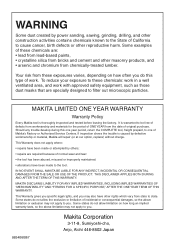
... THIS WARRANTY. Some states do not allow limitation on how often you do this one year period, return the COMPLETE tool, freight prepaid, to one of Makita's Factory or Authorized Service Centers. Some examples of these chemicals are required because of normal wear and tear: •...to you . This Warranty does not apply where: • repairs have been made to the tool. MAKITA LIMITED ONE YEAR WARRANTY Warranty Policy Every Makita tool is caused by defective workmanship or material, Makita will repair (or at our option, replace) without charge. Should any trouble develop during this ...
... THIS WARRANTY. Some states do not allow limitation on how often you do this one year period, return the COMPLETE tool, freight prepaid, to one of Makita's Factory or Authorized Service Centers. Some examples of these chemicals are required because of normal wear and tear: •...to you . This Warranty does not apply where: • repairs have been made to the tool. MAKITA LIMITED ONE YEAR WARRANTY Warranty Policy Every Makita tool is caused by defective workmanship or material, Makita will repair (or at our option, replace) without charge. Should any trouble develop during this ...
Parts Breakdown
Page 2
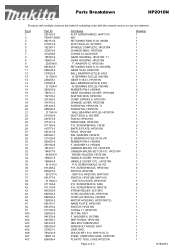
..., 8401 CHUCK KEY S13, NHP1310-T2 STEEL CARRYING CASE, HP2010N PLASTIC TOOL CASE HP2010N Page 2 of 3 Quantity 1 1 1 1 1 1 1 1 1 1 1 1 1 1 1 1 1 2 1 1 1 1 1 1 1 1 1 1 2 1 1 1 1 1 1 1 1 2 1 1 5 4 1 1 1 1 2 2 1 1 1 1 1 1 1 1 1 1 1 1 1 1 1 1 8/18/2010 SCREW M5X45, HP2010N SWITCH,HP2010N SWITCH, HP2010N, NHP1030 SWITCH, HP2010N, NHP1030 SWITCH COVER, HP2010N P.H. SPRING 5, HP2010N CHANGE LEVER, HP2010N SCREW M4, HP2010N, T1 SCREW M4, HP2010N BALL BEARING 807LLB, HP2010N DUST SEAL 8, 6013BR FAN 62, HP2010N ARMATURE, HP2010N P.H. BEARING 627LB, 6510LVR RUBBER PIN 4, HR2400 F. SCREW M4X18...
..., 8401 CHUCK KEY S13, NHP1310-T2 STEEL CARRYING CASE, HP2010N PLASTIC TOOL CASE HP2010N Page 2 of 3 Quantity 1 1 1 1 1 1 1 1 1 1 1 1 1 1 1 1 1 2 1 1 1 1 1 1 1 1 1 1 2 1 1 1 1 1 1 1 1 2 1 1 5 4 1 1 1 1 2 2 1 1 1 1 1 1 1 1 1 1 1 1 1 1 1 1 8/18/2010 SCREW M5X45, HP2010N SWITCH,HP2010N SWITCH, HP2010N, NHP1030 SWITCH, HP2010N, NHP1030 SWITCH COVER, HP2010N P.H. SPRING 5, HP2010N CHANGE LEVER, HP2010N SCREW M4, HP2010N, T1 SCREW M4, HP2010N BALL BEARING 807LLB, HP2010N DUST SEAL 8, 6013BR FAN 62, HP2010N ARMATURE, HP2010N P.H. BEARING 627LB, 6510LVR RUBBER PIN 4, HR2400 F. SCREW M4X18...
