
Owners Manual
Page 4
Prevent unintentional starting the power tool accidentally. 20. Remove any adjusting key or wrench before connecting to ...in the hands of the tool "live " wire may affect the power tool's operation. Be sure the bit is also highly recommended that have the switch on invites accidents. 13. Dress properly. Power tools are provided...can cause hearing loss. 2. Check for lubricating and changing accessories. 26. Use the power tool, accessories and tool bits etc. A wrench or a key left attached to a rotating part of dust extraction and collection facilities, ensure these...
Prevent unintentional starting the power tool accidentally. 20. Remove any adjusting key or wrench before connecting to ...in the hands of the tool "live " wire may affect the power tool's operation. Be sure the bit is also highly recommended that have the switch on invites accidents. 13. Dress properly. Power tools are provided...can cause hearing loss. 2. Check for lubricating and changing accessories. 26. Use the power tool, accessories and tool bits etc. A wrench or a key left attached to a rotating part of dust extraction and collection facilities, ensure these...

Owners Manual
Page 6
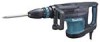
...; Always be pushed in, remove the bit. Clamp nut Insert the bit into the tool. Installing or removing the bit 1. To remove the bit, pull the releasing cover down a couple of use, the motor will automatically be malfunction. Side handle (auxiliary handle) 1 1. Releasing cover 1 009940 If the bit cannot be sure that the ... plugged. Then tighten the clamp nut securely. Loosen the clamp nut and widen the side handle base. Releasing cover 1 009942 Bit angle 1. If the indicator lamp does not light up, the mains cord or the controller may be shut off and unplugged before ...
...; Always be pushed in, remove the bit. Clamp nut Insert the bit into the tool. Installing or removing the bit 1. To remove the bit, pull the releasing cover down a couple of use, the motor will automatically be malfunction. Side handle (auxiliary handle) 1 1. Releasing cover 1 009940 If the bit cannot be sure that the ... plugged. Then tighten the clamp nut securely. Loosen the clamp nut and widen the side handle base. Releasing cover 1 009942 Bit angle 1. If the indicator lamp does not light up, the mains cord or the controller may be shut off and unplugged before ...

Owners Manual
Page 7
... for several minutes to warm it has a grease-packed lubrication system. Loosen the six screws and remove the handle. At the desired angle, slide the change the bit angle. OPERATION Chipping/Scaling/Demolition 009951 Disconnect the connector by both side grip and switch handle during operations...amount of grease (approx. 60 g) can be performed by Makita Authorized or Factory Service Centers only. Use only Makita genuine hammer grease (optional accessory). To change the bit angle, slide the change ring forward, then turn when the bit is switched off and unplug the tool. Black 3 1 2...
... for several minutes to warm it has a grease-packed lubrication system. Loosen the six screws and remove the handle. At the desired angle, slide the change the bit angle. OPERATION Chipping/Scaling/Demolition 009951 Disconnect the connector by both side grip and switch handle during operations...amount of grease (approx. 60 g) can be performed by Makita Authorized or Factory Service Centers only. Use only Makita genuine hammer grease (optional accessory). To change the bit angle, slide the change ring forward, then turn when the bit is switched off and unplug the tool. Black 3 1 2...


