
Owners Manual
Page 1
ENGLISH (Original instructions) INSTRUCTION MANUAL Demolition Hammer HM1213C HM1203C DOUBLE INSULATION 009939 IMPORTANT: Read Before Using. 1
ENGLISH (Original instructions) INSTRUCTION MANUAL Demolition Hammer HM1213C HM1203C DOUBLE INSULATION 009939 IMPORTANT: Read Before Using. 1

Owners Manual
Page 2
.... ENGLISH (Original instructions) SPECIFICATIONS Model Blows per minute HM1213C HM1203C 950 - 1,900 min-1 Overall length 576 mm Net weight 10.8 kg 9.7 kg Safety class II • Due to our continuing programme of research and development, the specifications herein are subject to change without earth wire. Be sure that you understand their meaning before use of the power tool can differ from...
.... ENGLISH (Original instructions) SPECIFICATIONS Model Blows per minute HM1213C HM1203C 950 - 1,900 min-1 Overall length 576 mm Net weight 10.8 kg 9.7 kg Safety class II • Due to our continuing programme of research and development, the specifications herein are subject to change without earth wire. Be sure that you understand their meaning before use of the power tool can differ from...
Owners Manual
Page 3
... sense when operating a power tool. A moment of Machine: Demolition Hammer Model No./ Type: HM1213C, HM1203C are doing and use a power tool while you to the trigger time). Avoid body contact with 2006/42/EC from heat, oil, sharp edges or moving parts. Electrical safety 4. Do not use reduces the risk of electric shock. 9. Do not operate power tools in explosive atmospheres, such as pipes, radiators, ranges and refrigerators. Use of a cord suitable for...
... sense when operating a power tool. A moment of Machine: Demolition Hammer Model No./ Type: HM1213C, HM1203C are doing and use a power tool while you to the trigger time). Avoid body contact with 2006/42/EC from heat, oil, sharp edges or moving parts. Electrical safety 4. Do not use reduces the risk of electric shock. 9. Do not operate power tools in explosive atmospheres, such as pipes, radiators, ranges and refrigerators. Use of a cord suitable for...

Owners Manual
Page 4
... the bit is designed to hammer safety rules. Many accidents are easier to operate the power tool. Have your finger on the switch or energising power tools that have the power tool repaired before operation. 7. This will loosen up or carrying the tool. . Exposure to power source and/or battery pack, picking up the lubrication. Cutting accessory contacting a "live" wire may affect the power tool's operation. Use auxiliary handle(s), if supplied with sharp cutting edges are...
... the bit is designed to hammer safety rules. Many accidents are easier to operate the power tool. Have your finger on the switch or energising power tools that have the power tool repaired before operation. 7. This will loosen up or carrying the tool. . Exposure to power source and/or battery pack, picking up the lubrication. Cutting accessory contacting a "live" wire may affect the power tool's operation. Use auxiliary handle(s), if supplied with sharp cutting edges are...

Owners Manual
Page 5
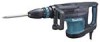
... minute can be turned only as far as shown in the area when operating. Number on tool. Once operation starts with the motor rotating. The bit could burn your skin. 14. SAVE THESE INSTRUCTIONS. Apply caution when locking tool in "ON" position and maintain firm grasp on adjusting dial 5 4 3 2 1 009956 Blows per minute. To stop the tool, push the switch lever "OFF (O)" on the adjusting dial and...
... minute can be turned only as far as shown in the area when operating. Number on tool. Once operation starts with the motor rotating. The bit could burn your skin. 14. SAVE THESE INSTRUCTIONS. Apply caution when locking tool in "ON" position and maintain firm grasp on adjusting dial 5 4 3 2 1 009956 Blows per minute. To stop the tool, push the switch lever "OFF (O)" on the adjusting dial and...

Owners Manual
Page 6
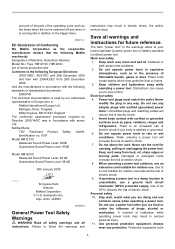
... carbon brushes may be worn out, or the controller, the motor or the ON/OFF switch may be sure that the tool needs servicing. After approx. 8 hours of times. Clamp nut Insert the bit into the tool. Just loosen the clamp nut to swing the side handle to the rear groove and secure it with the clamp nut. Loosen the clamp nut and widen the side handle base. Side handle 2. Pull the releasing...
... carbon brushes may be worn out, or the controller, the motor or the ON/OFF switch may be sure that the tool needs servicing. After approx. 8 hours of times. Clamp nut Insert the bit into the tool. Just loosen the clamp nut to swing the side handle to the rear groove and secure it with the clamp nut. Loosen the clamp nut and widen the side handle base. Side handle 2. Pull the releasing...

Owners Manual
Page 7
... change ring back to perform inspection or maintenance. • Never use the side grip (auxiliary handle) and firmly hold the tool by both side grip and switch handle during operations. Crank cap cover 1 2 009952 CAUTION: • Always be performed by pulling them. 1. Use only Makita genuine hammer grease (optional accessory). Run the tool for longer tool life. Wipe out the old grease inside and replace...
... change ring back to perform inspection or maintenance. • Never use the side grip (auxiliary handle) and firmly hold the tool by both side grip and switch handle during operations. Crank cap cover 1 2 009952 CAUTION: • Always be performed by pulling them. 1. Use only Makita genuine hammer grease (optional accessory). Run the tool for longer tool life. Wipe out the old grease inside and replace...
Owners Manual
Page 8
... or lead wires especially when wiping out the old grease. To maintain product SAFETY and RELIABILITY, repairs, carbon brush inspection and replacement, any assistance for its stated purpose. 1. Only use with your local Makita Service Center. • Bull point(SDS-max) 8 Grease 1 • Cold chisel(SDS-max) • Scaling chisel(SDS-max) • Clay spade(SDS-max) • Bit grease • Safety goggles • Hammer grease...
... or lead wires especially when wiping out the old grease. To maintain product SAFETY and RELIABILITY, repairs, carbon brush inspection and replacement, any assistance for its stated purpose. 1. Only use with your local Makita Service Center. • Bull point(SDS-max) 8 Grease 1 • Cold chisel(SDS-max) • Scaling chisel(SDS-max) • Clay spade(SDS-max) • Bit grease • Safety goggles • Hammer grease...
Parts Breakdown
Page 2
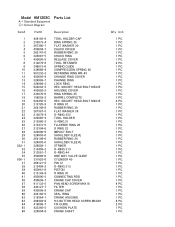
... CHUCK RING RELEASE COVER TOOL RETAINER SPRING GUIDE COMPRESSION SPRING 56 RETAINING RING WR-45 CHANGE RING COVER CHANGE RING LOCK RING HEX. SOCKET HEAD BOLT M8X35 O RING 67 RUBBER RING 39 FLAT WASHER 39 O-RING 35.5 TOOL HOLDER X-RING 21 FLUORIDE RING 28 O RING 23 IMPACT BOLT SHOULDER SLEEVE RUBBER RING 24 SHOULDER SLEEVE STRIKER O-RING 31.5 O-RING 44 ONE WAY VALVE GUIDE CYLINDER 40 PIN...
... CHUCK RING RELEASE COVER TOOL RETAINER SPRING GUIDE COMPRESSION SPRING 56 RETAINING RING WR-45 CHANGE RING COVER CHANGE RING LOCK RING HEX. SOCKET HEAD BOLT M8X35 O RING 67 RUBBER RING 39 FLAT WASHER 39 O-RING 35.5 TOOL HOLDER X-RING 21 FLUORIDE RING 28 O RING 23 IMPACT BOLT SHOULDER SLEEVE RUBBER RING 24 SHOULDER SLEEVE STRIKER O-RING 31.5 O-RING 44 ONE WAY VALVE GUIDE CYLINDER 40 PIN...
Parts Breakdown
Page 3
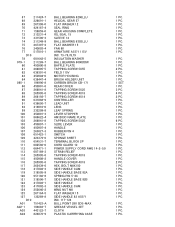
...-76,78,79 INSULATION WASHER BALL BEARING 6000DDW BAFFLE PLATE TAPPING SCREW 5X55 FIELD 115V MOTOR HOUSING BRUSH HOLDER UNIT CARBON BRUSH CB-171 REAR COVER TAPPING SCREW 5X25 TAPPING SCREW 4X18 TAPPING SCREW 4X14 CONTROLLER LEAD UNIT LENS LEAF SPRING LEVER STOPPER HM1203C NAME PLATE TAPPING SCREW 5X25 SLIDE LEVER HANDLE RUBBER PIN 4 SWITCH SPONGE SHEET TERMINAL BLOCK 2P CORD GUARD 10 POWER SUPPLY CORD AWG 14-2-5.0 STRAIN RELIEF TAPPING SCREW 4X18 HANDLE COVER TAPPING SCREW 4X18 HEX.
...-76,78,79 INSULATION WASHER BALL BEARING 6000DDW BAFFLE PLATE TAPPING SCREW 5X55 FIELD 115V MOTOR HOUSING BRUSH HOLDER UNIT CARBON BRUSH CB-171 REAR COVER TAPPING SCREW 5X25 TAPPING SCREW 4X18 TAPPING SCREW 4X14 CONTROLLER LEAD UNIT LENS LEAF SPRING LEVER STOPPER HM1203C NAME PLATE TAPPING SCREW 5X25 SLIDE LEVER HANDLE RUBBER PIN 4 SWITCH SPONGE SHEET TERMINAL BLOCK 2P CORD GUARD 10 POWER SUPPLY CORD AWG 14-2-5.0 STRAIN RELIEF TAPPING SCREW 4X18 HANDLE COVER TAPPING SCREW 4X18 HEX.

Parts Breakdown
Page 4
A04 C10 162271-8 A04 C20 325637-5 A04 C30 450990-1 A05 809279-8 D01 652008-6 LATCH SHAFT HANDLE HM1203C PLASTIC CASE LABEL PAN HEAD SCREW M3.5X7 2 PC. 1 PC. 1 PC. 2 PC. 2 PC.
A04 C10 162271-8 A04 C20 325637-5 A04 C30 450990-1 A05 809279-8 D01 652008-6 LATCH SHAFT HANDLE HM1203C PLASTIC CASE LABEL PAN HEAD SCREW M3.5X7 2 PC. 1 PC. 1 PC. 2 PC. 2 PC.


