Instruction Manual
Page 2
...8 Maintenance 8 First aid 8 Technical data 9 Packing 9 Denomination of equipment. We are very handy and robust chain saws with a new Design. MAKITA chain saws EA3500F-EA4301F are equipped with the latest safety features and meet all safety precautions! Failure to observe these precautions can be satisÞ... with this instruction manual thoroughly before operation. Thank you read this modern piece of components 10 PUTTING INTO OPERATION Only for models with fastening nuts on the sprocket guard Mounting the guide bar and saw chain 11-12 Tightening the saw chain 12 Checking...
...8 Maintenance 8 First aid 8 Technical data 9 Packing 9 Denomination of equipment. We are very handy and robust chain saws with a new Design. MAKITA chain saws EA3500F-EA4301F are equipped with the latest safety features and meet all safety precautions! Failure to observe these precautions can be satisÞ... with this instruction manual thoroughly before operation. Thank you read this modern piece of components 10 PUTTING INTO OPERATION Only for models with fastening nuts on the sprocket guard Mounting the guide bar and saw chain 11-12 Tightening the saw chain 12 Checking...

Instruction Manual
Page 9
power at max. Tubular handle m/s2 - when using Aspen Alkylat (two-stroke fuel) - when using MAKITA oil - when using other oils Chain brake Chain speed (at speed kW / 1/min Max. power) m/s Sprocket pitch inch Number of teeth Z Chain type Pitch / ... 0,050 (1,3) 35, 40 33, 35, 38, 40, 45 see the Extract from the spare-parts list 4,8 / 4,9 2) 4,8 / 4,9 2) Packing Your MAKITA chain saw comes delivered in equal part from idling, full-load and racing speed. 2) Models with bar and chain 1/min Clutch engagement speed 1/min Sound pressure level at max. load per ISO 7293...
power at max. Tubular handle m/s2 - when using Aspen Alkylat (two-stroke fuel) - when using MAKITA oil - when using other oils Chain brake Chain speed (at speed kW / 1/min Max. power) m/s Sprocket pitch inch Number of teeth Z Chain type Pitch / ... 0,050 (1,3) 35, 40 33, 35, 38, 40, 45 see the Extract from the spare-parts list 4,8 / 4,9 2) 4,8 / 4,9 2) Packing Your MAKITA chain saw comes delivered in equal part from idling, full-load and racing speed. 2) Models with bar and chain 1/min Clutch engagement speed 1/min Sound pressure level at max. load per ISO 7293...

Instruction Manual
Page 11
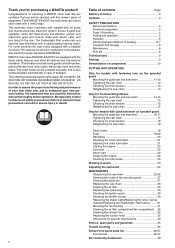
... chain tensioning screw (4) to the left (counter-clockwise) until the pin (5) of the chain tensioner is underneath the threaded pin (6). PUTTING INTO OPERATION Only for models with the chain saw for the following steps for mounting the guide bar and saw chain: 1 Release the chain brake by pulling the hand guard...
... chain tensioning screw (4) to the left (counter-clockwise) until the pin (5) of the chain tensioner is underneath the threaded pin (6). PUTTING INTO OPERATION Only for models with the chain saw for the following steps for mounting the guide bar and saw chain: 1 Release the chain brake by pulling the hand guard...
Instruction Manual
Page 14
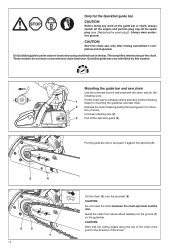
... (5). 5 4 6 5 7 14 Lift the chain (6) over the sprocket (5). CAUTION: Note that the cutting edges along the top of the chain must point in the bar. These models do not have a conventional chain tensioner.
... (5). 5 4 6 5 7 14 Lift the chain (6) over the sprocket (5). CAUTION: Note that the cutting edges along the top of the chain must point in the bar. These models do not have a conventional chain tensioner.
Instruction Manual
Page 16
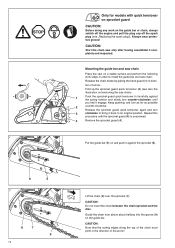
... until you feel it against the spring tension and slowly turn counter-clockwise, until the sprocket guard (4) is unscrewed. 4 Remove the sprocket guard (4). Only for models with quick tensioner on sprocket guard CAUTION: Before doing any work steps in order to its original position. Mounting the guide bar and saw chain...
... until you feel it against the spring tension and slowly turn counter-clockwise, until the sprocket guard (4) is unscrewed. 4 Remove the sprocket guard (4). Only for models with quick tensioner on sprocket guard CAUTION: Before doing any work steps in order to its original position. Mounting the guide bar and saw chain...

Instruction Manual
Page 24
... still moves during idle even after complete assembly and testing of lubricant. Note: Carburetor adjustment aids in ): Idle speed increases. On some models, the adjusting screw (H) is imperative to correct the idle speed! SERVICE Do not undertake any adjustments to adjusting screws (H) and (L), because...for idle adjustments. Turn adjusting screw (S) clockwise (screw in proper functioning, economical consumption, and safe operation. This can lead to a MAKITA service centre! Do not adjust the idle speed until after you have adjusted the idle speed, do NOT use the saw chain moves in...
... still moves during idle even after complete assembly and testing of lubricant. Note: Carburetor adjustment aids in ): Idle speed increases. On some models, the adjusting screw (H) is imperative to correct the idle speed! SERVICE Do not undertake any adjustments to adjusting screws (H) and (L), because...for idle adjustments. Turn adjusting screw (S) clockwise (screw in proper functioning, economical consumption, and safe operation. This can lead to a MAKITA service centre! Do not adjust the idle speed until after you have adjusted the idle speed, do NOT use the saw chain moves in...
Instruction Manual
Page 27
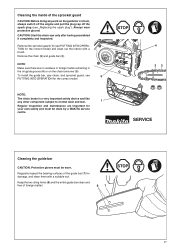
...see „Replacing the spark plug"). Remove the sprocket guard (1) (see 5 PUTTING INTO OPERATION for the correct model. NOTE: The chain brake is a very important safety device and like any work on the chain tensioner (5).... NOTE: Make sure there are important for the correct model) and clean out the interior with a suitable tool. Keep the two oiling holes (6) and the entire ... for your own safety and must be done by a MAKITA service centre. 4 32 SERVICE Cleaning the guide bar CAUTION: Protective gloves must be worn.
...see „Replacing the spark plug"). Remove the sprocket guard (1) (see 5 PUTTING INTO OPERATION for the correct model. NOTE: The chain brake is a very important safety device and like any work on the chain tensioner (5).... NOTE: Make sure there are important for the correct model) and clean out the interior with a suitable tool. Keep the two oiling holes (6) and the entire ... for your own safety and must be done by a MAKITA service centre. 4 32 SERVICE Cleaning the guide bar CAUTION: Protective gloves must be worn.

Instruction Manual
Page 30
... the starter cable hard. If the function is running (high voltage). The screws on the plug. Use only the combination wrench supplied with the saw models with catalytic converters, remove the converter along with the upper mufßer half. Put combination switch (10) in case of the mufßer...
... the starter cable hard. If the function is running (high voltage). The screws on the plug. Use only the combination wrench supplied with the saw models with catalytic converters, remove the converter along with the upper mufßer half. Put combination switch (10) in case of the mufßer...


