
Instruction Manual
Page 2
...;er screws 30 Replacing the starter cable/Replacing the return spring cassette/Replacing the Featherlight -Start spring ......... 31 Mounting the fan housing 31 Cleaning the air Þlter compartment/fan compartment ... 32 Cleaning the cylinder Þns 32 Replacing the suction head 32 Instructions for the user. Failure to observe these precautions can be satisÞed with this instruction manual thoroughly before operation. MAKITA chain saws EA3500F...
...;er screws 30 Replacing the starter cable/Replacing the return spring cassette/Replacing the Featherlight -Start spring ......... 31 Mounting the fan housing 31 Cleaning the air Þlter compartment/fan compartment ... 32 Cleaning the cylinder Þns 32 Replacing the suction head 32 Instructions for the user. Failure to observe these precautions can be satisÞed with this instruction manual thoroughly before operation. MAKITA chain saws EA3500F...
Instruction Manual
Page 4
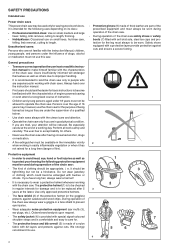
... user has to improper handling. - In order to avoid head, eye, hand or foot injuries as well as to care for damage and is recommended to lend the chain saw only to length. The kind of 16 years may be used during operation of being trained as long as others . - SAFETY PRECAUTIONS Intended use Power chain saws This power chain saw may , however, use...
... user has to improper handling. - In order to avoid head, eye, hand or foot injuries as well as to care for damage and is recommended to lend the chain saw only to length. The kind of 16 years may be used during operation of being trained as long as others . - SAFETY PRECAUTIONS Intended use Power chain saws This power chain saw may , however, use...
Instruction Manual
Page 5
... chain or guide bar after having stopped the saw immediately if you observe any in this instruction manual (8). When starting the chain saw such that nobody is completely assembled. Take the back handle with the right hand and the tubular handle with fuel, change protective clothes. Hold the chain saw it with mineral oil products. When the sawing device is not allowed in its operating behavior...
... chain or guide bar after having stopped the saw immediately if you observe any in this instruction manual (8). When starting the chain saw such that nobody is completely assembled. Take the back handle with the right hand and the tubular handle with fuel, change protective clothes. Hold the chain saw it with mineral oil products. When the sawing device is not allowed in its operating behavior...
Instruction Manual
Page 6
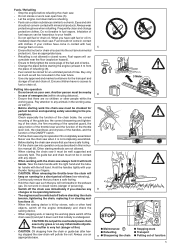
... when working on unstable surfaces. Only use the chain saw ! - Never saw . - Remove foreign objects such as sand, stones and nails found within the elongated swivelling range of 12 wood or other objects. - Do longitudinal - This causes the saw (12). - Never climb up or removing pieces of the saw to make a cut , as a centre of working area, risk of the saw during good light and...
... when working on unstable surfaces. Only use the chain saw ! - Never saw . - Remove foreign objects such as sand, stones and nails found within the elongated swivelling range of 12 wood or other objects. - Do longitudinal - This causes the saw (12). - Never climb up or removing pieces of the saw to make a cut , as a centre of working area, risk of the saw during good light and...

Instruction Manual
Page 7
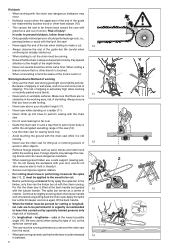
... clamping of fall and guides the tree. Never perform detensioning cuts while standing on the trunk. Before cutting down the tree check the direction of the guide bar can be exactly horizontal. is free from foreign objects, underbrush and branches. Never cut the pressure side (A). Do not use the lower edge of injuries). - When cutting of branches, the chain saw may be supported on...
... clamping of fall and guides the tree. Never perform detensioning cuts while standing on the trunk. Before cutting down the tree check the direction of the guide bar can be exactly horizontal. is free from foreign objects, underbrush and branches. Never cut the pressure side (A). Do not use the lower edge of injuries). - When cutting of branches, the chain saw may be supported on...

Instruction Manual
Page 8
... not been approved. Number of injuries - Keep the chain saw ) must not be carried out by MAKITA Service. Before starting work switch off the chain saw and actuate the chain brake in order to prevent an inadvertent start of a possible accident, please make sure that the chain is adjusted correctly. - Regularly clean the chain saw . Use only original MAKITA spare parts and accessories. Place of...
... not been approved. Number of injuries - Keep the chain saw ) must not be carried out by MAKITA Service. Before starting work switch off the chain saw and actuate the chain brake in order to prevent an inadvertent start of a possible accident, please make sure that the chain is adjusted correctly. - Regularly clean the chain saw . Use only original MAKITA spare parts and accessories. Place of...

Instruction Manual
Page 9
...). 3) Uncertainty (K=). power) m/s Sprocket pitch inch Number of teeth Z Chain type Pitch / gauge inch / (mm) Guide bar, length of kickback 18,1 18,3 3/8 3/8 .325 6 6 7 see the Extract from the spare-parts list 3/8 / 0,050 (1,3) 3/8, .325 / 0,050 (1,3) 35, 40 33, 35, 38, 40, 45 see the Extract from the spare-parts list 4,8 / 4,9 2) 4,8 / 4,9 2) Packing Your MAKITA chain saw comes delivered in equal part from idling, full-load and racing speed. 2) Models with...
...). 3) Uncertainty (K=). power) m/s Sprocket pitch inch Number of teeth Z Chain type Pitch / gauge inch / (mm) Guide bar, length of kickback 18,1 18,3 3/8 3/8 .325 6 6 7 see the Extract from the spare-parts list 3/8 / 0,050 (1,3) 3/8, .325 / 0,050 (1,3) 35, 40 33, 35, 38, 40, 45 see the Extract from the spare-parts list 4,8 / 4,9 2) 4,8 / 4,9 2) Packing Your MAKITA chain saw comes delivered in equal part from idling, full-load and racing speed. 2) Models with...

Instruction Manual
Page 10
...) 14 IdentiÞcation plate 10 15 Starter grip 16 Combination switch (Choke / ON / Stop) 17 Fuel pump (Primer) 18 Throttle lever 19 Safety locking button 20 Rear hand guard 21 Fuel tank cap 22 Adjusting screws for carburetor 23 Fan housing with starting assembly 24 Oil tank cap 25 Chain (Blade) 26 Guide bar 27 Sprocket guard quick tensioner EA4301F 2011 123456 Serial number Year of components 12...
...) 14 IdentiÞcation plate 10 15 Starter grip 16 Combination switch (Choke / ON / Stop) 17 Fuel pump (Primer) 18 Throttle lever 19 Safety locking button 20 Rear hand guard 21 Fuel tank cap 22 Adjusting screws for carburetor 23 Fan housing with starting assembly 24 Oil tank cap 25 Chain (Blade) 26 Guide bar 27 Sprocket guard quick tensioner EA4301F 2011 123456 Serial number Year of components 12...

Instruction Manual
Page 11
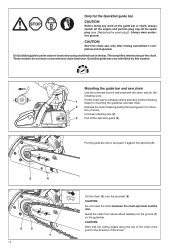
... work on the guide bar or chain, always switch off the engine and pull the plug cap off the sprocket guard (3). 3 Turn chain tensioning screw (4) to the left (counter-clockwise) until the pin (5) of the chain tensioner is underneath the threaded pin (6). Unscrew retaining nuts (2). Pull off the spark plug (see „Replacing the spark plug"). Mounting the guide bar and saw chain Use...
... work on the guide bar or chain, always switch off the engine and pull the plug cap off the sprocket guard (3). 3 Turn chain tensioning screw (4) to the left (counter-clockwise) until the pin (5) of the chain tensioner is underneath the threaded pin (6). Unscrew retaining nuts (2). Pull off the spark plug (see „Replacing the spark plug"). Mounting the guide bar and saw chain Use...
Instruction Manual
Page 14
... insert the chain between the chain sprocket and the disc. CAUTION: Start the chain saw chain: 2 Release the chain brake by pulling the hand guard (1) in direc- On QuickSet guide bars the chain is tensioned using a toothed rack in the direction of the arrow! These models do not have a conventional chain tensioner. Only for mounting the guide bar and saw only after having assembled...
... insert the chain between the chain sprocket and the disc. CAUTION: Start the chain saw chain: 2 Release the chain brake by pulling the hand guard (1) in direc- On QuickSet guide bars the chain is tensioned using a toothed rack in the direction of the arrow! These models do not have a conventional chain tensioner. Only for mounting the guide bar and saw only after having assembled...
Instruction Manual
Page 19
... ml order number 980 008 606 In case MAKITA high-performance two-stroke engine oil is not available, it will pollute the environment and clog the exhaust channel in the following sizes: 1 l order number 980 008 610 5 l order number 980 008 611 Bio-degradable oil is urgently recommended to ensure safe operation. If oil comes into the chain saw is not...
... ml order number 980 008 606 In case MAKITA high-performance two-stroke engine oil is not available, it will pollute the environment and clog the exhaust channel in the following sizes: 1 l order number 980 008 610 5 l order number 980 008 611 Bio-degradable oil is urgently recommended to ensure safe operation. If oil comes into the chain saw is not...
Instruction Manual
Page 23
... the saw! Normal operation Symbol visible - Contact a MAKITA service centre. Remove the insert (7) and insert it is inserted the induction opening (8) is above + 5°C (40°F) turn off the engine immediately. Caution: If the chain does not stop immediately. Start the engine as shown for winter operation. Remove the cover (see "Cleaning the air Þlter"). For temperatures above + 5°C (40°F) the engine needs...
... the saw! Normal operation Symbol visible - Contact a MAKITA service centre. Remove the insert (7) and insert it is inserted the induction opening (8) is above + 5°C (40°F) turn off the engine immediately. Caution: If the chain does not stop immediately. Start the engine as shown for winter operation. Remove the cover (see "Cleaning the air Þlter"). For temperatures above + 5°C (40°F) the engine needs...

Instruction Manual
Page 24
... NOT use the saw ! Adjusting the idle speed Turn adjusting screw (S) counter-clockwise (unscrew): Idle speed decreases. Note: Carburetor adjustment aids in ): Idle speed increases. On some models, the adjusting screw (H) is imperative to a MAKITA service centre! This can be manipulated by a specialist MAKITA service centre! Adjusting the carburetor CAUTION: Carburetor adjustment may only be done by the user. Important: If the saw chain still moves during idle even after complete assembly...
... NOT use the saw ! Adjusting the idle speed Turn adjusting screw (S) counter-clockwise (unscrew): Idle speed decreases. Note: Carburetor adjustment aids in ): Idle speed increases. On some models, the adjusting screw (H) is imperative to a MAKITA service centre! This can be manipulated by a specialist MAKITA service centre! Adjusting the carburetor CAUTION: Carburetor adjustment may only be done by the user. Important: If the saw chain still moves during idle even after complete assembly...

Instruction Manual
Page 25
MAINTENANCE Sharpening the saw is pulled to the left or right when sawing. The cutting edge is determined by uneven sharpening of the chain and can cause cracks in height between the depth limiter (round nose) and the cutting edge. Important: Sharpen frequently, but without removing too much ...dimension a). This is used. 80° for this point, the chain must be identical for all cutters! 30° for chain type 092, 484 The teeth will be replaced (see the Extract from the spare-parts list)! Have the chain resharpened at this saw chain"). Cutters with a depth-limiter depth...
MAINTENANCE Sharpening the saw is pulled to the left or right when sawing. The cutting edge is determined by uneven sharpening of the chain and can cause cracks in height between the depth limiter (round nose) and the cutting edge. Important: Sharpen frequently, but without removing too much ...dimension a). This is used. 80° for this point, the chain must be identical for all cutters! 30° for chain type 092, 484 The teeth will be replaced (see the Extract from the spare-parts list)! Have the chain resharpened at this saw chain"). Cutters with a depth-limiter depth...
Instruction Manual
Page 27
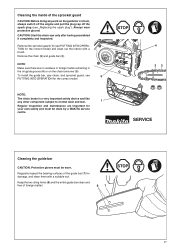
... the plug cap off the spark plug (see 5 PUTTING INTO OPERATION for the correct model) and clean out the interior with a suitable tool. Keep the two oiling holes (6) and the entire guide bar clean and free of foreign matter! 67 27 Remove the chain (2) and guide bar (3). CAUTION: Start the chain saw chain, and sprocket guard, see „Replacing the spark plug").
... the plug cap off the spark plug (see 5 PUTTING INTO OPERATION for the correct model) and clean out the interior with a suitable tool. Keep the two oiling holes (6) and the entire guide bar clean and free of foreign matter! 67 27 Remove the chain (2) and guide bar (3). CAUTION: Start the chain saw chain, and sprocket guard, see „Replacing the spark plug").

Instruction Manual
Page 28
...) must therefore be changed to be replaced at least at half-throttle for the part numbers, see the Extract from popping off. Remove the sprocket guard (See „PUTTING INTO OPERATION"). CAUTION: The circlip will need to Þt the different chain. Install a complete new clutch drum (12), cup washer (11) and new circlip (9) (for a few minutes before mounting a new chain. By...
...) must therefore be changed to be replaced at least at half-throttle for the part numbers, see the Extract from popping off. Remove the sprocket guard (See „PUTTING INTO OPERATION"). CAUTION: The circlip will need to Þt the different chain. Install a complete new clutch drum (12), cup washer (11) and new circlip (9) (for a few minutes before mounting a new chain. By...

Instruction Manual
Page 29
... lock (1) back on , Þrst guiding the two holders (7) into the carburetor. Push up and out. sory) is for any , remove them with compressed air. Note that the ßeece Þlter does not need to clean the air Þlter. Cleaning the nylon Þlter: Use a soft brush or blow out dirt from the inside with a brush. Before assembling the air...
... lock (1) back on , Þrst guiding the two holders (7) into the carburetor. Push up and out. sory) is for any , remove them with compressed air. Note that the ßeece Þlter does not need to clean the air Þlter. Cleaning the nylon Þlter: Use a soft brush or blow out dirt from the inside with a brush. Before assembling the air...
Instruction Manual
Page 33
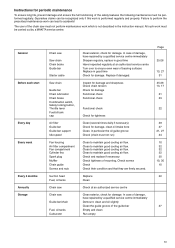
... Storage Chain saw Saw chain Chain brake Guide bar Starter cable Saw chain Guide bar Chain lubrication Chain brake Combination switch, Safety locking button, Throttle lever Fuel/oil tank cap Air Þlter Guide bar Guide bar support Idle speed Fan housing Air Þlter compartment Fan compartment Cylinder Þns Spark plug Mufßer Chain guide Screws and nuts Suction head Fuel, oil tanks Chain saw Chain saw must not perform maintenance work is...
... Storage Chain saw Saw chain Chain brake Guide bar Starter cable Saw chain Guide bar Chain lubrication Chain brake Combination switch, Safety locking button, Throttle lever Fuel/oil tank cap Air Þlter Guide bar Guide bar support Idle speed Fan housing Air Þlter compartment Fan compartment Cylinder Þns Spark plug Mufßer Chain guide Screws and nuts Suction head Fuel, oil tanks Chain saw Chain saw must not perform maintenance work is...
Instruction Manual
Page 34
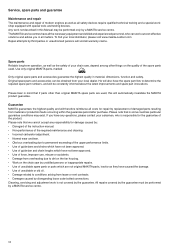
... spare part numbers, and will therefore reimburse all the necessary equipment and skilled and experienced personnel, who is not covered by the guarantee. Any work is responsible for repair by replacement of damaged parts resulting from your local dealer. Original spare parts and accessories can work out cost-effective solutions and advise you in material, dimensions, function and safety. Use only original MAKITA parts...
... spare part numbers, and will therefore reimburse all the necessary equipment and skilled and experienced personnel, who is not covered by the guarantee. Any work is responsible for repair by replacement of damaged parts resulting from your local dealer. Original spare parts and accessories can work out cost-effective solutions and advise you in material, dimensions, function and safety. Use only original MAKITA parts...

Instruction Manual
Page 37
...5l chain oil) 4 941 713 160 1 Universal wrench SW 13/16 5 940 827 000 1 Offset screwdriver 6 944 340 001 1 Carburetor screwdriver 7 320 163 447 1 Suction head 8 181 114 202 1 Fuel tank cap, cpl. 9 963 229 036 1 O-Ring 29,3 x 3,6 mm 10 195 160 050 1 Return spring pack, complete...310 1 Clutch drum cpl. 3/8", 6-tooth 21 181 224 081 1 Cup washer 22 927 408 000 1 Circlip 23 963 220 013 1 O-Ring 20 x 1,3 mm 37 Qty. For repairs and replacement of other parts, see your MAKITA service centre. EA3500F, 3501F EA4300F, 4301F Pos. Extract from the spare parts list Use only original MAKITA parts.
...5l chain oil) 4 941 713 160 1 Universal wrench SW 13/16 5 940 827 000 1 Offset screwdriver 6 944 340 001 1 Carburetor screwdriver 7 320 163 447 1 Suction head 8 181 114 202 1 Fuel tank cap, cpl. 9 963 229 036 1 O-Ring 29,3 x 3,6 mm 10 195 160 050 1 Return spring pack, complete...310 1 Clutch drum cpl. 3/8", 6-tooth 21 181 224 081 1 Cup washer 22 927 408 000 1 Circlip 23 963 220 013 1 O-Ring 20 x 1,3 mm 37 Qty. For repairs and replacement of other parts, see your MAKITA service centre. EA3500F, 3501F EA4300F, 4301F Pos. Extract from the spare parts list Use only original MAKITA parts.


