Owners Manual
Page 2
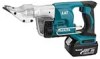
... hazards. 2 Avoid accidental starting. Do not overreach. Keep your finger on . If devices are tired or under the influence of the power tool may differ from country to country. GEA002-3 GENERAL SAFETY RULES WARNING! Electrical Safety 4. Avoid body contact with your hair, clothing, and gloves ... result in electric shock, fire and/or serious injury. SAVE THESE INSTRUCTIONS. Keep work area clean and well lit. Do not expose power tools to 600 N/mm2 BJS130 1.3 mm (18 ga.) 1.0 mm (20 ga.) Strokes per minute 2,800/min. Always wear eye protection. A wrench or a key left...
... hazards. 2 Avoid accidental starting. Do not overreach. Keep your finger on . If devices are tired or under the influence of the power tool may differ from country to country. GEA002-3 GENERAL SAFETY RULES WARNING! Electrical Safety 4. Avoid body contact with your hair, clothing, and gloves ... result in electric shock, fire and/or serious injury. SAVE THESE INSTRUCTIONS. Keep work area clean and well lit. Do not expose power tools to 600 N/mm2 BJS130 1.3 mm (18 ga.) 1.0 mm (20 ga.) Strokes per minute 2,800/min. Always wear eye protection. A wrench or a key left...
Owners Manual
Page 3
... When battery pack is below when using only identical replacement parts. Shorting the battery terminals together may affect the power tools operation. Liquid ejected from repeated use the power tool if the switch does not turn it can suffer serious personal injury. 1. This will do not allow persons unfamiliar ... must be sure you can cause damage and trouble on thickly bottomed shoes to another battery pack. 25. Power tool use and care 23. Use of the power tool for one type of battery pack may create a risk of parts and any other condition that cannot be controlled ...
... When battery pack is below when using only identical replacement parts. Shorting the battery terminals together may affect the power tools operation. Liquid ejected from repeated use the power tool if the switch does not turn it can suffer serious personal injury. 1. This will do not allow persons unfamiliar ... must be sure you can cause damage and trouble on thickly bottomed shoes to another battery pack. 25. Power tool use and care 23. Use of the power tool for one type of battery pack may create a risk of parts and any other condition that cannot be controlled ...
Owners Manual
Page 4
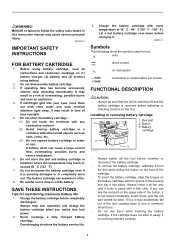
.... (3) Do not expose battery cartridge to water or rain. A battery short can explode in a fire. 8. SAVE THESE INSTRUCTIONS. Tips for tool. ・ volts ・ direct current ・ no load speed ・ revolutions or reciprocation per minute FUNCTIONAL DESCRIPTION CAUTION: • Always ...CARTRIDGE 1. Do not short the battery cartridge: (1) Do not touch the terminals with a little click. Do not store the tool and battery cartridge in this instruction manual may cause serious personal injury. Always stop operating immediately. Always insert it all instructions and...
.... (3) Do not expose battery cartridge to water or rain. A battery short can explode in a fire. 8. SAVE THESE INSTRUCTIONS. Tips for tool. ・ volts ・ direct current ・ no load speed ・ revolutions or reciprocation per minute FUNCTIONAL DESCRIPTION CAUTION: • Always ...CARTRIDGE 1. Do not short the battery cartridge: (1) Do not touch the terminals with a little click. Do not store the tool and battery cartridge in this instruction manual may cause serious personal injury. Always stop operating immediately. Always insert it all instructions and...
Owners Manual
Page 5
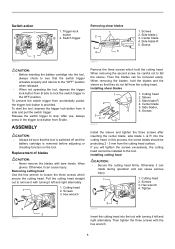
...8226; Secure the cutting head firmly. Screws 3. Switch trigger Removing shear blades 1 2 3 4 5 009019 1. Center blade 4. To start the tool, depress the trigger lock-button from the cutting head surface. When removing the second screw, be careful not to loosen the three screws which hold...Removing cutting head Use the hex wrench to fall from accidentally pulled, the trigger lock-button is removed before adjusting or checking function on the tool. Cutting head 1 2. Screws 3. Hex wrench 4. Tighten 2 3 4 009016 Insert the cutting head into the cutting head. Screws 2. ...
...8226; Secure the cutting head firmly. Screws 3. Switch trigger Removing shear blades 1 2 3 4 5 009019 1. Center blade 4. To start the tool, depress the trigger lock-button from the cutting head surface. When removing the second screw, be careful not to loosen the three screws which hold...Removing cutting head Use the hex wrench to fall from accidentally pulled, the trigger lock-button is removed before adjusting or checking function on the tool. Cutting head 1 2. Screws 3. Hex wrench 4. Tighten 2 3 4 009016 Insert the cutting head into the cutting head. Screws 2. ...
Owners Manual
Page 6
...still with the provided wrench while keeping the spindle still by placing another wrench. CAUTION: • Do not confound the bearing assembly provided on the tool (thin one ) and screw the bearing assembly for capacity of gauge 16 (Optional Accessory). Remove the cutting head. (Refer to the section titled... wrench while keeping the spindle still by grabbing the two flat parts on the spindle. 4. It can be installed on the tool is convenient for capacity of the arrow (2). 1. Center blade 4. Hex wrench 1 009021 009050 2. Replacing cutting head for temporarily hooking the...
...still with the provided wrench while keeping the spindle still by placing another wrench. CAUTION: • Do not confound the bearing assembly provided on the tool (thin one ) and screw the bearing assembly for capacity of gauge 16 (Optional Accessory). Remove the cutting head. (Refer to the section titled... wrench while keeping the spindle still by grabbing the two flat parts on the spindle. 4. It can be installed on the tool is convenient for capacity of the arrow (2). 1. Center blade 4. Hex wrench 1 009021 009050 2. Replacing cutting head for temporarily hooking the...

Owners Manual
Page 7
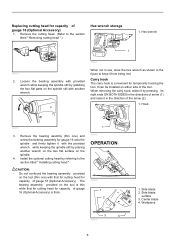
...forth to adjust it can cause injury. Lubrication 1 2 3 4 5 1. First remove the holder by unscrewing the hex socket head bolt. 2 1. Move the tool forward keeping the side blades flush with the hex wrench. Side blade L 3. MAINTENANCE CAUTION: • Always be replaced at the same time. And, also lubricate...or the workpiece. Keep the carbon brushes clean and free to the limit mark. Both carbon brushes should be sure that the tool is switched off and unplugged before attempting to time during operation. Hex socket head bolt 009048 Then loosen the hex socket head ...
...forth to adjust it can cause injury. Lubrication 1 2 3 4 5 1. First remove the holder by unscrewing the hex socket head bolt. 2 1. Move the tool forward keeping the side blades flush with the hex wrench. Side blade L 3. MAINTENANCE CAUTION: • Always be replaced at the same time. And, also lubricate...or the workpiece. Keep the carbon brushes clean and free to the limit mark. Both carbon brushes should be sure that the tool is switched off and unplugged before attempting to time during operation. Hex socket head bolt 009048 Then loosen the hex socket head ...

Owners Manual
Page 8
... Centers. Hole 2. The use accessory or attachment for more details regarding these accessories, ask your Makita tool specified in this one year period, return the COMPLETE tool, freight prepaid, to state. THIS DISCLAIMER APPLIES BOTH DURING AND AFTER THE TERM OF THIS WARRANTY...L • Hex wrench • Shear head assembly 16 • Various type of Makita genuine batteries and chargers MAKITA LIMITED ONE YEAR WARRANTY Warranty Policy Every Makita tool is caused by defective workmanship or material, Makita will repair (or at our option, replace) without charge. IN NO EVENT SHALL...
... Centers. Hole 2. The use accessory or attachment for more details regarding these accessories, ask your Makita tool specified in this one year period, return the COMPLETE tool, freight prepaid, to state. THIS DISCLAIMER APPLIES BOTH DURING AND AFTER THE TERM OF THIS WARRANTY...L • Hex wrench • Shear head assembly 16 • Various type of Makita genuine batteries and chargers MAKITA LIMITED ONE YEAR WARRANTY Warranty Policy Every Makita tool is caused by defective workmanship or material, Makita will repair (or at our option, replace) without charge. IN NO EVENT SHALL...
Flyer (English)
Page 1
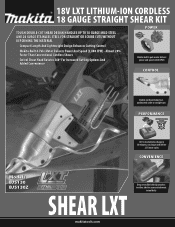
... Rotates 360º For Increased Cutting Options And Added Convenience POWER Makita-built 4-pole motor delivers power and speed (2,800 SPM) CONTROL Double-cut head makes fast, undistorted scribe or straight cuts PERFORMANCE Models BJS130 BJS130Z LXT Li-Ion batteries charge in 30 minutes, run longer ...and deliver 2.5X more cycles CONVENIENCE SHEAR LXT makitatools.com Deep reversible belt-clip attaches to either side for secure attachment to tool belts 18V LXT LITHIUM-ION CORDLESS...
... Rotates 360º For Increased Cutting Options And Added Convenience POWER Makita-built 4-pole motor delivers power and speed (2,800 SPM) CONTROL Double-cut head makes fast, undistorted scribe or straight cuts PERFORMANCE Models BJS130 BJS130Z LXT Li-Ion batteries charge in 30 minutes, run longer ...and deliver 2.5X more cycles CONVENIENCE SHEAR LXT makitatools.com Deep reversible belt-clip attaches to either side for secure attachment to tool belts 18V LXT LITHIUM-ION CORDLESS...

Flyer (English)
Page 2
...) 13-3/4" 5.0 lbs. (w/battery) (BJS130) 14.8 lbs. (BJS130Z) 4.6 lbs. 3 (BJS130) 088381-094566 (BJS130Z) 088381-094580 OPTIONAL ACCESSORIES I 16 Gauge Head (125513-1) I Optimum Automotive Charger (DC18SE) Model BJS130 Model BJS130Z Makita offers a wide variety of the tool for secure attachment I Compact design at ...makitatools.com, or call 1-800-4MAKITA or visit makitatools.com Makita U.S.A., 14930 Northam St., La Mirada, CA ...
...) 13-3/4" 5.0 lbs. (w/battery) (BJS130) 14.8 lbs. (BJS130Z) 4.6 lbs. 3 (BJS130) 088381-094566 (BJS130Z) 088381-094580 OPTIONAL ACCESSORIES I 16 Gauge Head (125513-1) I Optimum Automotive Charger (DC18SE) Model BJS130 Model BJS130Z Makita offers a wide variety of the tool for secure attachment I Compact design at ...makitatools.com, or call 1-800-4MAKITA or visit makitatools.com Makita U.S.A., 14930 Northam St., La Mirada, CA ...
