
Owners Manual
Page 1
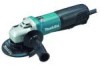
ENGLISH INSTRUCTION MANUAL Angle Grinder 9564PC 9564PCV 9565PC 9565PCV 9566PC 9566PCV DOUBLE INSULATION 008369 WARNING: For your personal safety, READ and UNDERSTAND before using. SAVE THESE INSTRUCTIONS FOR FU1 TURE REFERENCE.
ENGLISH INSTRUCTION MANUAL Angle Grinder 9564PC 9564PCV 9565PC 9565PCV 9566PC 9566PCV DOUBLE INSULATION 008369 WARNING: For your personal safety, READ and UNDERSTAND before using. SAVE THESE INSTRUCTIONS FOR FU1 TURE REFERENCE.
Owners Manual
Page 2
... subject to change without the use . ・ Read instruction manual. ・ DOUBLE INSULATION ・ Wear safety glasses. ・ Only for EU countries Do not dispose of electric equipment together with national law, electric equipment that have reached the end of their life must be used for grinding, sanding and cutting of metal and stone materials without notice. • Note: Specifications may...
... subject to change without the use . ・ Read instruction manual. ・ DOUBLE INSULATION ・ Wear safety glasses. ・ Only for EU countries Do not dispose of electric equipment together with national law, electric equipment that have reached the end of their life must be used for grinding, sanding and cutting of metal and stone materials without notice. • Note: Specifications may...

Owners Manual
Page 3
... and instructions for outdoor use any adapter plugs with earthed or grounded surfaces such as in the presence of standardized documents; Work area safety 1. Do not abuse the cord. When operating a power tool outdoors, use an extension cord suitable for future reference. A moment of electric shock if your hair, clothing, and gloves away from heat, oil, sharp edges or moving parts. Protective equipment such as dust...
... and instructions for outdoor use any adapter plugs with earthed or grounded surfaces such as in the presence of standardized documents; Work area safety 1. Do not abuse the cord. When operating a power tool outdoors, use an extension cord suitable for future reference. A moment of electric shock if your hair, clothing, and gloves away from heat, oil, sharp edges or moving parts. Protective equipment such as dust...

Owners Manual
Page 4
... the power tool's operation. This will ensure that cannot be performed with the switch is dropped, inspect for lubricating and changing accessories. 26. Keep handles dry, clean and free from the power tool before use inspect the accessory such as abrasive wheels for chips and cracks, backing pad for cracks, tear or excess wear, wire brush for Grinding, Sanding, Wire Brushing, or Abrasive Cutting-Off Operations: 2. This power tool is maintained. 25. Accessories running...
... the power tool's operation. This will ensure that cannot be performed with the switch is dropped, inspect for lubricating and changing accessories. 26. Keep handles dry, clean and free from the power tool before use inspect the accessory such as abrasive wheels for chips and cracks, backing pad for cracks, tear or excess wear, wire brush for Grinding, Sanding, Wire Brushing, or Abrasive Cutting-Off Operations: 2. This power tool is maintained. 25. Accessories running...

Owners Manual
Page 5
... Cutting-Off Operations: a) Do not "jam" the cut -off wheels are taken. Cutting accessory contacting a "live " and shock the operator. 12. The motor's fan will move if kickback occurs. Do not operate the power tool near the rotating accessory. The wheel may either jump toward or away from larger power tools. Safety Warnings Specific for Grinding and Abrasive Cutting-Off Operations: a) Use only wheel types that are recommended for your power tool and the specific guard...
... Cutting-Off Operations: a) Do not "jam" the cut -off wheels are taken. Cutting accessory contacting a "live " and shock the operator. 12. The motor's fan will move if kickback occurs. Do not operate the power tool near the rotating accessory. The wheel may either jump toward or away from larger power tools. Safety Warnings Specific for Grinding and Abrasive Cutting-Off Operations: a) Use only wheel types that are recommended for your power tool and the specific guard...
Owners Manual
Page 6
... damage the spindle, the flange (especially the installing surface) or the lock nut. When using the tool on both sides of the wheel. Operate the tool only when hand-held. 30. Observe the instructions of the manufacturer for flying sparks. Do not use cut-off the power tool and hold the power tool motionless until the wheel comes to a complete stop. When use the tool on . 26. c) When wheel is turned on any...
... damage the spindle, the flange (especially the installing surface) or the lock nut. When using the tool on both sides of the wheel. Operate the tool only when hand-held. 30. Observe the instructions of the manufacturer for flying sparks. Do not use cut-off the power tool and hold the power tool motionless until the wheel comes to a complete stop. When use the tool on . 26. c) When wheel is turned on any...
Owners Manual
Page 7
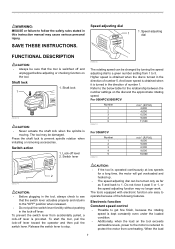
... stop. Release the switch lever to prevent spindle rotation when installing or removing accessories. To start the tool, pull the lock-off lever 2. The tools equipped with electronic function are easy to protect the motor from 1 to the "OFF" position when released. • Do not pull the switch lever forcibly without pushing in the direction of the following features. When the load 7 Shaft lock 1. Do not force it is switched off lever. Speed adjusting...
... stop. Release the switch lever to prevent spindle rotation when installing or removing accessories. To start the tool, pull the lock-off lever 2. The tools equipped with electronic function are easy to protect the motor from 1 to the "OFF" position when released. • Do not pull the switch lever forcibly without pushing in the direction of the following features. When the load 7 Shaft lock 1. Do not force it is switched off lever. Speed adjusting...
Owners Manual
Page 8
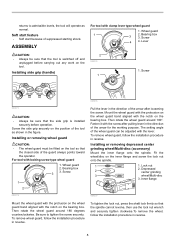
.... Wheel guard 2. Mount the wheel guard with the protrusion on the wheel guard band aligned with the notch on the tool so that the spindle cannot revolve, then use the lock nut wrench and securely tighten clockwise.To remove the wheel, follow the installation procedure in reverse. For tool with clamp lever type wheel guard 1. Then rotate the wheel guard around 180°. Installing or removing wheel guard CAUTION: • The wheel guard must be sure that the side grip is switched...
.... Wheel guard 2. Mount the wheel guard with the protrusion on the wheel guard band aligned with the notch on the tool so that the spindle cannot revolve, then use the lock nut wrench and securely tighten clockwise.To remove the wheel, follow the installation procedure in reverse. For tool with clamp lever type wheel guard 1. Then rotate the wheel guard around 180°. Installing or removing wheel guard CAUTION: • The wheel guard must be sure that the side grip is switched...
Owners Manual
Page 9
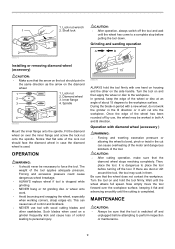
... screw the lock nut onto the spindle. Lock nut 2. Inner flange 3 4. Such blades when used . Shaft lock CAUTION: • After operation, always switch off the tool. The weight of about 15 degrees to bend, pinch or twist in period with one hand on and hold the tool firmly with a new wheel, do not work . • Avoid bouncing and snagging the wheel, especially when working corners, sharp edges etc. Turn the tool...
... screw the lock nut onto the spindle. Lock nut 2. Inner flange 3 4. Such blades when used . Shaft lock CAUTION: • After operation, always switch off the tool. The weight of about 15 degrees to bend, pinch or twist in period with one hand on and hold the tool firmly with a new wheel, do not work . • Avoid bouncing and snagging the wheel, especially when working corners, sharp edges etc. Turn the tool...
Owners Manual
Page 10
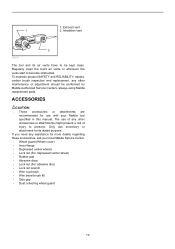
... SAFETY and RELIABILITY, repairs, carbon brush inspection and replacement, any other accessories or attachments might present a risk of any assistance for its air vents have to become obstructed. Only use with your local Makita Service Center. • Wheel guard (Wheel cover) • Inner flange • Depressed center wheels • Lock nut (For depressed center wheel) • Rubber pad • Abrasive discs • Lock nut (For abrasive disc) • Lock nut wrench • Wire cup brush...
... SAFETY and RELIABILITY, repairs, carbon brush inspection and replacement, any other accessories or attachments might present a risk of any assistance for its air vents have to become obstructed. Only use with your local Makita Service Center. • Wheel guard (Wheel cover) • Inner flange • Depressed center wheels • Lock nut (For depressed center wheel) • Rubber pad • Abrasive discs • Lock nut (For abrasive disc) • Lock nut wrench • Wire cup brush...

Owners Manual
Page 12
Makita Corporation Anjo, Aichi, Japan 884754A221 12
Makita Corporation Anjo, Aichi, Japan 884754A221 12

Parts Breakdown
Page 2
...SCREW 4X40, 4334DWD CORD GUARD 10, 9564CV CORD (2X16X8;SJ), 5007NBA STRAIN RELIEF, HP1621F TAPPING SCREW 4X14, 2012NB BRUSH HOLDER, 9557NB TAPPING SCREW PT3X10, GD0800C CARBON BRUSH SET CB-318,GD0800C CARBON BRUSH SET CB-318, GD0800C SWITCH, BGA452 TAPPING SCREW BIND PT3X8,9526PB PLATE, GD0060 SWITCH LEVER B ,9564PC REAR COVER SET, 9564PC CLEAR LABEL, 9565PCV GRIP 36, 9557NB 5 GRINDING WHEEL, 9005B,BULK Page 2 of 3 Quantity 1 1 1 1 1 1 1 1 1 1 1 1 1 1 1 1 1 1 1 1 1 1 2 2 2 1 1 4 1 1 1 1 1 1 1 1 4 1 1 1 1 1 1 1 1 1 1 3 1 1 1 1 2 4 1 1 1 1 1 1 1 1 1 1 8/18/2010 WASHER 6, 2040 SPIRAL BEVEL GEAR...
...SCREW 4X40, 4334DWD CORD GUARD 10, 9564CV CORD (2X16X8;SJ), 5007NBA STRAIN RELIEF, HP1621F TAPPING SCREW 4X14, 2012NB BRUSH HOLDER, 9557NB TAPPING SCREW PT3X10, GD0800C CARBON BRUSH SET CB-318,GD0800C CARBON BRUSH SET CB-318, GD0800C SWITCH, BGA452 TAPPING SCREW BIND PT3X8,9526PB PLATE, GD0060 SWITCH LEVER B ,9564PC REAR COVER SET, 9564PC CLEAR LABEL, 9565PCV GRIP 36, 9557NB 5 GRINDING WHEEL, 9005B,BULK Page 2 of 3 Quantity 1 1 1 1 1 1 1 1 1 1 1 1 1 1 1 1 1 1 1 1 1 1 2 2 2 1 1 4 1 1 1 1 1 1 1 1 4 1 1 1 1 1 1 1 1 1 1 3 1 1 1 1 2 4 1 1 1 1 1 1 1 1 1 1 8/18/2010 WASHER 6, 2040 SPIRAL BEVEL GEAR...

Parts Breakdown
Page 3
1,002 1,002 1,003 D-18465 D-18465 782424-9 Parts Breakdown N/A N/A LOCK NUT WRENCH 28, BGA452 9565PC 1 1 1 Page 3 of 3 8/18/2010
1,002 1,002 1,003 D-18465 D-18465 782424-9 Parts Breakdown N/A N/A LOCK NUT WRENCH 28, BGA452 9565PC 1 1 1 Page 3 of 3 8/18/2010

Flyer (English)
Page 1
..., Fabricators, Masons, Maintenance/Repair and More INNOVATION SJS - As the armature starts to rotate, the coil tightens around the spiral bevel gear, which drives the grinding wheel. 4-1/2", 5" & 6" ANGLE GRINDERS SJS TECHNOLOGY STOPS THE WHEEL AND HELPS PREVENT GEAR DAMAGE Powerful 13 AMP Motor Delivers More Output for Increased Performance Gear Housing can be Rotated 90º Left and Right for operator comfort PERFORMANCE DRIVEN makitatools.com Lock Spring that joins...
..., Fabricators, Masons, Maintenance/Repair and More INNOVATION SJS - As the armature starts to rotate, the coil tightens around the spiral bevel gear, which drives the grinding wheel. 4-1/2", 5" & 6" ANGLE GRINDERS SJS TECHNOLOGY STOPS THE WHEEL AND HELPS PREVENT GEAR DAMAGE Powerful 13 AMP Motor Delivers More Output for Increased Performance Gear Housing can be Rotated 90º Left and Right for operator comfort PERFORMANCE DRIVEN makitatools.com Lock Spring that joins...

Flyer (English)
Page 2
... the motor from dust and debris by creating a complex set of ANGLE GRINDER accessories. All specifications subject to ANSI B7.1 and owner/operator manual for proper accessory mounting and grinding procedures and always wear ANSI Z87.1 eye protection. For a complete listing, please refer to the Makita General Catalog, or visit our website at only 4.2 lbs. ■ "Tool-less" wheel guard to all safety precautions for welders, fabricators, masons, maintenance/repair...
... the motor from dust and debris by creating a complex set of ANGLE GRINDER accessories. All specifications subject to ANSI B7.1 and owner/operator manual for proper accessory mounting and grinding procedures and always wear ANSI Z87.1 eye protection. For a complete listing, please refer to the Makita General Catalog, or visit our website at only 4.2 lbs. ■ "Tool-less" wheel guard to all safety precautions for welders, fabricators, masons, maintenance/repair...


