Owners Manual
Page 4
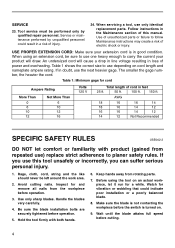
... away from the workpiece before the switch is in loss of this tool unsafely or incorrectly, you use one heavy enough to planer safety rules. Avoid cutting nails. Rags, cloth, cord, string and the like should never be performed only by unqualified personnel ...could indicate poor installation or a poorly balanced blade. 8. Hold the tool firmly with product (gained from repeated use the next heavier gage. Service or maintenance performed by qualified repair personnel....
... away from the workpiece before the switch is in loss of this tool unsafely or incorrectly, you use one heavy enough to planer safety rules. Avoid cutting nails. Rags, cloth, cord, string and the like should never be performed only by unqualified personnel ...could indicate poor installation or a poorly balanced blade. 8. Hold the tool firmly with product (gained from repeated use the next heavier gage. Service or maintenance performed by qualified repair personnel....
Owners Manual
Page 5
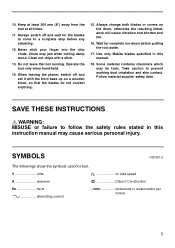
... may cause serious personal injury. When leaving the planer, switch off and wait for the blades to come to a complete stop before putting the tool aside. 17. Always change both blades or covers on a wooden block, so that the blades do not contact anything. 15. Follow material supplier...otherwise the resulting imbalance will cause vibration and shorten tool life. 16. Operate the tool only when hand-held. 14. Use only Makita blades specified in this manual. 18. Never stick your finger into the chip chute. Wait for tool. SYMBOLS USD201-2 The followings show the...
... may cause serious personal injury. When leaving the planer, switch off and wait for the blades to come to a complete stop before putting the tool aside. 17. Always change both blades or covers on a wooden block, so that the blades do not contact anything. 15. Follow material supplier...otherwise the resulting imbalance will cause vibration and shorten tool life. 16. Operate the tool only when hand-held. 14. Use only Makita blades specified in this manual. 18. Never stick your finger into the chip chute. Wait for tool. SYMBOLS USD201-2 The followings show the...
Owners Manual
Page 6
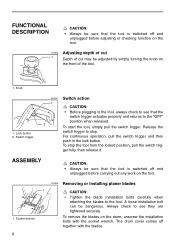
...work on the tool. 1. Always check to the tool. Socket wrench 6 001605 Removing or installing planer blades 1 CAUTION: • Tighten the blade installation bolts carefully when attaching the blades to see that the switch trigger actuates properly and returns to stop the tool from the locked position... and then push in the tool, always check to see they are tightened securely. To remove the blades on the drum, unscrew the installation bolts with the blades. The drum cover comes off together with the socket wrench. FUNCTIONAL DESCRIPTION CAUTION: • Always be...
...work on the tool. 1. Always check to the tool. Socket wrench 6 001605 Removing or installing planer blades 1 CAUTION: • Tighten the blade installation bolts carefully when attaching the blades to see that the switch trigger actuates properly and returns to stop the tool from the locked position... and then push in the tool, always check to see they are tightened securely. To remove the blades on the drum, unscrew the installation bolts with the blades. The drum cover comes off together with the socket wrench. FUNCTIONAL DESCRIPTION CAUTION: • Always be...
Owners Manual
Page 7
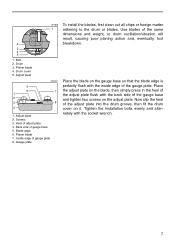
... with the inside edge of the same dimensions and weight, or drum oscillation/vibration will result, causing poor planing action and, eventually, tool breakdown. Screws 3. Planer blade 7. Inside edge of gauge base 5. Place the blade on it. Tighten the installation bolts evenly and alternately with the back side of adjust plate...
... with the inside edge of the same dimensions and weight, or drum oscillation/vibration will result, causing poor planing action and, eventually, tool breakdown. Screws 3. Planer blade 7. Inside edge of gauge base 5. Place the blade on it. Tighten the installation bolts evenly and alternately with the back side of adjust plate...
Owners Manual
Page 8
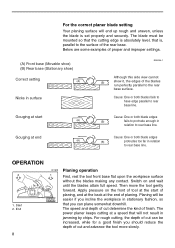
...flat upon the workpiece surface without the blades making any contact. The power planer keeps cutting at start of planing, and at the back at end Cause: One or both blade edges (A) (B) protrudes too far in...Correct setting (A) Nicks in surface EN0004-1 Although this side view cannot (B) show it, the edges of the blades run perfectly parallel to rear base line. Gouging at the end of planing. Then move the tool gently ... is absolutely level, that is set properly and securely. For the correct planer blade setting Your planing surface will be easier if you incline the workpiece in ...
...flat upon the workpiece surface without the blades making any contact. The power planer keeps cutting at start of planing, and at the back at end Cause: One or both blade edges (A) (B) protrudes too far in...Correct setting (A) Nicks in surface EN0004-1 Although this side view cannot (B) show it, the edges of the blades run perfectly parallel to rear base line. Gouging at the end of planing. Then move the tool gently ... is absolutely level, that is set properly and securely. For the correct planer blade setting Your planing surface will be easier if you incline the workpiece in ...
Owners Manual
Page 9
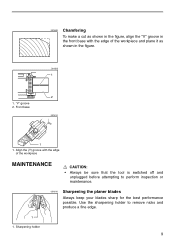
... off and unplugged before attempting to remove nicks and produce a fine edge. 1 1. Use the sharpening holder to perform inspection or maintenance. 001610 Sharpening the planer blades Always keep your blades sharp for the best performance possible. Sharpening holder 9 001609 Chamfering To make a cut as shown in the figure, align the "V'' groove in the...
... off and unplugged before attempting to remove nicks and produce a fine edge. 1 1. Use the sharpening holder to perform inspection or maintenance. 001610 Sharpening the planer blades Always keep your blades sharp for the best performance possible. Sharpening holder 9 001609 Chamfering To make a cut as shown in the figure, align the "V'' groove in the...
Owners Manual
Page 11
... recommended for use accessory or attachment for more details regarding these accessories, ask your Makita tool specified in this manual. Only use with your local Makita service center. • 110 mm (4-3/8") Planer blade • Dressing stone • Sharpening holder assembly • Blade gauge • Guide rule • Extension guide set • Socket wrench 9 • Dust...
... recommended for use accessory or attachment for more details regarding these accessories, ask your Makita tool specified in this manual. Only use with your local Makita service center. • 110 mm (4-3/8") Planer blade • Dressing stone • Sharpening holder assembly • Blade gauge • Guide rule • Extension guide set • Socket wrench 9 • Dust...
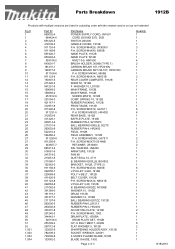
Parts Breakdown
Page 2
... 10, LS1030 MAIN FRAME, 1912B MAIN FRAME, 1912B SCREW M5X10, 1912B COMP. SCREW M5X18, GA7911 P.H. SCREW M5X65, GA7911 P.H. BEARING 6000ZZ, N1900B WASHER 10, 1912B DRUM, 1912B WASHER 12, 1912B BALL BEARING 6201ZZ, 1912B RUBBER PIN 6,LS1013 RUBBER PIN 4, HR2400 ADJUSTING PLATE, 1912B P.H. BOLT M6X17, 2030S FLAT WASHER 5, 1912B SHARPENING HOLDER ASSY, 1912B SOCKET WRENCH, 4200H 4-3/8HSS PLANER BLADE,1912B BLADE GAUGE, 1902 Page 2 of...
... 10, LS1030 MAIN FRAME, 1912B MAIN FRAME, 1912B SCREW M5X10, 1912B COMP. SCREW M5X18, GA7911 P.H. SCREW M5X65, GA7911 P.H. BEARING 6000ZZ, N1900B WASHER 10, 1912B DRUM, 1912B WASHER 12, 1912B BALL BEARING 6201ZZ, 1912B RUBBER PIN 6,LS1013 RUBBER PIN 4, HR2400 ADJUSTING PLATE, 1912B P.H. BOLT M6X17, 2030S FLAT WASHER 5, 1912B SHARPENING HOLDER ASSY, 1912B SOCKET WRENCH, 4200H 4-3/8HSS PLANER BLADE,1912B BLADE GAUGE, 1902 Page 2 of...


