
Owners Manual
Page 1
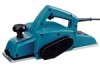
www.makitatools.com SAVE THESE INSTRUCTIONS FOR FUTURE REFERENCE. Power Planer 110 mm (4-3/8") MODEL 1912B DOUBLE INSULATION INSTRUCTION MANUAL WARNING: For your personal safety, READ and UNDERSTAND before using.
www.makitatools.com SAVE THESE INSTRUCTIONS FOR FUTURE REFERENCE. Power Planer 110 mm (4-3/8") MODEL 1912B DOUBLE INSULATION INSTRUCTION MANUAL WARNING: For your personal safety, READ and UNDERSTAND before using.
Owners Manual
Page 2
... away while operating a power tool. Distractions can cause you to install a polarized outlet. Power tools create sparks which may result in electric shock, fire and/or serious personal injury. Keep your work area clean and well lit. Do not change specifications without notice. • Specifications may differ from country to country. SPECIFICATIONS Model Planing width Planing depth No load speed (RPM) Overall length Net weight 1912B 110...
... away while operating a power tool. Distractions can cause you to install a polarized outlet. Power tools create sparks which may result in electric shock, fire and/or serious personal injury. Keep your work area clean and well lit. Do not change specifications without notice. • Specifications may differ from country to country. SPECIFICATIONS Model Planing width Planing depth No load speed (RPM) Overall length Net weight 1912B 110...

Owners Manual
Page 3
... inattention while operating power tools may result in unexpected situations. 14. Remove adjusting keys or wrenches before using. Use the correct tool for appropriate conditions. Use only accessories that have the tool serviced before turning the tool on invites accidents. 12. Do not expose power tools to a stable platform. Be sure switch is unstable and may affect the tools operation. Always wear eye protection. Use clamps or other untrained persons. 5. Personal Safety 9. A moment of...
... inattention while operating power tools may result in unexpected situations. 14. Remove adjusting keys or wrenches before using. Use the correct tool for appropriate conditions. Use only accessories that have the tool serviced before turning the tool on invites accidents. 12. Do not expose power tools to a stable platform. Be sure switch is unstable and may affect the tools operation. Always wear eye protection. Use clamps or other untrained persons. 5. Personal Safety 9. A moment of...
Owners Manual
Page 4
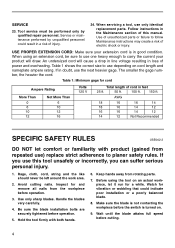
... the switch is in the Maintenance section of power and overheating. Make sure the blade is not contacting the workpiece before operation. 3. Wait until the blade attains full speed before operation. 5. Follow instructions in good condition. When using the tool on cord length and nameplate ampere rating. Table 1: Minimum gage for vibration or wobbling that could result in doubt, use only identical replacement parts. Avoid cutting nails. Handle the blades...
... the switch is in the Maintenance section of power and overheating. Make sure the blade is not contacting the workpiece before operation. 3. Wait until the blade attains full speed before operation. 5. Follow instructions in good condition. When using the tool on cord length and nameplate ampere rating. Table 1: Minimum gage for vibration or wobbling that could result in doubt, use only identical replacement parts. Avoid cutting nails. Handle the blades...
Owners Manual
Page 5
10. Chute may be toxic. Operate the tool only when hand-held. 14. Wait for tool. Use only Makita blades specified in this manual. 18. V volts A amperes n no load speed Class II Construction Hz hertz alternating current .../min revolutions or reciprocation per minute 5 Clean out chips with the front base up on the drum, otherwise the resulting imbalance will cause vibration and shorten...
10. Chute may be toxic. Operate the tool only when hand-held. 14. Wait for tool. Use only Makita blades specified in this manual. 18. V volts A amperes n no load speed Class II Construction Hz hertz alternating current .../min revolutions or reciprocation per minute 5 Clean out chips with the front base up on the drum, otherwise the resulting imbalance will cause vibration and shorten...
Owners Manual
Page 6
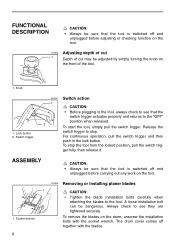
... the tool. 001603 Adjusting depth of cut 1 Depth of cut may be adjusted by simply turning the knob on the tool. 1. Knob 1. Lock button 2. To stop . Release the switch trigger to the tool. For continuous operation, pull the switch trigger and then push in the tool, always check to the "OFF" position when released. 2 To start the tool, simply pull the switch trigger. Socket wrench 6 001605 Removing or installing planer blades 1 CAUTION: • Tighten the blade installation bolts carefully when attaching the blades to stop the tool...
... the tool. 001603 Adjusting depth of cut 1 Depth of cut may be adjusted by simply turning the knob on the tool. 1. Knob 1. Lock button 2. To stop . Release the switch trigger to the tool. For continuous operation, pull the switch trigger and then push in the tool, always check to the "OFF" position when released. 2 To start the tool, simply pull the switch trigger. Socket wrench 6 001605 Removing or installing planer blades 1 CAUTION: • Tighten the blade installation bolts carefully when attaching the blades to stop the tool...
Owners Manual
Page 7
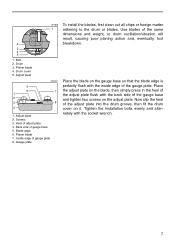
... drum cover on the adjust plate. Screws 3. 001606 1 2 3 4 5 1. Planer blade 4. Adjust plate 5 6 1 2 3 4 001607 7 8 1. Adjust plate 2. Back side of adjust plate 4. Use blades of gauge plate 8. Now slip the heel of the gauge plate. Blade edge 6. Place the blade on the gauge base so that the blade edge is perfectly flush with the socket wrench. 7 Drum 3. Inside edge of the same dimensions and weight, or drum oscillation/vibration will result, causing poor planing action and, eventually, tool breakdown. Bolt 2.
... drum cover on the adjust plate. Screws 3. 001606 1 2 3 4 5 1. Planer blade 4. Adjust plate 5 6 1 2 3 4 001607 7 8 1. Adjust plate 2. Back side of adjust plate 4. Use blades of gauge plate 8. Now slip the heel of the gauge plate. Blade edge 6. Place the blade on the gauge base so that the blade edge is perfectly flush with the socket wrench. 7 Drum 3. Inside edge of the same dimensions and weight, or drum oscillation/vibration will result, causing poor planing action and, eventually, tool breakdown. Bolt 2.
Owners Manual
Page 8
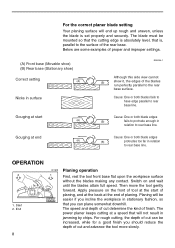
... of the rear base. Switch on the front of tool at the start of planing, and at the back at start Cause: One or both blades fails to have edge parallel to the rear base surface. The speed and depth of cut and advance the tool more slowly. The blade must be mounted so that the cutting edge is absolutely level, that is set properly and securely...
... of the rear base. Switch on the front of tool at the start of planing, and at the back at start Cause: One or both blades fails to have edge parallel to the rear base surface. The speed and depth of cut and advance the tool more slowly. The blade must be mounted so that the cutting edge is absolutely level, that is set properly and securely...
Owners Manual
Page 9
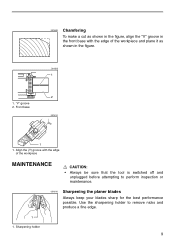
... 1 1. Use the sharpening holder to perform inspection or maintenance. 001610 Sharpening the planer blades Always keep your blades sharp for the best performance possible. "V" groove 2. Sharpening holder 9 001609 Chamfering To make a cut as shown in the front base with the edge of the workpiece MAINTENANCE CAUTION: • Always be sure that the tool is switched off and unplugged before attempting to remove nicks...
... 1 1. Use the sharpening holder to perform inspection or maintenance. 001610 Sharpening the planer blades Always keep your blades sharp for the best performance possible. "V" groove 2. Sharpening holder 9 001609 Chamfering To make a cut as shown in the front base with the edge of the workpiece MAINTENANCE CAUTION: • Always be sure that the tool is switched off and unplugged before attempting to remove nicks...
Owners Manual
Page 10
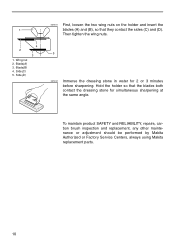
... (B), so that the blades both contact the dressing stone for 2 or 3 minutes before sharpening. To maintain product SAFETY and RELIABILITY, repairs, carbon brush inspection and replacement, any other maintenance or adjustment should be performed by Makita Authorized or Factory Service Centers, always using Makita replacement parts. 10 Then tighten the wing nuts. 5 001612 Immerse the dressing stone in water for simultaneous sharpening at the same angle. Wing nut 2. Blade(B) 4. 1 4 2 3 1. Blade(A) 3.
... (B), so that the blades both contact the dressing stone for 2 or 3 minutes before sharpening. To maintain product SAFETY and RELIABILITY, repairs, carbon brush inspection and replacement, any other maintenance or adjustment should be performed by Makita Authorized or Factory Service Centers, always using Makita replacement parts. 10 Then tighten the wing nuts. 5 001612 Immerse the dressing stone in water for simultaneous sharpening at the same angle. Wing nut 2. Blade(B) 4. 1 4 2 3 1. Blade(A) 3.
Owners Manual
Page 11
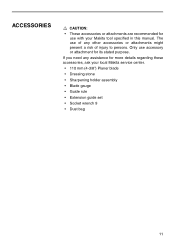
... manual. If you need any other accessories or attachments might present a risk of injury to persons. The use of any assistance for its stated purpose. ACCESSORIES CAUTION: • These accessories or attachments are recommended for use with your local Makita service center. • 110 mm (4-3/8") Planer blade • Dressing stone • Sharpening holder assembly • Blade gauge • Guide rule • Extension guide set • Socket wrench 9 • Dust...
... manual. If you need any other accessories or attachments might present a risk of injury to persons. The use of any assistance for its stated purpose. ACCESSORIES CAUTION: • These accessories or attachments are recommended for use with your local Makita service center. • 110 mm (4-3/8") Planer blade • Dressing stone • Sharpening holder assembly • Blade gauge • Guide rule • Extension guide set • Socket wrench 9 • Dust...

Owners Manual
Page 13
Fold 13 Cut Makita U.S.A., Inc. 14930 Northam Street La Mirada, CA 90638-5753 First-Class Postage Required Post Office will not deliver without proper postage.
Fold 13 Cut Makita U.S.A., Inc. 14930 Northam Street La Mirada, CA 90638-5753 First-Class Postage Required Post Office will not deliver without proper postage.
Owners Manual
Page 14
... DATE PURCHASED MONTH DAY YEAR MODEL NO. INTL. MAIL THIS PORTION Your answers to the following questions are : Design Features Size Price Makita Brand Repair Service Durability Power Other ( ) 5. Most favored points are appreciated. 1. SERIAL NO. LAST NAME / COMPANY NAME STREET ADRESS CITY STATE ZIP CODE PHONE STATUS Married Single SEX MF AREA CODE AGE: Under 19 20-29...
... DATE PURCHASED MONTH DAY YEAR MODEL NO. INTL. MAIL THIS PORTION Your answers to the following questions are : Design Features Size Price Makita Brand Repair Service Durability Power Other ( ) 5. Most favored points are appreciated. 1. SERIAL NO. LAST NAME / COMPANY NAME STREET ADRESS CITY STATE ZIP CODE PHONE STATUS Married Single SEX MF AREA CODE AGE: Under 19 20-29...

Owners Manual
Page 15
...) to one of the Makita Factory Service Centers listed, or to the outside of the carton detailing the problem with your tool. La Mirada, CA 90638-5753 (714) 522-8088 1970 Fulton Avenue Sacramento, CA 95825 (916) 482-5197 7674 Clairemont Mesa Blvd. Serial No. 15 San Diego, CA 92111 (858) 278-4471 16735 Saticoy St...-3100 MARYLAND 7397 Washington Boulevard, Suite 104 Elkridge, MD 21075 (410) 796-4401 MASSACHUSETTS 232 Providence Hwy. Be sure to attach a letter to an Authorized Makita Service Center. Date Purchased Dealer's Name & Address Model No.
...) to one of the Makita Factory Service Centers listed, or to the outside of the carton detailing the problem with your tool. La Mirada, CA 90638-5753 (714) 522-8088 1970 Fulton Avenue Sacramento, CA 95825 (916) 482-5197 7674 Clairemont Mesa Blvd. Serial No. 15 San Diego, CA 92111 (858) 278-4471 16735 Saticoy St...-3100 MARYLAND 7397 Washington Boulevard, Suite 104 Elkridge, MD 21075 (410) 796-4401 MASSACHUSETTS 232 Providence Hwy. Be sure to attach a letter to an Authorized Makita Service Center. Date Purchased Dealer's Name & Address Model No.

Owners Manual
Page 16
...Makita will repair (or at our option, replace) without charge. IN NO EVENT SHALL MAKITA BE LIABLE FOR ANY INDIRECT, INCIDENTAL OR CONSEQUENTIAL DAMAGES FROM THE SALE OR USE OF THE PRODUCT. MAKITA DISCLAIMS LIABILITY FOR ANY IMPLIED WARRANTIES, INCLUDING IMPLIED WARRANTIES OF "MERCHANTABILITY" AND "FITNESS FOR A SPECIFIC... designed to the tool. MAKITA LIMITED ONE YEAR WARRANTY Warranty Policy Every Makita tool is warranted to one of Makita's Factory or Authorized Service Centers. WARNING Some dust created by power sanding, sawing, grinding, drilling, and other construction...
...Makita will repair (or at our option, replace) without charge. IN NO EVENT SHALL MAKITA BE LIABLE FOR ANY INDIRECT, INCIDENTAL OR CONSEQUENTIAL DAMAGES FROM THE SALE OR USE OF THE PRODUCT. MAKITA DISCLAIMS LIABILITY FOR ANY IMPLIED WARRANTIES, INCLUDING IMPLIED WARRANTIES OF "MERCHANTABILITY" AND "FITNESS FOR A SPECIFIC... designed to the tool. MAKITA LIMITED ONE YEAR WARRANTY Warranty Policy Every Makita tool is warranted to one of Makita's Factory or Authorized Service Centers. WARNING Some dust created by power sanding, sawing, grinding, drilling, and other construction...

Parts Breakdown
Page 2
... POWER SUPPLY CORD, JN1601 CORD (2X18X8 SJT), 3621 SWITCH,JN3200 HANDLE COVER, 1912B P.H. WASHER, JN3200 ARMATURE, 1912B FAN 68 DUST SEAL 10, 2711 B. SCREW M4X14, N9501B V-PULLEY 4-38, 1912B B. SCREW M4X40, 6905B P.H. SCREW M5X18, GA7911 P.H. SCREW M4X28, JR3000V P.H. SCREW M4X14, N9501B REAR COVER COMPLETE, 1912B KNOB 50, 1912B F. SPRING 18, 1912B RUBBER PACKING, 1912B FRONT BASE, 1912B P.H. SCREW M5X70 5014NB RETAINER, JR3000V INS. BEARING 6200LLB, BO4552 BRACKET, 1912B, (TYPE 2) P.H. SCREW M4X40, 6905B NAME PLATE, 1912B NAME PLATE 1912B RIVET 0-5, HM1500 BRUSH HOLDER...
... POWER SUPPLY CORD, JN1601 CORD (2X18X8 SJT), 3621 SWITCH,JN3200 HANDLE COVER, 1912B P.H. WASHER, JN3200 ARMATURE, 1912B FAN 68 DUST SEAL 10, 2711 B. SCREW M4X14, N9501B V-PULLEY 4-38, 1912B B. SCREW M4X40, 6905B P.H. SCREW M5X18, GA7911 P.H. SCREW M4X28, JR3000V P.H. SCREW M4X14, N9501B REAR COVER COMPLETE, 1912B KNOB 50, 1912B F. SPRING 18, 1912B RUBBER PACKING, 1912B FRONT BASE, 1912B P.H. SCREW M5X70 5014NB RETAINER, JR3000V INS. BEARING 6200LLB, BO4552 BRACKET, 1912B, (TYPE 2) P.H. SCREW M4X40, 6905B NAME PLATE, 1912B NAME PLATE 1912B RIVET 0-5, HM1500 BRUSH HOLDER...


