User manual, English (US)
Page 1
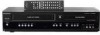
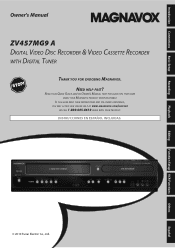
.... Introduction Connections Basic Setup Recording Playback Owner's Manual ZV457MG9 A DIGITAL VIDEO DISC RECORDER & VIDEO CASSETTE RECORDER WITH DIGITAL TUNER THANK YOU FOR CHOOSING MAGNAVOX. READ YOUR QUICK GUIDE AND/OR OWNER'S MANUAL FIRST FOR QUICK TIPS THAT MAKE USING YOUR MAGNAVOX PRODUCT MORE ENJOYABLE. Editing Function Setup VCR Functions Others Español IF YOU HAVE...
.... Introduction Connections Basic Setup Recording Playback Owner's Manual ZV457MG9 A DIGITAL VIDEO DISC RECORDER & VIDEO CASSETTE RECORDER WITH DIGITAL TUNER THANK YOU FOR CHOOSING MAGNAVOX. READ YOUR QUICK GUIDE AND/OR OWNER'S MANUAL FIRST FOR QUICK TIPS THAT MAKE USING YOUR MAGNAVOX PRODUCT MORE ENJOYABLE. Editing Function Setup VCR Functions Others Español IF YOU HAVE...

User manual, English (US)
Page 2
... provided plug does not fit into your safety. When a cart is intended to alert the user to provide reasonable protection against harmful interference in the manual. CAUTION RISK OF ELECTRIC SHOCK DO NOT OPEN CAUTION: TO REDUCE THE RISK OF ELECTRIC SHOCK, DO NOT REMOVE COVER (OR BACK). The exclamation point...
... provided plug does not fit into your safety. When a cart is intended to alert the user to provide reasonable protection against harmful interference in the manual. CAUTION RISK OF ELECTRIC SHOCK DO NOT OPEN CAUTION: TO REDUCE THE RISK OF ELECTRIC SHOCK, DO NOT REMOVE COVER (OR BACK). The exclamation point...

User manual, English (US)
Page 4
...detergent solution. Cleaning the disc lens • If this unit still does not perform properly although you can cause this owner's manual, the laser optical pickup unit may become blurred or interrupted while the TV program reception is working. 4 EN Auto head cleaning...Supplied Accessories remote control (NB884UD) with batteries AA(1.5 V)x2 RF coaxial cable (WPZ0901TM005/WPZ0901TM002) RCA audio/video cables (WPZ0102TM018/WPZ0102LTE01) owner's manual (1VMN26713A) quick guide (1VMN26714) Cleaning discs • When a disc becomes dirty, clean it is not used. If a video head ...
...detergent solution. Cleaning the disc lens • If this unit still does not perform properly although you can cause this owner's manual, the laser optical pickup unit may become blurred or interrupted while the TV program reception is working. 4 EN Auto head cleaning...Supplied Accessories remote control (NB884UD) with batteries AA(1.5 V)x2 RF coaxial cable (WPZ0901TM005/WPZ0901TM002) RCA audio/video cables (WPZ0102TM018/WPZ0102LTE01) owner's manual (1VMN26713A) quick guide (1VMN26714) Cleaning discs • When a disc becomes dirty, clean it is not used. If a video head ...
User manual, English (US)
Page 5
... high-quality video with actual recordable DVD discs. with the design is a registered trademark of Funai. All other content in this manual is strictly prohibited. Dolby Digital Recording "Dolby® Digital Recording enables consumers to change without the express prior written consent of the... is trademark of the law. DVDs created using Dolby Digital Recording will play back on each DVD. Recording Playback Editing Function Setup VCR Functions Others © 2010 Funai Electric Co., Ltd. Furthermore, any person or organization of PCM recording, also saves recordable disc space...
... high-quality video with actual recordable DVD discs. with the design is a registered trademark of Funai. All other content in this manual is strictly prohibited. Dolby Digital Recording "Dolby® Digital Recording enables consumers to change without the express prior written consent of the... is trademark of the law. DVDs created using Dolby Digital Recording will play back on each DVD. Recording Playback Editing Function Setup VCR Functions Others © 2010 Funai Electric Co., Ltd. Furthermore, any person or organization of PCM recording, also saves recordable disc space...
User manual, English (US)
Page 6
...Setup BEFORE YOU START 22 Finding the Viewing Channel on Your TV 22 Guide to On-Screen Display / Menu 23 Main Menu 25 Switching DVD / VCR Mode 26 How to Insert a Disc / Cassette Tape 26 INITIAL SETTING 27 CHANNEL SETTING 28 Auto Channel Scan 28 Adding / Deleting Channels 29 ...SETTING THE CLOCK 30 Auto Clock Setting 30 Manual Clock Setting 32 Daylight Saving Time 32 TUNER SETTINGS 33 Switching Analog Mode / Digital Mode 33 Channel Selection 33 Selecting TV Audio 34 DTV ...
...Setup BEFORE YOU START 22 Finding the Viewing Channel on Your TV 22 Guide to On-Screen Display / Menu 23 Main Menu 25 Switching DVD / VCR Mode 26 How to Insert a Disc / Cassette Tape 26 INITIAL SETTING 27 CHANNEL SETTING 28 Auto Channel Scan 28 Adding / Deleting Channels 29 ...SETTING THE CLOCK 30 Auto Clock Setting 30 Manual Clock Setting 32 Daylight Saving Time 32 TUNER SETTINGS 33 Switching Analog Mode / Digital Mode 33 Channel Selection 33 Selecting TV Audio 34 DTV ...
User manual, English (US)
Page 9
EN 9 Editing Function Setup VCR Functions Others Español Symbol Description For Recording, Playing Back, and Editing Description refers to DVD+RW Description refers to DVD+R Description refers to ... Symbols Used in the mode other than +VR is applicable to all contents in the disc (refer to page 80). * DVD-R recorded in this Owner's Manual To specify for what disc type each function is, we put the following symbols at the beginning of the symbols listed above under the function...
EN 9 Editing Function Setup VCR Functions Others Español Symbol Description For Recording, Playing Back, and Editing Description refers to DVD+RW Description refers to DVD+R Description refers to ... Symbols Used in the mode other than +VR is applicable to all contents in the disc (refer to page 80). * DVD-R recorded in this Owner's Manual To specify for what disc type each function is, we put the following symbols at the beginning of the symbols listed above under the function...
User manual, English (US)
Page 22
...turn on the unit. 2 Turn on your TV. • If connected to step 2 in standby mode before proceeding. 3 Press "2" on your TV's user manual for the recorder. • For some TVs, there may see "Initial Setup" menu. Note • Video input selection varies for Setup display. Finding the Viewing... Channel on Your TV 1 After you may be labeled "SOURCE", "AV", or "SELECT". MAGNAVOX screen saver: 4 Proceed to your VCR make sure it repeatedly. In such case, press it is switched off or in "INITIAL SETTING" on page 27. It may be ...
...turn on the unit. 2 Turn on your TV. • If connected to step 2 in standby mode before proceeding. 3 Press "2" on your TV's user manual for the recorder. • For some TVs, there may see "Initial Setup" menu. Note • Video input selection varies for Setup display. Finding the Viewing... Channel on Your TV 1 After you may be labeled "SOURCE", "AV", or "SELECT". MAGNAVOX screen saver: 4 Proceed to your VCR make sure it repeatedly. In such case, press it is switched off or in "INITIAL SETTING" on page 27. It may be ...

User manual, English (US)
Page 27
... Digital) Auto Preset will start getting channels available in analog TV and digital TV are automatically scanned and memorized. Only the receivable channels in "Manual Clock Setting" on page 22 to display "Initial Setup" menu. 2 Use [K / L] to select your area, clock setting will automatically be... performed and the correct clock will be displayed following the channel preset procedure. EN 27 Editing Function Setup VCR Functions Others Español Then proceed to step 5 in the area will be memorized. Initial Setup OSD Language English Fran...
... Digital) Auto Preset will start getting channels available in analog TV and digital TV are automatically scanned and memorized. Only the receivable channels in "Manual Clock Setting" on page 22 to display "Initial Setup" menu. 2 Use [K / L] to select your area, clock setting will automatically be... performed and the correct clock will be displayed following the channel preset procedure. EN 27 Editing Function Setup VCR Functions Others Español Then proceed to step 5 in the area will be memorized. Initial Setup OSD Language English Fran...

User manual, English (US)
Page 29
... channels, go to 5 DIGITAL to continue. DIGITAL 5 Select the channel number to delete. • Only the major channel is displayed in "Manual Channel Preset" menu. (The channel number displayed in the parenthesis is a virtual channel number) • Use [CHANNEL / ] to cycle through... 6 Use [K / L] to select "Delete", then press [OK]. CH 2 Add Delete Your setting will be activated. Editing Function Setup VCR Functions Others Español EN 29 Introduction Connections Basic Setup Recording Playback CHANNEL SETTING Adding / Deleting Channels You may want to add/delete channels...
... channels, go to 5 DIGITAL to continue. DIGITAL 5 Select the channel number to delete. • Only the major channel is displayed in "Manual Channel Preset" menu. (The channel number displayed in the parenthesis is a virtual channel number) • Use [CHANNEL / ] to cycle through... 6 Use [K / L] to select "Delete", then press [OK]. CH 2 Add Delete Your setting will be activated. Editing Function Setup VCR Functions Others Español EN 29 Introduction Connections Basic Setup Recording Playback CHANNEL SETTING Adding / Deleting Channels You may want to add/delete channels...

User manual, English (US)
Page 30
... [OK]. 2 Use [the Number buttons] or [K / L] to select "Auto", then press [OK]. Set Channel No. If not, follow "Auto Clock Setting" below . 1 Select "Manual" at 12:00 am & 12:00 pm when unit is in the standby mode. This unit will search for auto clock setting. • For analog... in standby mode. "General Setting" menu will appear. 3 Use [K / L] to select "Auto Clock Setting", then press [OK]. 4 Use [K / L] to enter your area, follow "Manual Clock Setting" on page 32. Check the time after you connect the antenna/cable signal and plug in the power cord. • Only the Analog...
... [OK]. 2 Use [the Number buttons] or [K / L] to select "Auto", then press [OK]. Set Channel No. If not, follow "Auto Clock Setting" below . 1 Select "Manual" at 12:00 am & 12:00 pm when unit is in the standby mode. This unit will search for auto clock setting. • For analog... in standby mode. "General Setting" menu will appear. 3 Use [K / L] to select "Auto Clock Setting", then press [OK]. 4 Use [K / L] to enter your area, follow "Manual Clock Setting" on page 32. Check the time after you connect the antenna/cable signal and plug in the power cord. • Only the Analog...

User manual, English (US)
Page 31
...the Auto Clock was set, if it is incorrect time then set , the unit receives the clock data at step 4 and try "Manual Clock Setting" on page 32. EN 31 Español Time Zone Atlantic Eastern Central Mountain Pacific Alaska Hawaii Note for auto clock setting... hours Pacific GMT (Greenwich Mean Time ) - 8 hours Alaska GMT (Greenwich Mean Time ) - 9 hours Hawaii GMT (Greenwich Mean Time ) - 10 hours Editing Function Setup VCR Functions Others 8 Press [SETUP] to exit and turn the unit to "OFF" in standby mode. This unit will appear. 3 Use [K / L] to select "Auto Clock ...
...the Auto Clock was set, if it is incorrect time then set , the unit receives the clock data at step 4 and try "Manual Clock Setting" on page 32. EN 31 Español Time Zone Atlantic Eastern Central Mountain Pacific Alaska Hawaii Note for auto clock setting... hours Pacific GMT (Greenwich Mean Time ) - 8 hours Alaska GMT (Greenwich Mean Time ) - 9 hours Hawaii GMT (Greenwich Mean Time ) - 10 hours Editing Function Setup VCR Functions Others 8 Press [SETUP] to exit and turn the unit to "OFF" in standby mode. This unit will appear. 3 Use [K / L] to select "Auto Clock ...

User manual, English (US)
Page 32
... Use [K / L] to suit your preference, then press [OK] when you finish setting all the contents. The clock starts counting when you set the clock manually. • For setting the day, year, hour, and minute, [the Number buttons] can set , and use [K / L] to select the contents to... select "ON (MAR NOV)", "ON (APR - ON (APR - SETTING THE CLOCK Manual Clock Setting Daylight Saving Time 1 Press [SETUP] and use [K / L] to select "General Setting", then press [OK]. Clock Setting JAN / 01 / 2009 ( THU )...
... Use [K / L] to suit your preference, then press [OK] when you finish setting all the contents. The clock starts counting when you set the clock manually. • For setting the day, year, hour, and minute, [the Number buttons] can set , and use [K / L] to select the contents to... select "ON (MAR NOV)", "ON (APR - ON (APR - SETTING THE CLOCK Manual Clock Setting Daylight Saving Time 1 Press [SETUP] and use [K / L] to select "General Setting", then press [OK]. Clock Setting JAN / 01 / 2009 ( THU )...

User manual, English (US)
Page 33
...a channel you want to watch . By using [CHANNEL / ] or [the Number buttons] found on remote control. [CHANNEL / ] Use [CHANNEL / ] to change manually by using [CHANNEL / ] Note • It may take up to 5 to 7 seconds to switch the digital TV channels. • In digital TV broadcasting, 2 ...enter 1 digit for major channel and leave it for 2 seconds. Channel Selection Select channels by a single network. Playback Editing Function Setup VCR Functions Others Español EN 33 What is no minor channel input, lowest minor channel of the major channel will be displayed. ...
...a channel you want to watch . By using [CHANNEL / ] or [the Number buttons] found on remote control. [CHANNEL / ] Use [CHANNEL / ] to change manually by using [CHANNEL / ] Note • It may take up to 5 to 7 seconds to switch the digital TV channels. • In digital TV broadcasting, 2 ...enter 1 digit for major channel and leave it for 2 seconds. Channel Selection Select channels by a single network. Playback Editing Function Setup VCR Functions Others Español EN 33 What is no minor channel input, lowest minor channel of the major channel will be displayed. ...
User manual, English (US)
Page 43
... be made on both DVD and VCR. • You cannot make sure to • Set the clock before setting a timer programming. • Insert a recordable disc with the step 5 in "Manual Clock Setting" on page 32 before setting a timer programming. • Use [s / B] to move the cursor to... length of the recording 4 Timer program list 5 Total number of pages and current page (2 pages maximum) 6 Recording media (" " (DVD) or " " (VCR)) 1 Press [TIMER]. 2 Use [K / L] to change as follows. If their recording channels are also available. e.g.) January 1st SUN JAN/31 EN 43 Function Setup...
... be made on both DVD and VCR. • You cannot make sure to • Set the clock before setting a timer programming. • Insert a recordable disc with the step 5 in "Manual Clock Setting" on page 32 before setting a timer programming. • Use [s / B] to move the cursor to... length of the recording 4 Timer program list 5 Total number of pages and current page (2 pages maximum) 6 Recording media (" " (DVD) or " " (VCR)) 1 Press [TIMER]. 2 Use [K / L] to change as follows. If their recording channels are also available. e.g.) January 1st SUN JAN/31 EN 43 Function Setup...
User manual, English (US)
Page 84
...Page 55 OFF End of Timer Rec ON OFF Dubbing Mode Pages 51-52 VCR DVD DVD VCR General Setting Make Recording Compatible ON Page 40 OFF Clock Clock Setting Pages 31-32 Auto Clock Setting OFF Auto Manual Daylight Saving Time ON(MAR-NOV) ON(APR-OCT) OFF Channel Auto ...Channel Preset Pages 28-30 Antenna Cable (Analog) Cable (Analog / Digital) Manual Channel Preset TV Audio...
...Page 55 OFF End of Timer Rec ON OFF Dubbing Mode Pages 51-52 VCR DVD DVD VCR General Setting Make Recording Compatible ON Page 40 OFF Clock Clock Setting Pages 31-32 Auto Clock Setting OFF Auto Manual Daylight Saving Time ON(MAR-NOV) ON(APR-OCT) OFF Channel Auto ...Channel Preset Pages 28-30 Antenna Cable (Analog) Cable (Analog / Digital) Manual Channel Preset TV Audio...
User manual, English (US)
Page 94
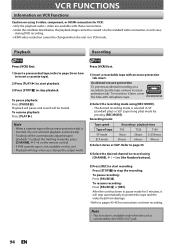
... Information on VCR Functions Caution on using S-video, component, or HDMI connection for 5 minutes, it later, cover the hole with cellophane tape. To pause playback: Press [PAUSE F]. To adjust the tracking manually, press [CHANNEL / ] on the remote control. • S-VHS cassette tape is inserted, the unit will stop the recording. protection tab...
... Information on VCR Functions Caution on using S-video, component, or HDMI connection for 5 minutes, it later, cover the hole with cellophane tape. To pause playback: Press [PAUSE F]. To adjust the tracking manually, press [CHANNEL / ] on the remote control. • S-VHS cassette tape is inserted, the unit will stop the recording. protection tab...
User manual, English (US)
Page 97
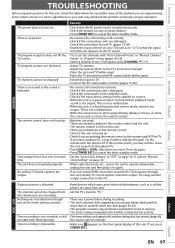
...• Disc space was a power failure during recording. • The unit's internal clock stopped due to "OFF" on page 30-31 and try "Manual Clock Setting" on . • Check if you are using another setting that lasted for a possible cause of any TV program using [CHANNEL / ]. ...." Timer recording is not output. The remote control does not function. No analog TV closed caption cannot be output. Editing Function Setup VCR Functions Others Español EN 97 TV program pictures are recording. The channel cannot be changed from the plasma TV. • Press...
...• Disc space was a power failure during recording. • The unit's internal clock stopped due to "OFF" on page 30-31 and try "Manual Clock Setting" on . • Check if you are using another setting that lasted for a possible cause of any TV program using [CHANNEL / ]. ...." Timer recording is not output. The remote control does not function. No analog TV closed caption cannot be output. Editing Function Setup VCR Functions Others Español EN 97 TV program pictures are recording. The channel cannot be changed from the plasma TV. • Press...
User manual, English (US)
Page 98
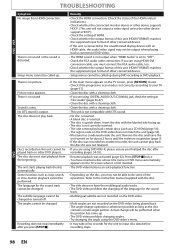
Remedy • Check the HDMI connection. (Check the status of the language for the unit to the instruction manual supplied with the labeled side facing up during DVD recording or DVD playback. There is no sound or the sound is distorted. The disc does ... may not be played back on the TV screen, press [RETURN] to "OFF". • Check the RCA audio cable connection. DVD 98 EN DVD • VCR TROUBLESHOOTING Symptom No image from the beginning. Actual change operation is first inserted. • The DVD-video features an auto playback function. • Depending on...
Remedy • Check the HDMI connection. (Check the status of the language for the unit to the instruction manual supplied with the labeled side facing up during DVD recording or DVD playback. There is no sound or the sound is distorted. The disc does ... may not be played back on the TV screen, press [RETURN] to "OFF". • Check the RCA audio cable connection. DVD 98 EN DVD • VCR TROUBLESHOOTING Symptom No image from the beginning. Actual change operation is first inserted. • The DVD-video features an auto playback function. • Depending on...


