
User manual, English (US)
Page 4
... spray intended for inspection and cleaning of the laser optical pickup unit. If infrared light appears through digital camera, the remote control is not used. If a streaky or snowy picture appears during playback, the video heads in your dealer or an ...an Authorized Service Center. Consult your unit may become blurred or interrupted while the TV program reception is clear. SAFETY INFORMATION Supplied Accessories remote control (NB884UD) with batteries AA(1.5 V)x2 RF coaxial cable (WPZ0901TM005/WPZ0901TM002) RCA audio/video cables (WPZ0102TM018/WPZ0102LTE01) owner's manual (...
... spray intended for inspection and cleaning of the laser optical pickup unit. If infrared light appears through digital camera, the remote control is not used. If a streaky or snowy picture appears during playback, the video heads in your dealer or an ...an Authorized Service Center. Consult your unit may become blurred or interrupted while the TV program reception is clear. SAFETY INFORMATION Supplied Accessories remote control (NB884UD) with batteries AA(1.5 V)x2 RF coaxial cable (WPZ0901TM005/WPZ0901TM002) RCA audio/video cables (WPZ0102TM018/WPZ0102LTE01) owner's manual (...
User manual, English (US)
Page 6
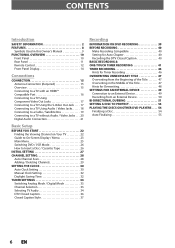
CONTENTS Introduction SAFETY INFORMATION 2 FEATURES 8 Symbols Used in this Owner's Manual 9 FUNCTIONAL OVERVIEW 10 Front Panel 10 Rear Panel 11 Remote Control 12 Front Panel Display 14 Connections CONNECTION 15 Antenna Connection (Required 15 Overview 15 Connecting to a TV with an HDMI™ Compatible Port... BEFORE YOU START 22 Finding the Viewing Channel on Your TV 22 Guide to On-Screen Display / Menu 23 Main Menu 25 Switching DVD / VCR Mode 26 How to Insert a Disc / Cassette Tape 26 INITIAL SETTING 27 CHANNEL SETTING 28 Auto Channel Scan 28 Adding / Deleting Channels 29...
CONTENTS Introduction SAFETY INFORMATION 2 FEATURES 8 Symbols Used in this Owner's Manual 9 FUNCTIONAL OVERVIEW 10 Front Panel 10 Rear Panel 11 Remote Control 12 Front Panel Display 14 Connections CONNECTION 15 Antenna Connection (Required 15 Overview 15 Connecting to a TV with an HDMI™ Compatible Port... BEFORE YOU START 22 Finding the Viewing Channel on Your TV 22 Guide to On-Screen Display / Menu 23 Main Menu 25 Switching DVD / VCR Mode 26 How to Insert a Disc / Cassette Tape 26 INITIAL SETTING 27 CHANNEL SETTING 28 Auto Channel Scan 28 Adding / Deleting Channels 29...
User manual, English (US)
Page 10
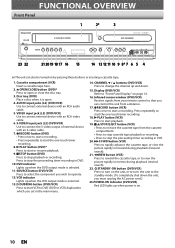
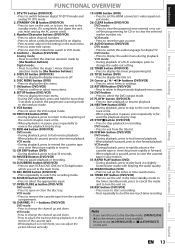
...Press to connect external device with an RCA audio cable. 5. CHANNEL L / K buttons (DVD/VCR) Press to change the channel up when power is selected. 11. Infrared sensor window (DVD/VCR) Receive signals from your remote control so that you must unplug the AC power cord.) 23.POWER-ON indicator (DVD...the main menu. 14. FUNCTIONAL OVERVIEW Front Panel 1 2* 3 ZV457MG9 23 22 21 2019 18 17 16 15 14 13 12 11 10 9 8* 7 6 5 4 (*) The unit can control the unit from a distance. 17. S-VIDEO input jack (L2) (DVD/VCR) Use to connect external device with an S-video cable. 7. ...
...Press to connect external device with an RCA audio cable. 5. CHANNEL L / K buttons (DVD/VCR) Press to change the channel up when power is selected. 11. Infrared sensor window (DVD/VCR) Receive signals from your remote control so that you must unplug the AC power cord.) 23.POWER-ON indicator (DVD...the main menu. 14. FUNCTIONAL OVERVIEW Front Panel 1 2* 3 ZV457MG9 23 22 21 2019 18 17 16 15 14 13 12 11 10 9 8* 7 6 5 4 (*) The unit can control the unit from a distance. 17. S-VIDEO input jack (L2) (DVD/VCR) Use to connect external device with an S-video cable. 7. ...

User manual, English (US)
Page 12
...use different kinds of batteries together. Please observe the following when using remote control for different devices can result in hazards such as follows. - FUNCTIONAL OVERVIEW Remote Control Installing the Batteries in the Remote Control Install the batteries (AAx2) matching the polarity indicated inside battery compartment ...in mind the following : • Do not mix new and old batteries together. • Do not use of the remote control. 1 Open the cover. 2 Insert batteries. Although they may look similar, different batteries may become unreliable if strong sunlight...
...use different kinds of batteries together. Please observe the following when using remote control for different devices can result in hazards such as follows. - FUNCTIONAL OVERVIEW Remote Control Installing the Batteries in the Remote Control Install the batteries (AAx2) matching the polarity indicated inside battery compartment ...in mind the following : • Do not mix new and old batteries together. • Do not use of the remote control. 1 Open the cover. 2 Insert batteries. Although they may look similar, different batteries may become unreliable if strong sunlight...
User manual, English (US)
Page 13
...the timer standby mode. TIMER SET button (DVD/VCR) • Press to select the appropriate input. 17. DISPLAY button (DVD/VCR) • Press to select the VCR output mode. 10. VCR button • Press to display the display menu on the remote control is paused, press to reverse the playback step... by [the Number buttons]. CM SKIP button (DVD) • During playback, press to open or close the disc tray. OPEN/CLOSE A button (DVD/VCR) DVD mode: • Press to skip ...
...the timer standby mode. TIMER SET button (DVD/VCR) • Press to select the appropriate input. 17. DISPLAY button (DVD/VCR) • Press to select the VCR output mode. 10. VCR button • Press to display the display menu on the remote control is paused, press to reverse the playback step... by [the Number buttons]. CM SKIP button (DVD) • During playback, press to open or close the disc tray. OPEN/CLOSE A button (DVD/VCR) DVD mode: • Press to skip ...
User manual, English (US)
Page 22
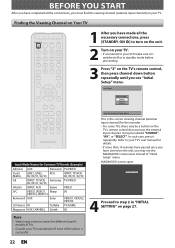
...TV. • If connected to your VCR make sure it repeatedly. This is successful. 22 EN It may be labeled "SOURCE", "AV", or "SELECT". MAGNAVOX screen saver: 4 Proceed to step 2 in standby mode before proceeding. 3 Press "2" on the TV's remote control that accesses the external input channel. Initial...LXI-Series 00 Toshiba TV/GAME Magnavox AUX CHANNEL Zenith 00 Select the language for the recorder. • For some TVs, there may be a button on the TV's remote control, then press channel down button repeatedly until you see the MAGNAVOX screen saver instead of the above...
...TV. • If connected to your VCR make sure it repeatedly. This is successful. 22 EN It may be labeled "SOURCE", "AV", or "SELECT". MAGNAVOX screen saver: 4 Proceed to step 2 in standby mode before proceeding. 3 Press "2" on the TV's remote control that accesses the external input channel. Initial...LXI-Series 00 Toshiba TV/GAME Magnavox AUX CHANNEL Zenith 00 Select the language for the recorder. • For some TVs, there may be a button on the TV's remote control, then press channel down button repeatedly until you see the MAGNAVOX screen saver instead of the above...
User manual, English (US)
Page 26
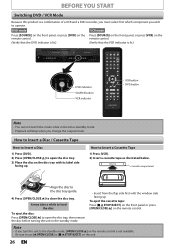
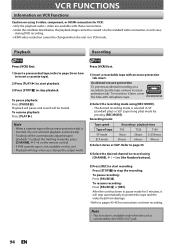
...To eject the cassette tape: Press [C ASTOP/EJECT] on the front panel or press [OPEN/CLOSE A] on the remote control. (Verify that the VCR indicator is a combination of a VCR and a DVD recorder, you must select first which component you change the output mode. Note • If you ...side facing up . Be sure to the standby mode, [OPEN/CLOSE A] on the remote control is lit.) Press [SOURCE] on the front panel, or press [VCR] on the remote control. How to Insert a Cassette Tape 1) Press [VCR]. 2) Insert a cassette tape as illustrated below. 4 HEAD HI-FI STEREO Cassette compartment...
...To eject the cassette tape: Press [C ASTOP/EJECT] on the front panel or press [OPEN/CLOSE A] on the remote control. (Verify that the VCR indicator is a combination of a VCR and a DVD recorder, you must select first which component you change the output mode. Note • If you ...side facing up . Be sure to the standby mode, [OPEN/CLOSE A] on the remote control is lit.) Press [SOURCE] on the front panel, or press [VCR] on the remote control. How to Insert a Cassette Tape 1) Press [VCR]. 2) Insert a cassette tape as illustrated below. 4 HEAD HI-FI STEREO Cassette compartment...

User manual, English (US)
Page 33
..., digital broadcasting far surpasses analog broadcasting in both its picture and sound quality. Playback Editing Function Setup VCR Functions Others Español EN 33 Introduction Connections Basic Setup Recording TUNER SETTINGS Switching Analog Mode / Digital...smallest CH CH4-3 CH4-1 CH4-2 smallest CH major channel minor channel : change automatically : change the channel. [the Number buttons] Press the channel number with the remote control. For 1-digit number e.g.) 2.2 ch: major channel [0] + [2] or [2] + [•] minor channel [0] + [2], [2] + [•] or [2] + ...
..., digital broadcasting far surpasses analog broadcasting in both its picture and sound quality. Playback Editing Function Setup VCR Functions Others Español EN 33 Introduction Connections Basic Setup Recording TUNER SETTINGS Switching Analog Mode / Digital...smallest CH CH4-3 CH4-1 CH4-2 smallest CH major channel minor channel : change automatically : change the channel. [the Number buttons] Press the channel number with the remote control. For 1-digit number e.g.) 2.2 ch: major channel [0] + [2] or [2] + [•] minor channel [0] + [2], [2] + [•] or [2] + ...
User manual, English (US)
Page 42
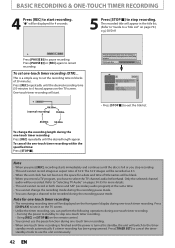
.... • Unlike the timer recording, you press [REC], recording starts immediately and continues until the desired recording time (30 minutes to 6 hours) appears on the remote control. • You cannot use the unit continuously. 42 EN Note • When you can change a channel to be recorded as aspect ratio of 16:9. Only...
.... • Unlike the timer recording, you press [REC], recording starts immediately and continues until the desired recording time (30 minutes to 6 hours) appears on the remote control. • You cannot use the unit continuously. 42 EN Note • When you can change a channel to be recorded as aspect ratio of 16:9. Only...
User manual, English (US)
Page 45
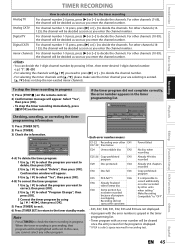
... 1) Press [STOP C ] on the unit. For other channels (10-99), the channel will appear. Recording Playback Editing Function Setup VCR Functions To stop the timer recording immediately, press [ CSTOP] on the remote control. 2) Confirmation message will be highlighted with an error number will be cleared once the entry screen for the program is...
... 1) Press [STOP C ] on the unit. For other channels (10-99), the channel will appear. Recording Playback Editing Function Setup VCR Functions To stop the timer recording immediately, press [ CSTOP] on the remote control. 2) Confirmation message will be highlighted with an error number will be cleared once the entry screen for the program is...
User manual, English (US)
Page 91
... with progressive scan (525p / 480p), you have a standard TV: Select "4:3 Letter Box", so that black bars appear on the unit or remote control within 15 seconds, then press [OK]. Activating progressive scan: Check your TV is compatible with the higher definition images than the traditional output system... [STOP C] if you are playing back or watching digital TV broadcasting with component video cable. Recording Playback Editing Function Setup VCR Functions NOTE : If there is no picture or picture is compatible with both sides trimmed when playing back wide-screen picture.
... with progressive scan (525p / 480p), you have a standard TV: Select "4:3 Letter Box", so that black bars appear on the unit or remote control within 15 seconds, then press [OK]. Activating progressive scan: Check your TV is compatible with the higher definition images than the traditional output system... [STOP C] if you are playing back or watching digital TV broadcasting with component video cable. Recording Playback Editing Function Setup VCR Functions NOTE : If there is no picture or picture is compatible with both sides trimmed when playing back wide-screen picture.
User manual, English (US)
Page 94
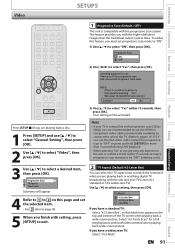
To adjust the tracking manually, press [CHANNEL / ] on the remote control. • S-VHS cassette tape is not available on a recorded cassette tape, remove its erase- erase-protection tab 2) Select the recording mode using [REC MODE]. • ... [CHANNEL / ] or [the Number buttons]. 5) Press [REC] to stop playback. Note • This function is available only when the unit is selected in VCR mode. Playback Recording Press [VCR] first. 1) Insert a prerecorded tape (refer to page 26 on how to insert a cassette tape). 2) Press [PLAY B] to start playback. 3) Press [STOP C] to ...
To adjust the tracking manually, press [CHANNEL / ] on the remote control. • S-VHS cassette tape is not available on a recorded cassette tape, remove its erase- erase-protection tab 2) Select the recording mode using [REC MODE]. • ... [CHANNEL / ] or [the Number buttons]. 5) Press [REC] to stop playback. Note • This function is available only when the unit is selected in VCR mode. Playback Recording Press [VCR] first. 1) Insert a prerecorded tape (refer to page 26 on how to insert a cassette tape). 2) Press [PLAY B] to start playback. 3) Press [STOP C] to ...

User manual, English (US)
Page 95
...is completed during the one -touch timer recording. After index search, the VCR will switch to the timer standby mode automatically if a timer recording has been programmed. Using [REC] or [STOP C] on the remote control. • When the one -touch timer recording is connected by the VIDEO... OUT jack. You can select a fixed recording time by following operations during DVD playback or recording, the VCR will turn to the standby mode automatically. CURRENT ...
...is completed during the one -touch timer recording. After index search, the VCR will switch to the timer standby mode automatically if a timer recording has been programmed. Using [REC] or [STOP C] on the remote control. • When the one -touch timer recording is connected by the VIDEO... OUT jack. You can select a fixed recording time by following operations during DVD playback or recording, the VCR will turn to the standby mode automatically. CURRENT ...

User manual, English (US)
Page 96
... tape is in stop mode, press [E] to rewind the cassette tape. If the picture is distorted or rolling vertically, adjust the vertical hold control on the remote control to select Hi-Fi or MONO for playback sound mode. • If you have connected a stereo TV to this unit, select "HIFI".... • If you playback a cassette tape recorded in Hi-Fi stereo: Press [AUDIO] on your desired time to start time search. Press [VCR] first. Time Search VCR...
... tape is in stop mode, press [E] to rewind the cassette tape. If the picture is distorted or rolling vertically, adjust the vertical hold control on the remote control to select Hi-Fi or MONO for playback sound mode. • If you have connected a stereo TV to this unit, select "HIFI".... • If you playback a cassette tape recorded in Hi-Fi stereo: Press [AUDIO] on your desired time to start time search. Press [VCR] first. Time Search VCR...
User manual, English (US)
Page 97
... • The program contains copy protection signals that has priority. If not, press [TIMER SET]. Editing Function Setup VCR Functions Others Español EN 97 The remote control does not function. No analog TV closed caption cannot be changed . This is not a malfunction. • While ... the screen saver is active, the audio is muted. • Batteries are weak. • There are obstacles between the remote control and the unit. • The remote control is far from the unit appears on . • Check if you set 's incorrect time. Try using another setting that restricts...
... • The program contains copy protection signals that has priority. If not, press [TIMER SET]. Editing Function Setup VCR Functions Others Español EN 97 The remote control does not function. No analog TV closed caption cannot be changed . This is not a malfunction. • While ... the screen saver is active, the audio is muted. • Batteries are weak. • There are obstacles between the remote control and the unit. • The remote control is far from the unit appears on . • Check if you set 's incorrect time. Try using another setting that restricts...

User manual, English (US)
Page 99
..., finalizing, formatting or editing (even after "Repairing" disappears), a repairing process will begin automatically just after turning the unit on again. The remote control does not function. • Check if a cassette tape is inserted. When selecting "Yes", the disc may take out the disc. After ...usable. The motor rotates even when playback / recording is stopped. • The motor may rotate for the duration of approximately 5 minutes for VCR may take a few seconds for better picture by pressing [CHANNEL / ] while you are playing back a cassette tape. This is a power ...
..., finalizing, formatting or editing (even after "Repairing" disappears), a repairing process will begin automatically just after turning the unit on again. The remote control does not function. • Check if a cassette tape is inserted. When selecting "Yes", the disc may take out the disc. After ...usable. The motor rotates even when playback / recording is stopped. • The motor may rotate for the duration of approximately 5 minutes for VCR may take a few seconds for better picture by pressing [CHANNEL / ] while you are playing back a cassette tape. This is a power ...

User manual, English (US)
Page 108
... warranty service, you for general service inquiries, please contact us at: FUNAI SERVICE CORPORATION Customer Service Tel: 1-800-605-8610 www.magnavox.com/support 2200 Spiegel Drive Groveport, OH 43125 Printed in the United States. LIMITED WARRANTY FUNAI CORP. THIS WARRANTY IS ONLY VALID ...RETAIL PURCHASER. This warranty is void and of God. THIS WARRANTY DOES NOT COVER PACKING MATERIALS, ANY ACCESSORIES (EXCEPT REMOTE CONTROL), ANY COSMETIC PARTS, COMPLETE ASSEMBLY PARTS, DEMO OR FLOOR MODELS. FUNAI CORP. will provide the labor without prior written approval.
... warranty service, you for general service inquiries, please contact us at: FUNAI SERVICE CORPORATION Customer Service Tel: 1-800-605-8610 www.magnavox.com/support 2200 Spiegel Drive Groveport, OH 43125 Printed in the United States. LIMITED WARRANTY FUNAI CORP. THIS WARRANTY IS ONLY VALID ...RETAIL PURCHASER. This warranty is void and of God. THIS WARRANTY DOES NOT COVER PACKING MATERIALS, ANY ACCESSORIES (EXCEPT REMOTE CONTROL), ANY COSMETIC PARTS, COMPLETE ASSEMBLY PARTS, DEMO OR FLOOR MODELS. FUNAI CORP. will provide the labor without prior written approval.


