User manual, English (US)
Page 1
.... © 2010 Funai Electric Co., Ltd. Editing Function Setup VCR Functions Others Español Introduction Connections Basic Setup Recording Playback Owner's Manual ZV457MG9 A DIGITAL VIDEO DISC RECORDER & VIDEO CASSETTE RECORDER WITH DIGITAL TUNER THANK YOU FOR CHOOSING MAGNAVOX. READ YOUR QUICK GUIDE AND/OR OWNER'S MANUAL FIRST FOR QUICK TIPS THAT MAKE USING YOUR...
.... © 2010 Funai Electric Co., Ltd. Editing Function Setup VCR Functions Others Español Introduction Connections Basic Setup Recording Playback Owner's Manual ZV457MG9 A DIGITAL VIDEO DISC RECORDER & VIDEO CASSETTE RECORDER WITH DIGITAL TUNER THANK YOU FOR CHOOSING MAGNAVOX. READ YOUR QUICK GUIDE AND/OR OWNER'S MANUAL FIRST FOR QUICK TIPS THAT MAKE USING YOUR...

User manual, English (US)
Page 2
... is used in use this equipment if an unauthorized change or modification is encouraged to try to provide reasonable protection against harmful interference in the manual. Cet appareil numérique de la classe B est conforme à la norme NMB-003 du Canada. REFER SERVICING TO QUALIFIED SERVICE PERSONNEL. Follow all...
... is used in use this equipment if an unauthorized change or modification is encouraged to try to provide reasonable protection against harmful interference in the manual. Cet appareil numérique de la classe B est conforme à la norme NMB-003 du Canada. REFER SERVICING TO QUALIFIED SERVICE PERSONNEL. Follow all...

User manual, English (US)
Page 4
...and to define the cause of cellular phone). If a streaky or snowy picture appears during playback, the video heads in this owner's manual, the laser optical pickup unit may be cleaned. 1. If a video head cleaner does not solve the problem, please consult your ...INFORMATION Supplied Accessories remote control (NB884UD) with batteries AA(1.5 V)x2 RF coaxial cable (WPZ0901TM005/WPZ0901TM002) RCA audio/video cables (WPZ0102TM018/WPZ0102LTE01) owner's manual (1VMN26713A) quick guide (1VMN26714) Cleaning discs • When a disc becomes dirty, clean it is not used. Wipe the disc from the ...
...and to define the cause of cellular phone). If a streaky or snowy picture appears during playback, the video heads in this owner's manual, the laser optical pickup unit may be cleaned. 1. If a video head cleaner does not solve the problem, please consult your ...INFORMATION Supplied Accessories remote control (NB884UD) with batteries AA(1.5 V)x2 RF coaxial cable (WPZ0901TM005/WPZ0901TM002) RCA audio/video cables (WPZ0102TM018/WPZ0102LTE01) owner's manual (1VMN26713A) quick guide (1VMN26714) Cleaning discs • When a disc becomes dirty, clean it is not used. Wipe the disc from the ...
User manual, English (US)
Page 5
... of such changes. Funai shall aggressively enforce its intellectual property rights to the fullest extent of this manual should be construed as granting, by implication or otherwise, any license or right to change without notice...manual is strictly prohibited. HDMI, the HDMI logo and High-Definition Multimedia Interface are compatible with stereo sound on recordable DVD discs. Furthermore, any revision hereto is strictly prohibited. All other content in any person or organization of their respective owners. EN 5 Español Recording Playback Editing Function Setup VCR...
... of such changes. Funai shall aggressively enforce its intellectual property rights to the fullest extent of this manual should be construed as granting, by implication or otherwise, any license or right to change without notice...manual is strictly prohibited. HDMI, the HDMI logo and High-Definition Multimedia Interface are compatible with stereo sound on recordable DVD discs. Furthermore, any revision hereto is strictly prohibited. All other content in any person or organization of their respective owners. EN 5 Español Recording Playback Editing Function Setup VCR...
User manual, English (US)
Page 6
...Setup BEFORE YOU START 22 Finding the Viewing Channel on Your TV 22 Guide to On-Screen Display / Menu 23 Main Menu 25 Switching DVD / VCR Mode 26 How to Insert a Disc / Cassette Tape 26 INITIAL SETTING 27 CHANNEL SETTING 28 Auto Channel Scan 28 Adding / Deleting Channels 29 ...SETTING THE CLOCK 30 Auto Clock Setting 30 Manual Clock Setting 32 Daylight Saving Time 32 TUNER SETTINGS 33 Switching Analog Mode / Digital Mode 33 Channel Selection 33 Selecting TV Audio 34 DTV ...
...Setup BEFORE YOU START 22 Finding the Viewing Channel on Your TV 22 Guide to On-Screen Display / Menu 23 Main Menu 25 Switching DVD / VCR Mode 26 How to Insert a Disc / Cassette Tape 26 INITIAL SETTING 27 CHANNEL SETTING 28 Auto Channel Scan 28 Adding / Deleting Channels 29 ...SETTING THE CLOCK 30 Auto Clock Setting 30 Manual Clock Setting 32 Daylight Saving Time 32 TUNER SETTINGS 33 Switching Analog Mode / Digital Mode 33 Channel Selection 33 Selecting TV Audio 34 DTV ...
User manual, English (US)
Page 9
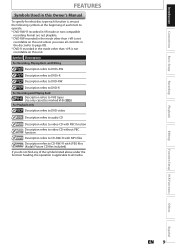
... VR mode or non compatible recording format are not playable. * DVD-RW recorded in the mode other than +VR is not recordable on this Owner's Manual To specify for what disc type each function is, we put the following symbols at the beginning of the symbols listed above under the function...
... VR mode or non compatible recording format are not playable. * DVD-RW recorded in the mode other than +VR is not recordable on this Owner's Manual To specify for what disc type each function is, we put the following symbols at the beginning of the symbols listed above under the function...
User manual, English (US)
Page 22
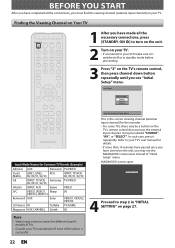
...Initial Setup" menu. This is the correct viewing channel (external input channel) for different brand's models of TVs. • Consult your TV. Refer to your VCR make sure it repeatedly. Finding the Viewing Channel on Your TV 1 After you have made all the connections, you must find the viewing channel (external...press it is switched off or in "INITIAL SETTING" on page 27. BEFORE YOU START After you have turned on the unit, you see the MAGNAVOX screen saver instead of the above is successful. 22 EN MAGNAVOX screen saver: 4 Proceed to your TV's user manual for Setup display.
...Initial Setup" menu. This is the correct viewing channel (external input channel) for different brand's models of TVs. • Consult your TV. Refer to your VCR make sure it repeatedly. Finding the Viewing Channel on Your TV 1 After you have made all the connections, you must find the viewing channel (external...press it is switched off or in "INITIAL SETTING" on page 27. BEFORE YOU START After you have turned on the unit, you see the MAGNAVOX screen saver instead of the above is successful. 22 EN MAGNAVOX screen saver: 4 Proceed to your TV's user manual for Setup display.

User manual, English (US)
Page 27
...then press [OK]. Initial setting is connected to select the type of broadcasting signal, then press [OK]. EN 27 Editing Function Setup VCR Functions Others Español The unit will start getting channels available in the area will scan all terrestrial channels. Cable (Analog / ...Digital): (When using basic cable) The channels broadcasted in "Manual Clock Setting" on page 32. Press [RETURN] to complete. Then proceed to step 5 in analog CATV and digital CATV are automatically scanned...
...then press [OK]. Initial setting is connected to select the type of broadcasting signal, then press [OK]. EN 27 Editing Function Setup VCR Functions Others Español The unit will start getting channels available in the area will scan all terrestrial channels. Cable (Analog / ...Digital): (When using basic cable) The channels broadcasted in "Manual Clock Setting" on page 32. Press [RETURN] to complete. Then proceed to step 5 in analog CATV and digital CATV are automatically scanned...

User manual, English (US)
Page 29
...or delete TV channels if your channel lineup changes or if you perform the auto channel preset again. 7 Press [SETUP] to activate "Manual Channel Preset". Introduction Connections Basic Setup Recording Playback CHANNEL SETTING Adding / Deleting Channels You may want to add/delete channels. 6 Use [K...is only available for the digital TV channel selection. • Use [the Number buttons] to select "General Setting", then press [OK]. Editing Function Setup VCR Functions Others Español EN 29 DTV 2 (CH - - - ) Add Delete Your setting will appear. 3 Use [K / L] to continue....
...or delete TV channels if your channel lineup changes or if you perform the auto channel preset again. 7 Press [SETUP] to activate "Manual Channel Preset". Introduction Connections Basic Setup Recording Playback CHANNEL SETTING Adding / Deleting Channels You may want to add/delete channels. 6 Use [K...is only available for the digital TV channel selection. • Use [the Number buttons] to select "General Setting", then press [OK]. Editing Function Setup VCR Functions Others Español EN 29 DTV 2 (CH - - - ) Add Delete Your setting will appear. 3 Use [K / L] to continue....

User manual, English (US)
Page 30
.../cable signal and plug in step 4 above , then press [OK]. 2 Use [the Number buttons] or [K / L] to the standby mode. Then try "Manual Clock Setting" on the broadcast information. If a PBS (public broadcasting station) channel is incorrect time then set the "Auto Clock Setting" to "OFF" in the... may be obtained depending on page 32. 30 EN 5 Press [SETUP] to exit. 6 Press [STANDBY-ON y] to turn the unit to enter your area, follow "Manual Clock Setting" on page 32. "Clock" menu will appear. 3 Use [K / L] to select "Auto Clock Setting", then press [OK]. 4 Use [K / L] to select "...
.../cable signal and plug in step 4 above , then press [OK]. 2 Use [the Number buttons] or [K / L] to the standby mode. Then try "Manual Clock Setting" on the broadcast information. If a PBS (public broadcasting station) channel is incorrect time then set the "Auto Clock Setting" to "OFF" in the... may be obtained depending on page 32. 30 EN 5 Press [SETUP] to exit. 6 Press [STANDBY-ON y] to turn the unit to enter your area, follow "Manual Clock Setting" on page 32. "Clock" menu will appear. 3 Use [K / L] to select "Auto Clock Setting", then press [OK]. 4 Use [K / L] to select "...

User manual, English (US)
Page 31
... receive the Clock Data, then press [OK]. 7 Use [K / L] to select "General Setting", then press [OK]. Auto Clock Setting OFF Auto Manual Enable Manual operation to select the DTV Channel for each time zone Atlantic GMT (Greenwich Mean Time ) - 4 hours Eastern GMT (Greenwich Mean Time ) - ... Mean Time ) - 8 hours Alaska GMT (Greenwich Mean Time ) - 9 hours Hawaii GMT (Greenwich Mean Time ) - 10 hours Editing Function Setup VCR Functions Others 8 Press [SETUP] to exit and turn the unit to "OFF" in the standby mode. Try digital auto clock setting in this unit receives...
... receive the Clock Data, then press [OK]. 7 Use [K / L] to select "General Setting", then press [OK]. Auto Clock Setting OFF Auto Manual Enable Manual operation to select the DTV Channel for each time zone Atlantic GMT (Greenwich Mean Time ) - 4 hours Eastern GMT (Greenwich Mean Time ) - ... Mean Time ) - 8 hours Alaska GMT (Greenwich Mean Time ) - 9 hours Hawaii GMT (Greenwich Mean Time ) - 10 hours Editing Function Setup VCR Functions Others 8 Press [SETUP] to exit and turn the unit to "OFF" in the standby mode. Try digital auto clock setting in this unit receives...

User manual, English (US)
Page 32
...2008 up to 2058. 32 EN Clock Setting JAN / 01 / 2009 ( THU ) 12 : 00 AM 5 Use [{ / B] to select an item to set the clock manually. • For setting the day, year, hour, and minute, [the Number buttons] can set the built-in October. 5 Press [SETUP] to exit. "ON (MAR -... the first Sunday in April and move back one hour on the first Sunday in order to fit the daylight saving time. SETTING THE CLOCK Manual Clock Setting Daylight Saving Time 1 Press [SETUP] and use [K / L] to select "General Setting", then press [OK]. "Clock" menu will appear. 3 Use [K / L] to select ...
...2008 up to 2058. 32 EN Clock Setting JAN / 01 / 2009 ( THU ) 12 : 00 AM 5 Use [{ / B] to select an item to set the clock manually. • For setting the day, year, hour, and minute, [the Number buttons] can set the built-in October. 5 Press [SETUP] to exit. "ON (MAR -... the first Sunday in April and move back one hour on the first Sunday in order to fit the daylight saving time. SETTING THE CLOCK Manual Clock Setting Daylight Saving Time 1 Press [SETUP] and use [K / L] to select "General Setting", then press [OK]. "Clock" menu will appear. 3 Use [K / L] to select ...

User manual, English (US)
Page 33
... e.g.) 12ch: [1] + [2] Enter the major and minor channel number with the remote control. Playback Editing Function Setup VCR Functions Others Español EN 33 Press [DTV/TV] on remote control. [CHANNEL / ] Use [CHANNEL / ] to change manually by using [CHANNEL / ] Note • It may take up to 5 to 7 seconds to switch the digital...
... e.g.) 12ch: [1] + [2] Enter the major and minor channel number with the remote control. Playback Editing Function Setup VCR Functions Others Español EN 33 Press [DTV/TV] on remote control. [CHANNEL / ] Use [CHANNEL / ] to change manually by using [CHANNEL / ] Note • It may take up to 5 to 7 seconds to switch the digital...
User manual, English (US)
Page 43
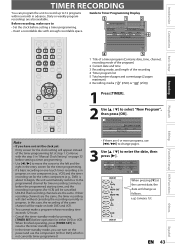
... You cannot make sure to • Set the clock before setting a timer programming. • Insert a recordable disc with the step 5 in "Manual Clock Setting" on page 32 before setting a timer programming. • Use [s / B] to move the cursor to the left and the right .... 1 Start - - : - If their recording channels are the same. REC To DVD End - - : - e.g.) January 1st SUN JAN/31 EN 43 Function Setup VCR Functions Others Español Continue with enough recordable space. Introduction Connections Basic Setup TIMER RECORDING You can turn on one -touch timer recording is...
... You cannot make sure to • Set the clock before setting a timer programming. • Insert a recordable disc with the step 5 in "Manual Clock Setting" on page 32 before setting a timer programming. • Use [s / B] to move the cursor to the left and the right .... 1 Start - - : - If their recording channels are the same. REC To DVD End - - : - e.g.) January 1st SUN JAN/31 EN 43 Function Setup VCR Functions Others Español Continue with enough recordable space. Introduction Connections Basic Setup TIMER RECORDING You can turn on one -touch timer recording is...
User manual, English (US)
Page 84
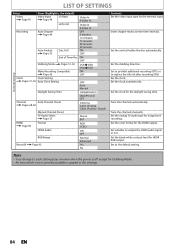
...Page 55 OFF End of Timer Rec ON OFF Dubbing Mode Pages 51-52 VCR DVD DVD VCR General Setting Make Recording Compatible ON Page 40 OFF Clock Clock Setting Pages 31-32 Auto Clock Setting OFF Auto Manual Daylight Saving Time ON(MAR-NOV) ON(APR-OCT) OFF Channel Auto ...Channel Preset Pages 28-30 Antenna Cable (Analog) Cable (Analog / Digital) Manual Channel Preset TV Audio...
...Page 55 OFF End of Timer Rec ON OFF Dubbing Mode Pages 51-52 VCR DVD DVD VCR General Setting Make Recording Compatible ON Page 40 OFF Clock Clock Setting Pages 31-32 Auto Clock Setting OFF Auto Manual Daylight Saving Time ON(MAR-NOV) ON(APR-OCT) OFF Channel Auto ...Channel Preset Pages 28-30 Antenna Cable (Analog) Cable (Analog / Digital) Manual Channel Preset TV Audio...
User manual, English (US)
Page 94
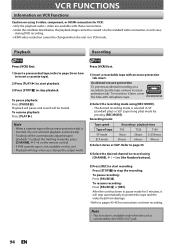
To resume playback: Press [PLAY B]. Press [VCR] first. 1) Insert a recordable tape with cellophane tape. Accidental erasure prevention To prevent accidental recording on timer recording. To adjust the tracking manually, press [CHANNEL / ] on the remote control. • S-VHS cassette tape is... time T60 T120 T160 1hour 2hours 2-2/3hours 3hours 6hours 8hours 3) Select stereo or SAP. Use the standard video connection, in VCR mode. Playback Recording Press [VCR] first. 1) Insert a prerecorded tape (refer to page 26 on how to insert a cassette tape). 2) Press [PLAY...
To resume playback: Press [PLAY B]. Press [VCR] first. 1) Insert a recordable tape with cellophane tape. Accidental erasure prevention To prevent accidental recording on timer recording. To adjust the tracking manually, press [CHANNEL / ] on the remote control. • S-VHS cassette tape is... time T60 T120 T160 1hour 2hours 2-2/3hours 3hours 6hours 8hours 3) Select stereo or SAP. Use the standard video connection, in VCR mode. Playback Recording Press [VCR] first. 1) Insert a prerecorded tape (refer to page 26 on how to insert a cassette tape). 2) Press [PLAY...
User manual, English (US)
Page 97
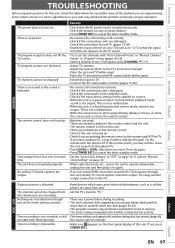
... the AC power cord is turned on your TV (such as a cellular phone, etc away from the plasma TV. • Press [DVD] or [VCR], whichever you are output. Reset the clock (pages 30-32). • The program contains copy protection signals that restricts copying. • The timer setting... more than 30 seconds. TV program reception does not fill the TV screen. If the remote works, you may interfere with "Auto Channel Preset" or "Manual Channel Preset" in slow-motion playback mode, sound is not output. If not, press [TIMER SET]. Some simple checks or a minor adjustment on . ...
... the AC power cord is turned on your TV (such as a cellular phone, etc away from the plasma TV. • Press [DVD] or [VCR], whichever you are output. Reset the clock (pages 30-32). • The program contains copy protection signals that restricts copying. • The timer setting... more than 30 seconds. TV program reception does not fill the TV screen. If the remote works, you may interfere with "Auto Channel Preset" or "Manual Channel Preset" in slow-motion playback mode, sound is not output. If not, press [TIMER SET]. Some simple checks or a minor adjustment on . ...
User manual, English (US)
Page 98
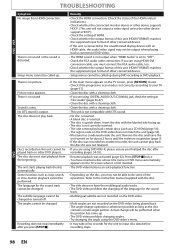
...sound or the sound is upside down. No DTS sound is noisy. The language for the sound track cannot be changed. Refer to the instruction manual supplied with the disc. • The title does not have inserted a disc whose title menu or DVD menu automatically appears on the TV screen... functions such as a CD-ROM) (page 56). • The region code on for the unit to do some of other DVD players. DVD • VCR TROUBLESHOOTING Symptom No image from the beginning. The subtitle language cannot be performed when the portion has come up. • The DVD-video prohibits changing...
...sound or the sound is upside down. No DTS sound is noisy. The language for the sound track cannot be changed. Refer to the instruction manual supplied with the disc. • The title does not have inserted a disc whose title menu or DVD menu automatically appears on the TV screen... functions such as a CD-ROM) (page 56). • The region code on for the unit to do some of other DVD players. DVD • VCR TROUBLESHOOTING Symptom No image from the beginning. The subtitle language cannot be performed when the portion has come up. • The DVD-video prohibits changing...


