
Owners Manual
Page 8
...12. OPEN/CLOSE A button (DVD)* Press to connect the S-video output of the cassette tape. S-VIDEO input jack (E2) (DVD/VCR) Use to open . 4. STOP C / EJECT A button (VCR) EJECT A button When the unit is selected. 13. Press to rapidly advance the cassette tape, or view the picture ...rapidly in DVD. 10. F.FWD D button (VCR) Press to stop mode, press to start a recording. VIDEO input jack (E2) (DVD/VCR) Use to "Front Panel Display" on by pressing these buttons or insert a cassette tape. 1. Display Refer...
...12. OPEN/CLOSE A button (DVD)* Press to connect the S-video output of the cassette tape. S-VIDEO input jack (E2) (DVD/VCR) Use to open . 4. STOP C / EJECT A button (VCR) EJECT A button When the unit is selected. 13. Press to rapidly advance the cassette tape, or view the picture ...rapidly in DVD. 10. F.FWD D button (VCR) Press to stop mode, press to start a recording. VIDEO input jack (E2) (DVD/VCR) Use to "Front Panel Display" on by pressing these buttons or insert a cassette tape. 1. Display Refer...
Owners Manual
Page 14
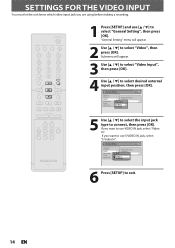
... DISC MENU ABC 2 JKL 5 TUV 8 SPACE 0 o DEF 3 MNO 6 WXYZ 9 CLEAR SETUP s OK B TITLE RETURN p j B i F h g C TRACKING -- + VCR DVD REC REC MODE D.DUBBING AUDIO I CM SKIP SEARCH RAPID PLAY NB552 1 Press [SETUP] and use S-VIDEO IN jack, select "S-Video In". General Setting Playback... Display Video Recording Clock Reset All Progressive Scan TV Aspect E1V(Rideeaor)InpVuidteo Input E1Vi(dReeoarIn) E2S-(VFirdoenot)In 6 Press [SETUP] to select "General Setting", then press [OK]. If you are using before making a recording. "...
... DISC MENU ABC 2 JKL 5 TUV 8 SPACE 0 o DEF 3 MNO 6 WXYZ 9 CLEAR SETUP s OK B TITLE RETURN p j B i F h g C TRACKING -- + VCR DVD REC REC MODE D.DUBBING AUDIO I CM SKIP SEARCH RAPID PLAY NB552 1 Press [SETUP] and use S-VIDEO IN jack, select "S-Video In". General Setting Playback... Display Video Recording Clock Reset All Progressive Scan TV Aspect E1V(Rideeaor)InpVuidteo Input E1Vi(dReeoarIn) E2S-(VFirdoenot)In 6 Press [SETUP] to select "General Setting", then press [OK]. If you are using before making a recording. "...

Owners Manual
Page 24
...-ON SOURCE TIMER SET DISPLAY OPEN/CLOSE A .@/: 1 GHI 4 PQRS 7 TIMER DISC MENU ABC 2 JKL 5 TUV 8 SPACE 0 o DEF 3 MNO 6 WXYZ 9 CLEAR SETUP s OK B TITLE RETURN p j B i F h g C TRACKING -- + VCR DVD REC REC MODE D.DUBBING AUDIO I CM SKIP SEARCH RAPID PLAY 2 Press [OPEN/CLOSE A] to open the disc tray and insert your external tuner is... your disc with this unit. (Refer to page 22 for DVD. NB552 SP(2Hr) 0:58 5 Press [SOURCE] to select the appropriate external input position (E1/E2) to close the disc tray.
...-ON SOURCE TIMER SET DISPLAY OPEN/CLOSE A .@/: 1 GHI 4 PQRS 7 TIMER DISC MENU ABC 2 JKL 5 TUV 8 SPACE 0 o DEF 3 MNO 6 WXYZ 9 CLEAR SETUP s OK B TITLE RETURN p j B i F h g C TRACKING -- + VCR DVD REC REC MODE D.DUBBING AUDIO I CM SKIP SEARCH RAPID PLAY 2 Press [OPEN/CLOSE A] to open the disc tray and insert your external tuner is... your disc with this unit. (Refer to page 22 for DVD. NB552 SP(2Hr) 0:58 5 Press [SOURCE] to select the appropriate external input position (E1/E2) to close the disc tray.

Owners Manual
Page 26
... 1 GHI 4 PQRS 7 TIMER DISC MENU ABC 2 JKL 5 TUV 8 SPACE 0 o DEF 3 MNO 6 WXYZ 9 CLEAR SETUP s OK B TITLE RETURN p j B i F h g C TRACKING -- + VCR DVD REC REC MODE D.DUBBING AUDIO I CM SKIP SEARCH RAPID PLAY 1 Press [TIMER]. 2 Use [K / L] to enter the date, then press [B]. Timer Programming Date Date JAN.../02 E1/E2 E1 MON JAN/01 11:00AM Start End NewSPtraorgt ram - - : - - TIMER RECORDING You can program the unit to record up to start recording...
... 1 GHI 4 PQRS 7 TIMER DISC MENU ABC 2 JKL 5 TUV 8 SPACE 0 o DEF 3 MNO 6 WXYZ 9 CLEAR SETUP s OK B TITLE RETURN p j B i F h g C TRACKING -- + VCR DVD REC REC MODE D.DUBBING AUDIO I CM SKIP SEARCH RAPID PLAY 1 Press [TIMER]. 2 Use [K / L] to enter the date, then press [B]. Timer Programming Date Date JAN.../02 E1/E2 E1 MON JAN/01 11:00AM Start End NewSPtraorgt ram - - : - - TIMER RECORDING You can program the unit to record up to start recording...

Owners Manual
Page 27
... MON JAN/01 11:00AM Start End NewSPtraorgt ram 12 : 00AM REC To E1/E2 End 1 : 00AM Mode DVD SP SP 1 : 00 Auto recording mode select... BS CS DR CD HDD DVD "VCR" will appear if VCR timer recording have not set the clock yet: "Clock Setting" menu will be cut ... "Checking, canceling, or correcting the timer programming information" on both DVD and VCR. • Cancel the timer-standby mode by pressing [TIMER SET] before operation for either DVD or VCR. Timer Programming Date Date JAN/02 E1/E2 E1 MON JAN/01 11:00AM Start End NewSPtraorgt ram 12 : 00AM REC ...
... MON JAN/01 11:00AM Start End NewSPtraorgt ram 12 : 00AM REC To E1/E2 End 1 : 00AM Mode DVD SP SP 1 : 00 Auto recording mode select... BS CS DR CD HDD DVD "VCR" will appear if VCR timer recording have not set the clock yet: "Clock Setting" menu will be cut ... "Checking, canceling, or correcting the timer programming information" on both DVD and VCR. • Cancel the timer-standby mode by pressing [TIMER SET] before operation for either DVD or VCR. Timer Programming Date Date JAN/02 E1/E2 E1 MON JAN/01 11:00AM Start End NewSPtraorgt ram 12 : 00AM REC ...
Owners Manual
Page 28
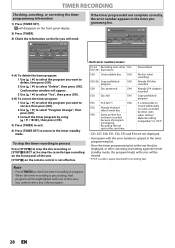
... the remote control is not effective. Timer Programming TUE JAN/02 11:00AM Date Start End E41 JAN/02 12:00AM 1:00AM New Program E1/E2 E1 1/1 Each error number means: E1-22 Recording error other units when setting " Make Recording Compatible" to the timer standby mode. When the timer recording... JAN/ 2/07 12:00 AM E1 SP SP (1:00) MON JAN/01 11:00AM Date JAN/02 Start End 12:00AM 1:00AM New Program E1/E2 E1 1/1 4-A) To delete the timer program: 1 Use [K / L] to select the program you want to delete, then press [OK]. 2 Use [K / L] to select "Program Change", then press...
... the remote control is not effective. Timer Programming TUE JAN/02 11:00AM Date Start End E41 JAN/02 12:00AM 1:00AM New Program E1/E2 E1 1/1 Each error number means: E1-22 Recording error other units when setting " Make Recording Compatible" to the timer standby mode. When the timer recording... JAN/ 2/07 12:00 AM E1 SP SP (1:00) MON JAN/01 11:00AM Date JAN/02 Start End 12:00AM 1:00AM New Program E1/E2 E1 1/1 4-A) To delete the timer program: 1 Use [K / L] to select the program you want to delete, then press [OK]. 2 Use [K / L] to select "Program Change", then press...
Owners Manual
Page 30
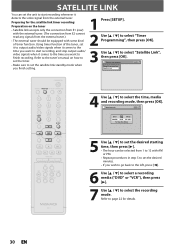
...SOURCE TIMER SET DISPLAY OPEN/CLOSE A .@/: 1 GHI 4 PQRS 7 TIMER ABC 2 JKL 5 TUV 8 SPACE 0 DEF 3 MNO 6 WXYZ 9 CLEAR DISC MENU o SETUP s OK B TITLE RETURN p j B i F h g C TRACKING -- + VCR DVD REC REC MODE D.DUBBING AUDIO I CM SKIP SEARCH RAPID PLAY NB552 4 Use [K / L] to select the time, media and recording mode, then press [OK]. Using...when it detects the video signal from the external tuner.) • The external tuner should be equipped with the external tuner. (The connection from E2 cannot read any signals from the external tuner. Preparing for details. 30 EN
...SOURCE TIMER SET DISPLAY OPEN/CLOSE A .@/: 1 GHI 4 PQRS 7 TIMER ABC 2 JKL 5 TUV 8 SPACE 0 DEF 3 MNO 6 WXYZ 9 CLEAR DISC MENU o SETUP s OK B TITLE RETURN p j B i F h g C TRACKING -- + VCR DVD REC REC MODE D.DUBBING AUDIO I CM SKIP SEARCH RAPID PLAY NB552 4 Use [K / L] to select the time, media and recording mode, then press [OK]. Using...when it detects the video signal from the external tuner.) • The external tuner should be equipped with the external tuner. (The connection from E2 cannot read any signals from the external tuner. Preparing for details. 30 EN
Owners Manual
Page 32
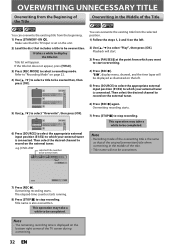
... 1 SP (2Hr) NOV/21/07 11:00AM E1 SP NOV/21/07 0:20:44 2 6) Press [SOURCE] to select the appropriate external input position (E1/E2) to which your external tuner is the same as illustrated on the left . 2) Use [K / L] to be overwritten. Playback will start overwriting. 4) Press [...the selected position. 1) Follow the steps 1, 2 and 4 on the left . 5) Press [SOURCE] to select the appropriate external input position (E1/E2) to which you want to stop recording. OVERWRITING UNNECESSARY TITLE Overwriting from the Beginning of the Title Overwriting in the middle of the title. •...
... 1 SP (2Hr) NOV/21/07 11:00AM E1 SP NOV/21/07 0:20:44 2 6) Press [SOURCE] to select the appropriate external input position (E1/E2) to which your external tuner is the same as illustrated on the left . 2) Use [K / L] to be overwritten. Playback will start overwriting. 4) Press [...the selected position. 1) Follow the steps 1, 2 and 4 on the left . 5) Press [SOURCE] to select the appropriate external input position (E1/E2) to which you want to stop recording. OVERWRITING UNNECESSARY TITLE Overwriting from the Beginning of the Title Overwriting in the middle of the title. •...

Owners Manual
Page 34
...OUT OUT VIDEO OUT Y L L COAXIAL R IN R R IN ---VIDEO---OUT front of this unit rear of E2 (Front). 34 EN or S-VIDEO VIDEO OUT OUT AUDIO OUT R L external device (camcorder, VCR etc.) S-VIDEO VIDEO OUT OUT AUDIO OUT R L S-video cable or RCA video cable RCA audio cable or S-...video cable or RCA video cable DVD/VCR S-VIDEO IN ---AUDIO---OUT L L IN R R IN ---VIDEO---OUT RCA audio cable E2 to E2 IN E1 to select the appropriate video input type by using S-video or RCA audio / video cables....
...OUT OUT VIDEO OUT Y L L COAXIAL R IN R R IN ---VIDEO---OUT front of this unit rear of E2 (Front). 34 EN or S-VIDEO VIDEO OUT OUT AUDIO OUT R L external device (camcorder, VCR etc.) S-VIDEO VIDEO OUT OUT AUDIO OUT R L S-video cable or RCA video cable RCA audio cable or S-...video cable or RCA video cable DVD/VCR S-VIDEO IN ---AUDIO---OUT L L IN R R IN ---VIDEO---OUT RCA audio cable E2 to E2 IN E1 to select the appropriate video input type by using S-video or RCA audio / video cables....
Owners Manual
Page 35
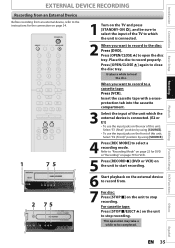
...again to record properly. Select "E1 (Rear)" position by using [SOURCE]. • To use the input jacks on the rear of this unit; Select "E2 (Front)" position by using [SOURCE]. 4 Press [REC MODE] to select a recording mode. STANDBY-ON SOURCE TIMER SET DISPLAY OPEN/CLOSE A .@/: 1... cassette tape: Press [STOP C/EJECT A] on the unit to stop recording. When you want to record to a cassette tape: Press [VCR]. Introduction Connections Basic Setup Recording Playback EXTERNAL DEVICE RECORDING Recording from an External Device Before recording from . 7 For disc: Press [STOP C]...
...again to record properly. Select "E1 (Rear)" position by using [SOURCE]. • To use the input jacks on the rear of this unit; Select "E2 (Front)" position by using [SOURCE]. 4 Press [REC MODE] to select a recording mode. STANDBY-ON SOURCE TIMER SET DISPLAY OPEN/CLOSE A .@/: 1... cassette tape: Press [STOP C/EJECT A] on the unit to stop recording. When you want to record to a cassette tape: Press [VCR]. Introduction Connections Basic Setup Recording Playback EXTERNAL DEVICE RECORDING Recording from an External Device Before recording from . 7 For disc: Press [STOP C]...
Owners Manual
Page 69
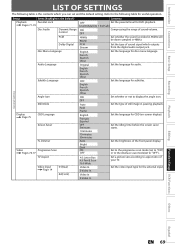
... level 8 [Adult] to aspect ratio of still image in 48kHz. OFF Auto Set the type of your TV. Playback Editing Function Setup VCR Functions Others Español EN 69 OFF 48kHz 96kHz Set whether the sound recorded in 96kHz will be down sampled in pausing playback. French...-screen display). English French Spanish Other OFF English French Spanish Other Set the language for useful operation. TV Aspect Video Input Page 14 E1(Rear) E2(Front) 4:3 Letter Box 4:3 Pan & Scan 16:9 Wide Video In S-Video In Video In S-Video In Set a picture size according to 1 [Kid ...
... level 8 [Adult] to aspect ratio of still image in 48kHz. OFF Auto Set the type of your TV. Playback Editing Function Setup VCR Functions Others Español EN 69 OFF 48kHz 96kHz Set whether the sound recorded in 96kHz will be down sampled in pausing playback. French...-screen display). English French Spanish Other OFF English French Spanish Other Set the language for useful operation. TV Aspect Video Input Page 14 E1(Rear) E2(Front) 4:3 Letter Box 4:3 Pan & Scan 16:9 Wide Video In S-Video In Video In S-Video In Set a picture size according to 1 [Kid ...

Owners Manual
Page 79
Press [VCR]. 2) Insert a prerecorded cassette tape. Before recording, make sure: • The appropriate external input position (E1/E2) to pages 26-29 for 5 minutes, it , press [PAUSE F]. Recording mode: Tape speed Recording / playback time Type of tape ... [STOP C] to stop playback. 6) Press [STOP C / EJECT A] on and be automatically adjusted upon playback. erase-protection tab Recording Playback Editing Function Setup VCR Functions Others Español EN 79 To adjust the tracking manually, press [TRACKING / ]. 1) Press [REC I] to eject the cassette tape. protection tab....
Press [VCR]. 2) Insert a prerecorded cassette tape. Before recording, make sure: • The appropriate external input position (E1/E2) to pages 26-29 for 5 minutes, it , press [PAUSE F]. Recording mode: Tape speed Recording / playback time Type of tape ... [STOP C] to stop playback. 6) Press [STOP C / EJECT A] on and be automatically adjusted upon playback. erase-protection tab Recording Playback Editing Function Setup VCR Functions Others Español EN 79 To adjust the tracking manually, press [TRACKING / ]. 1) Press [REC I] to eject the cassette tape. protection tab....

Owners Manual
Page 86
... I record to change the channels on the external tuner using an external tuner? - Can I play back DVD-video that is 1 and All. Select "E1" or "E2" as your recording channel, and leave the external tuner on your local store. No, this unit's remote control is not possible. No, you can. For...
... I record to change the channels on the external tuner using an external tuner? - Can I play back DVD-video that is 1 and All. Select "E1" or "E2" as your recording channel, and leave the external tuner on your local store. No, this unit's remote control is not possible. No, you can. For...