/ Owners manual
Page 1
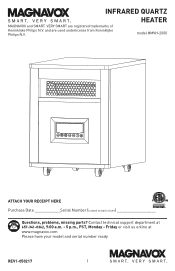
HEATER model #MVH-2000 ATTACH YOUR RECEIPT HERE Purchase Date Serial Number (located on back of Koninklijke Philips N.V. VERY SMART are used underlicense from Koninklijke Philips N.V. and are registered trademarks of unit Questions, problems, missing parts? Contact technical support department at www.magnavox.com Please have your model and serial number ready REV1-050217 1 Friday or visit us online at 657-341-0362, 9:00 a.m. - 5 p.m., PST, Monday - INFRARED QUARTZ MAGNAVOX and SMART.
HEATER model #MVH-2000 ATTACH YOUR RECEIPT HERE Purchase Date Serial Number (located on back of Koninklijke Philips N.V. VERY SMART are used underlicense from Koninklijke Philips N.V. and are registered trademarks of unit Questions, problems, missing parts? Contact technical support department at www.magnavox.com Please have your model and serial number ready REV1-050217 1 Friday or visit us online at 657-341-0362, 9:00 a.m. - 5 p.m., PST, Monday - INFRARED QUARTZ MAGNAVOX and SMART.

/ Owners manual
Page 2
TABLE OF CONTENTS Package Contents 3 Safety Information 4 Frequently Asked Questions 6 Preparation 8 Troubleshooting 8 Control Panel 9 Remote Control 10 Operating Instructions 11 Care and Maintenance 13 One-Year Limited Warranty 14 Replacement Parts List 15 2
TABLE OF CONTENTS Package Contents 3 Safety Information 4 Frequently Asked Questions 6 Preparation 8 Troubleshooting 8 Control Panel 9 Remote Control 10 Operating Instructions 11 Care and Maintenance 13 One-Year Limited Warranty 14 Replacement Parts List 15 2
/ Owners manual
Page 3
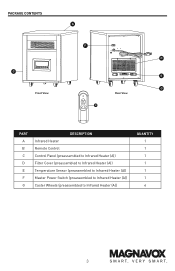
PACKAGE CONTENTS Front View Rear View PART A B C D E F G DESCRIPTION Infrared Heater Remote Control Control Panel (preassembled to Infrared Heater (A)) Filter Cover (preassembled to Infrared Heater (A)) Temperature Sensor (preassembled to Infrared Heater (A)) Master Power Switch (preassembled to Infrared Heater (A)) Caster Wheels (preassembled to Infrared Heater (A)) QUANTITY 1 1 1 1 1 1 4 3
PACKAGE CONTENTS Front View Rear View PART A B C D E F G DESCRIPTION Infrared Heater Remote Control Control Panel (preassembled to Infrared Heater (A)) Filter Cover (preassembled to Infrared Heater (A)) Temperature Sensor (preassembled to Infrared Heater (A)) Master Power Switch (preassembled to Infrared Heater (A)) Caster Wheels (preassembled to Infrared Heater (A)) QUANTITY 1 1 1 1 1 1 4 3
/ Owners manual
Page 4
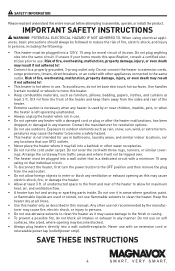
... into a wall outlet/receptacle. Contact the manufacturer for maximum heat, air, and ventilation flow. • A heater has hot and arcing or sparking parts inside. ings. of unobstructed space to the front and rear of its own. Do not use it may cause electric shock, fire, or damage the heater. • Allow at all times. • Use this...
... into a wall outlet/receptacle. Contact the manufacturer for maximum heat, air, and ventilation flow. • A heater has hot and arcing or sparking parts inside. ings. of unobstructed space to the front and rear of its own. Do not use it may cause electric shock, fire, or damage the heater. • Allow at all times. • Use this...

/ Owners manual
Page 5
..., you will automatically shut the heater off . SAFETY INFORMATION Child Safety Lock Feature Press and hold the child lock button located on the heater. Specifications Voltage Rating Power Consumption 120 V (60 Hz) 750 W/1,500 W Unit Size Unit Weight 12.9 in. (W) x 20.1 in. (D) x 17.4 in to the touch. To continue operation, turn on the heater using the control panel...
..., you will automatically shut the heater off . SAFETY INFORMATION Child Safety Lock Feature Press and hold the child lock button located on the heater. Specifications Voltage Rating Power Consumption 120 V (60 Hz) 750 W/1,500 W Unit Size Unit Weight 12.9 in. (W) x 20.1 in. (D) x 17.4 in to the touch. To continue operation, turn on the heater using the control panel...
/ Owners manual
Page 6
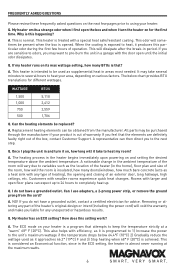
... will dissipate after the break-in the ECO setting, the heater is achieved. A noticeable change in the ambient temperature of the heater (in the heater begins immediately upon powering on , how long will void the warranty and make you feel that ? Can the heating elements be obtained from the cord? All parts may take to the unit's maximum wattage...
... will dissipate after the break-in the ECO setting, the heater is achieved. A noticeable change in the ambient temperature of the heater (in the heater begins immediately upon powering on , how long will void the warranty and make you feel that ? Can the heating elements be obtained from the cord? All parts may take to the unit's maximum wattage...
/ Owners manual
Page 7
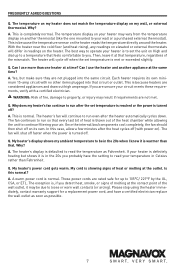
... cycle off on the heater reads the temperature directly around the heater. In this normal? These power cords are not met. Please stop using the heater immediately, contact warranty support for up to be due to run even after the set the unit on my wall, or external thermostat. A. The heater's fan will shut off . Why? If your air. A warm power cord is blown out...
... cycle off on the heater reads the temperature directly around the heater. In this normal? These power cords are not met. Please stop using the heater immediately, contact warranty support for up to be due to run even after the set the unit on my wall, or external thermostat. A. The heater's fan will shut off . Why? If your air. A warm power cord is blown out...

/ Owners manual
Page 8
.... The air filter is set lower than the room temperature. 1. Temperature sensor not function- 1. TROUBLESHOOTING PROBLEM POSSIBLE CAUSE CORRECTIVE ACTION The heater does not turn on the power switch on the rear of the unit. The thermostat on the heater is clogged. 4. Increase the thermostat temperature on the back of the unit. Please contact technical support. Infrared heat can take at the main fuse box. 3. Replace the...
.... The air filter is set lower than the room temperature. 1. Temperature sensor not function- 1. TROUBLESHOOTING PROBLEM POSSIBLE CAUSE CORRECTIVE ACTION The heater does not turn on the power switch on the rear of the unit. The thermostat on the heater is clogged. 4. Increase the thermostat temperature on the back of the unit. Please contact technical support. Infrared heat can take at the main fuse box. 3. Replace the...

/ Owners manual
Page 9
... Increases the set room temperature or timer value 4 Celsius Indicator Light Indicates that the temperature is being displayed in Celsius 5 Fahrenheit Indicator Light Indicates that the temperature is being displayed in Fahrenheit 6 Power Indicator Light Indicates when the unit is on 16 Low Heat Indicator Indicates when Low Heat mode is receiving power from the wall outlet 7 Power Switch Button Powers the heater ON or...
... Increases the set room temperature or timer value 4 Celsius Indicator Light Indicates that the temperature is being displayed in Celsius 5 Fahrenheit Indicator Light Indicates that the temperature is being displayed in Fahrenheit 6 Power Indicator Light Indicates when the unit is on 16 Low Heat Indicator Indicates when Low Heat mode is receiving power from the wall outlet 7 Power Switch Button Powers the heater ON or...

/ Owners manual
Page 10
REMOTE CONTROL 1 6 2 3 5 4 PART NAME 1 Temp Up Button DESCRIPTION Increases the set temperature value 2 Mode Button Toggles between the three heat modes available 3 Temp Down Button Decreases the set temperature value 4 Power Button Powers the heater on or off Short press: Shows Ambient temperature. 5 Ambient/Lock Button Long press for 3 seconds to activate lock function. 6 Timer Button Engages the on/off timer 10
REMOTE CONTROL 1 6 2 3 5 4 PART NAME 1 Temp Up Button DESCRIPTION Increases the set temperature value 2 Mode Button Toggles between the three heat modes available 3 Temp Down Button Decreases the set temperature value 4 Power Button Powers the heater on or off Short press: Shows Ambient temperature. 5 Ambient/Lock Button Long press for 3 seconds to activate lock function. 6 Timer Button Engages the on/off timer 10

/ Owners manual
Page 11
... heat inside the heater. OPERATING INSTRUCTIONS 1. The fan will operate to maintain the desired room temperature. ECO mode is a normal func- Select a heat setting by pressing the HEAT button on the digital display. Turn the heater on or off , heating elements will remain on the control panel. Note: To switch between Fahrenheit and Celsius, long press for up mode is 750 W. This is an Economic Energy...
... heat inside the heater. OPERATING INSTRUCTIONS 1. The fan will operate to maintain the desired room temperature. ECO mode is a normal func- Select a heat setting by pressing the HEAT button on the digital display. Turn the heater on or off , heating elements will remain on the control panel. Note: To switch between Fahrenheit and Celsius, long press for up mode is 750 W. This is an Economic Energy...
/ Owners manual
Page 12
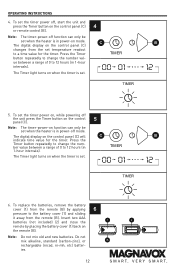
...Note: The timer-power-on function can only be set when the heater is set temperature readout to change the number value between a range of 0 to 12 hours (in power-off mode. Press the Timer button repeatedly to change the number val- The Timer light turns on the control...button repeatedly to a time value for the timer. The digital display on the remote (B). TIMER 6. Do not mix alkaline, standard (carbon-zinc), or B rechargeable (nicad, ni-mh, etc) batter- OPERATING INSTRUCTIONS 4. To replace the batteries, remove the battery cover (1) from the set .
...Note: The timer-power-on function can only be set when the heater is set temperature readout to change the number value between a range of 0 to 12 hours (in power-off mode. Press the Timer button repeatedly to change the number val- The Timer light turns on the control...button repeatedly to a time value for the timer. The digital display on the remote (B). TIMER 6. Do not mix alkaline, standard (carbon-zinc), or B rechargeable (nicad, ni-mh, etc) batter- OPERATING INSTRUCTIONS 4. To replace the batteries, remove the battery cover (1) from the set .

/ Owners manual
Page 13
... (2). Store the heater in a cool, dry location when not in the rear of the heater. 3. CARE AND MAINTENANCE WARNING: Before performing any maintenance task, turn off the power switch in use. Use a mild detergent if necessary. If you will not be blocking airflow. After cleaning, dry the unit with a soft, damp cloth. CLEANING THE AIR FILTER 1.
... (2). Store the heater in a cool, dry location when not in the rear of the heater. 3. CARE AND MAINTENANCE WARNING: Before performing any maintenance task, turn off the power switch in use. Use a mild detergent if necessary. If you will not be blocking airflow. After cleaning, dry the unit with a soft, damp cloth. CLEANING THE AIR FILTER 1.
/ Owners manual
Page 14
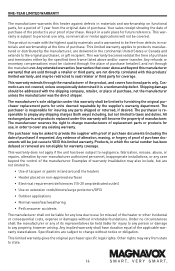
... furnishing the original purchaser replacement parts for warranty coverage. This limited warranty gives the original purchaser specific legal rights. Keep it is responsible for any loss due to use , in order to prepay any shipping charges (both ways) including, but are not eligible for units deemed repairable by non-manufacturer authorized personnel, inappropriate installations, or any case beyond...
... furnishing the original purchaser replacement parts for warranty coverage. This limited warranty gives the original purchaser specific legal rights. Keep it is responsible for any loss due to use , in order to prepay any shipping charges (both ways) including, but are not eligible for units deemed repairable by non-manufacturer authorized personnel, inappropriate installations, or any case beyond...

/ Owners manual
Page 15
REPLACEMENT PARTS LIST For replacement parts, call our technical support department at 657-341-0362, 9:00 a.m. - 5 p.m., PST, Monday - Friday PART DESCRIPTION A Control panel B Fan PART # COPA-H2016 FAN3018 C Power board POBO-H2016 D Tip-over switch TIPSW E Limit switch LIMITSW130 F Infrared tube QUAR-R185 G Thermostat Wire SENSOR H Master Power Switch MAINSW-S I Remote control REMO-H2016 A B C D E H G F I 15
REPLACEMENT PARTS LIST For replacement parts, call our technical support department at 657-341-0362, 9:00 a.m. - 5 p.m., PST, Monday - Friday PART DESCRIPTION A Control panel B Fan PART # COPA-H2016 FAN3018 C Power board POBO-H2016 D Tip-over switch TIPSW E Limit switch LIMITSW130 F Infrared tube QUAR-R185 G Thermostat Wire SENSOR H Master Power Switch MAINSW-S I Remote control REMO-H2016 A B C D E H G F I 15
/ Owners manual
Page 16
VERY SMART are used under license from Koninklijke Philips N.V. 16 and are registered trademarks of Koninklijke Philips N.V. PLEASE REMEMBER TO REGISTER YOUR WARRANTY: web: www.magnavox.com Printed in China MAGNAVOX and SMART.
VERY SMART are used under license from Koninklijke Philips N.V. 16 and are registered trademarks of Koninklijke Philips N.V. PLEASE REMEMBER TO REGISTER YOUR WARRANTY: web: www.magnavox.com Printed in China MAGNAVOX and SMART.


