Quick Start Guide
Page 1
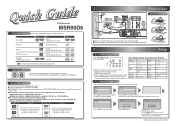
..., AUX VIDEO, VIDEO1, VIDEO2, VIDEO3 Sanyo Sharp VIDEO 00 Kenwood LXI-Series Magnavox AUX 00 AUX CHANNEL Sony Toshiba Zenith VIDEO1, VIDEO2, VIDEO3 TV/GAME 00 ... desired Press [OK] to Clock Setting. Remote Control 2 Setup 2 - 1 Watching on TV Press [STANDBY-ON ] to select an external input channel until the DVD recorder's picture appears. JAN / 01 / 2006...DVD Recorder MSR90D6 Playable discs Disc DVD-VIDEO This unit is a trademark of DVD Format/Logo Licensing Corporation. Logo Disc DVD-R (VIDEO mode, Finalized) Logo DVD+RW CD-DA (AUDIO CD) DVD+R DVD+R Double Layer DVD...
..., AUX VIDEO, VIDEO1, VIDEO2, VIDEO3 Sanyo Sharp VIDEO 00 Kenwood LXI-Series Magnavox AUX 00 AUX CHANNEL Sony Toshiba Zenith VIDEO1, VIDEO2, VIDEO3 TV/GAME 00 ... desired Press [OK] to Clock Setting. Remote Control 2 Setup 2 - 1 Watching on TV Press [STANDBY-ON ] to select an external input channel until the DVD recorder's picture appears. JAN / 01 / 2006...DVD Recorder MSR90D6 Playable discs Disc DVD-VIDEO This unit is a trademark of DVD Format/Logo Licensing Corporation. Logo Disc DVD-R (VIDEO mode, Finalized) Logo DVD+RW CD-DA (AUDIO CD) DVD+R DVD+R Double Layer DVD...
Quick Start Guide
Page 6
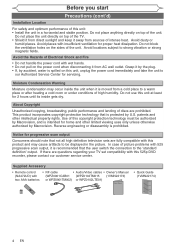
... the unit directly on this copyright protection technology must be displayed in a horizontal and stable position. Do not use this 525p DVD recorder, please contact our customer service center. Supplied Accessory • Remote control (NA472UD) with this unit at least for servicing. About Copyright Unauthorized copying, broadcasting, public performance and lending of this...
... the unit directly on this copyright protection technology must be displayed in a horizontal and stable position. Do not use this 525p DVD recorder, please contact our customer service center. Supplied Accessory • Remote control (NA472UD) with this unit at least for servicing. About Copyright Unauthorized copying, broadcasting, public performance and lending of this...
Quick Start Guide
Page 7
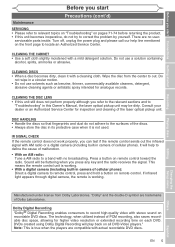
...; With an AM radio: Tune a AM radio to a band with actual recordable DVD discs. Wipe the disc from Dolby Laboratories. Do not wipe in camera of cellular phone). This means the remote control unit is true when the players are no broadcasting. Manufactured under license from... solution. Press a button on all DVD-Video players." DVDs created using Dolby Digital Recording will be dirty. Consult your dealer or an Authorized Service Center for higher video resolution or extended recording time on each DVD. IR SIGNAL CHECK If the remote control does not work properly, you ...
...; With an AM radio: Tune a AM radio to a band with actual recordable DVD discs. Wipe the disc from Dolby Laboratories. Do not wipe in camera of cellular phone). This means the remote control unit is true when the players are no broadcasting. Manufactured under license from... solution. Press a button on all DVD-Video players." DVDs created using Dolby Digital Recording will be dirty. Consult your dealer or an Authorized Service Center for higher video resolution or extended recording time on each DVD. IR SIGNAL CHECK If the remote control does not work properly, you ...
Quick Start Guide
Page 8
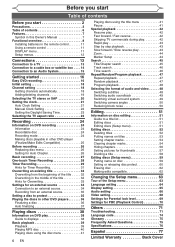
...'s Manual 7 Functional overview 8 Installing batteries in the remote control 11 Using a remote control 11 DISPLAY menu 11 Setup menus 12 Connections 13 Connection to a TV 13 Connection to a cable box or satellite box . . . . . 14 Connection to an Audio System 15 Getting started 16 Easy DVD recording 16 Initial setting 18 Channel setting 18 Getting...
...'s Manual 7 Functional overview 8 Installing batteries in the remote control 11 Using a remote control 11 DISPLAY menu 11 Setup menus 12 Connections 13 Connection to a TV 13 Connection to a cable box or satellite box . . . . . 14 Connection to an Audio System 15 Getting started 16 Easy DVD recording 16 Initial setting 18 Channel setting 18 Getting...

Quick Start Guide
Page 10
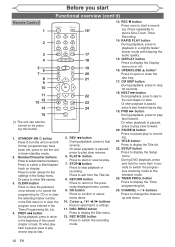
... play slow reverse. 6. TIMER REC indicator Light on when Timer Programming is paused, press and hold for 1.5 seconds to start a One-touch Timer Recording. 5. PLAY B button Press to play . 4. Press repeatedly to turn the unit on when power is paused, press to set . NEXT G ...program cannot be turned on . 2. S-VIDEO input jack (EXT2) Use to open or close the disc tray. 3. Remote control sensor Receive signals from your remote control so that you start a recording. OPEN/CLOSE A button* Press to connect the S-Video output of the current chapter or track. PREV H button ...
... play slow reverse. 6. TIMER REC indicator Light on when Timer Programming is paused, press and hold for 1.5 seconds to start a One-touch Timer Recording. 5. PLAY B button Press to play . 4. Press repeatedly to turn the unit on when power is paused, press to set . NEXT G ...program cannot be turned on . 2. S-VIDEO input jack (EXT2) Use to open or close the disc tray. 3. Remote control sensor Receive signals from your remote control so that you start a recording. OPEN/CLOSE A button* Press to connect the S-Video output of the current chapter or track. PREV H button ...
Quick Start Guide
Page 12
...menu screen. 9. Or when playback is paused, press to turn the unit on display. During DVD playback, press and hold for the settings in a slightly faster/ slower mode with keeping the audio... 11. Or when playback is paused, press to play slow reverse. 6. Before you start Functional overview (cont'd) Remote Control 1 16* 2 3 17 4 18 5 19 6 7 20 8 21 9 10 11 22 13 12...During playback, press to start or resume play. 7. REC I button Press once to play or recording. 21. Press to enter values for more than 3 seconds to switch the progressive scanning mode ...
...menu screen. 9. Or when playback is paused, press to turn the unit on display. During DVD playback, press and hold for the settings in a slightly faster/ slower mode with keeping the audio... 11. Or when playback is paused, press to play slow reverse. 6. Before you start Functional overview (cont'd) Remote Control 1 16* 2 3 17 4 18 5 19 6 7 20 8 21 9 10 11 22 13 12...During playback, press to start or resume play. 7. REC I button Press once to play or recording. 21. Press to enter values for more than 3 seconds to switch the progressive scanning mode ...
Quick Start Guide
Page 13
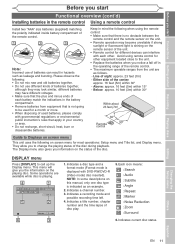
...the following on screen menu for other . The Display menu also gives you start Connections Getting started Recording Before you information on the status of the disc. Indicates a recording mode and possible recording time left. 4. Indicates a disc type and a format mode (Format mode is not going to... equipment located close to be used batteries, please comply with DVD-RW/DVD-R (Video mode) disc inserted). Avoid using the remote control: • Make sure that there is shining on the remote sensor of the unit. • Remote control for a month or more. • When disposing ...
...the following on screen menu for other . The Display menu also gives you start Connections Getting started Recording Before you information on the status of the disc. Indicates a recording mode and possible recording time left. 4. Indicates a disc type and a format mode (Format mode is not going to... equipment located close to be used batteries, please comply with DVD-RW/DVD-R (Video mode) disc inserted). Avoid using the remote control: • Make sure that there is shining on the remote sensor of the unit. • Remote control for a month or more. • When disposing ...
Quick Start Guide
Page 15
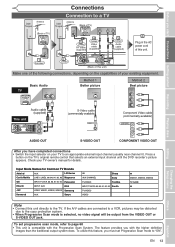
...System. Check your TV owner's manual for Common TV Brands Admiral AUX LXI-Series Curtis Mathis LINE1, LINE2, 00, 90, 91, 92, 93 Magnavox GE INPUT, TV/VCR, 00, 90, 91, 92, 93 Panasonic Hitachi INPUT, AUX RCA JVC VIDEO, VIDEO1, VIDEO2, VIDEO3 Samsung Kenwood AUX...Progressive Scan mode to "ON". Press a button on the capabilities of the following connections, depending on the TV's original remote control that selects an external input channel until the DVD recorder's picture appears. If the A/V cables are connected to a VCR, pictures may be distorted due to the copy protection ...
...System. Check your TV owner's manual for Common TV Brands Admiral AUX LXI-Series Curtis Mathis LINE1, LINE2, 00, 90, 91, 92, 93 Magnavox GE INPUT, TV/VCR, 00, 90, 91, 92, 93 Panasonic Hitachi INPUT, AUX RCA JVC VIDEO, VIDEO1, VIDEO2, VIDEO3 Samsung Kenwood AUX...Progressive Scan mode to "ON". Press a button on the capabilities of the following connections, depending on the TV's original remote control that selects an external input channel until the DVD recorder's picture appears. If the A/V cables are connected to a VCR, pictures may be distorted due to the copy protection ...
Quick Start Guide
Page 18
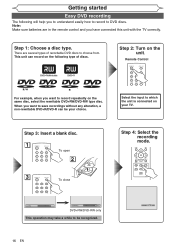
... unit with the TV correctly. Getting started Easy DVD recording The following type of recordable DVD discs to save recordings without any alteration, a non-rewritable DVD+R/DVD-R can record on the same disc, select the rewritable DVD+RW/DVD-RW type disc. There are in the remote control and you want to record repeatedly on the following will help you to understand...
... unit with the TV correctly. Getting started Easy DVD recording The following type of recordable DVD discs to save recordings without any alteration, a non-rewritable DVD+R/DVD-R can record on the same disc, select the rewritable DVD+RW/DVD-RW type disc. There are in the remote control and you want to record repeatedly on the following will help you to understand...
Quick Start Guide
Page 20
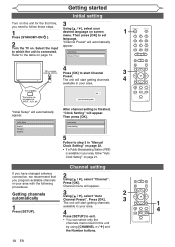
... unit will appear. The unit will automatically appear. Channel menu will automatically appear. Getting channels automatically 3 2 Using [K / L], select "Auto Channel Preset". Channel Preset TV's original remote control 4 Press [OK] to the table on page 13. Turn the TV on page 21. Channel setting If you have changed antenna connection, we recommend...
... unit will appear. The unit will automatically appear. Channel menu will automatically appear. Getting channels automatically 3 2 Using [K / L], select "Auto Channel Preset". Channel Preset TV's original remote control 4 Press [OK] to the table on page 13. Turn the TV on page 21. Channel setting If you have changed antenna connection, we recommend...
Quick Start Guide
Page 21
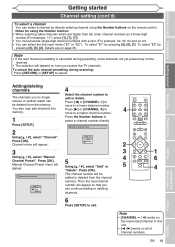
...[SETUP]. Note • [CHANNEL - / +] works on the memorized channel in this unit. • [{ / B] works on the remote control. EN 19 Changing the Setup menu Others Español Note • If the auto channel presetting is cancelled during scanning: Press [...Preset added or deleted from the memory. Add Delete 2 3 3 1 Using [K / L], select "Manual Channel Preset". Before you start Connections Getting started Recording Getting started Channel setting (cont'd) To select a channel You can select a channel by pressing [0], [0], [1]. Press [OK]. To select "E2" by pressing...
...[SETUP]. Note • [CHANNEL - / +] works on the memorized channel in this unit. • [{ / B] works on the remote control. EN 19 Changing the Setup menu Others Español Note • If the auto channel presetting is cancelled during scanning: Press [...Preset added or deleted from the memory. Add Delete 2 3 3 1 Using [K / L], select "Manual Channel Preset". Before you start Connections Getting started Recording Getting started Channel setting (cont'd) To select a channel You can select a channel by pressing [0], [0], [1]. Press [OK]. To select "E2" by pressing...

Quick Start Guide
Page 32
...recording Already 49 titles recorded Already 254 chapters recorded Copy prohibited program E36 Already finalized Video E46 It is impossible to record format disc additionally on a disc E40 Some portion has not been recorded because of the unit. [STOP C] on the remote... to exit. 5 6 Press [STANDBY-ON ] to return to erase the selected program. Recording Timer Recording (cont'd) Checking, canceling, or correcting the timer programming information 1 1 4 6 Press [STANDBY-ON ]. Recording did not complete correctly, the error number appears in process Press [STOP C] on the ...
...recording Already 49 titles recorded Already 254 chapters recorded Copy prohibited program E36 Already finalized Video E46 It is impossible to record format disc additionally on a disc E40 Some portion has not been recorded because of the unit. [STOP C] on the remote... to exit. 5 6 Press [STANDBY-ON ] to return to erase the selected program. Recording Timer Recording (cont'd) Checking, canceling, or correcting the timer programming information 1 1 4 6 Press [STANDBY-ON ]. Recording did not complete correctly, the error number appears in process Press [STOP C] on the ...
Quick Start Guide
Page 37
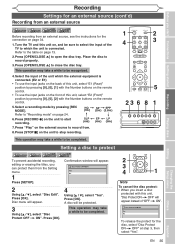
Refer to the table on the unit to start Connections Getting started Recording Playing discs Recording Settings for an external source (cont'd) Recording from an external source +VR +VR DVD+RW DVD+R DVD-RW DVD-R Before recording from an external source, see the instructions for the disc, select "Disc Protect ON OFF" at step ...To use the input jacks on the back of this unit, select "E1 (Rear)" position by pressing [0], [0], [1] with the Number buttons on the remote control. • To use the input jacks on the front of "OFF ON". HQ SP SPP (1Hr) (2Hr) (2.5Hr) 6. Disc Protect OFF...
Refer to the table on the unit to start Connections Getting started Recording Playing discs Recording Settings for an external source (cont'd) Recording from an external source +VR +VR DVD+RW DVD+R DVD-RW DVD-R Before recording from an external source, see the instructions for the disc, select "Disc Protect ON OFF" at step ...To use the input jacks on the back of this unit, select "E1 (Rear)" position by pressing [0], [0], [1] with the Number buttons on the remote control. • To use the input jacks on the front of "OFF ON". HQ SP SPP (1Hr) (2Hr) (2.5Hr) 6. Disc Protect OFF...
Quick Start Guide
Page 70
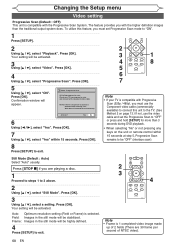
...OK]. 4 Using [K / L], select "Progressive Scan". Note • If your TV has progressive scan and connect with the higher definition images than 3 seconds during DVD playback. • When selecting "No" or not pressing any keys on page 13.) If not, use the video cable and set Progressive Scan mode to... 3 above. 2 3 4 2 Using [K / L], select "Still Mode". Press [OK]. To utilize this unit to the TV. (See Method 2 on the unit or remote control within 15 seconds. Your setting will be activated. Press [OK]. Press [OK]. 3 Using [K / L], select a setting. Press [OK].
...OK]. 4 Using [K / L], select "Progressive Scan". Note • If your TV has progressive scan and connect with the higher definition images than 3 seconds during DVD playback. • When selecting "No" or not pressing any keys on page 13.) If not, use the video cable and set Progressive Scan mode to... 3 above. 2 3 4 2 Using [K / L], select "Still Mode". Press [OK]. To utilize this unit to the TV. (See Method 2 on the unit or remote control within 15 seconds. Your setting will be activated. Press [OK]. Press [OK]. 3 Using [K / L], select a setting. Press [OK].
Quick Start Guide
Page 73
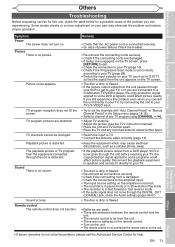
.... The playback picture or TV program from a DVD player, VCR or tuner goes through the unit before reaching your TV, the copy-protection ...signal applied to some DVD programs could affect picture quality. Sound is distorted. of any TV program using...recorder is in fast forward or fast reverse mode. • If the audio signal does not come through the DIGITAL OUT (COAXIAL) jack, check the Audio settings (pages 66-67). • The disc is dirty or flawed. • Batteries are weak. • There are obstacles between the remote...
.... The playback picture or TV program from a DVD player, VCR or tuner goes through the unit before reaching your TV, the copy-protection ...signal applied to some DVD programs could affect picture quality. Sound is distorted. of any TV program using...recorder is in fast forward or fast reverse mode. • If the audio signal does not come through the DIGITAL OUT (COAXIAL) jack, check the Audio settings (pages 66-67). • The disc is dirty or flawed. • Batteries are weak. • There are obstacles between the remote...
Quick Start Guide
Page 82
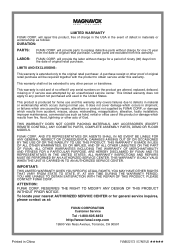
... and used in China 1VMN22173 / E7A61UD FUNAI CORP. A purchase receipt or other person or transferee. THIS WARRANTY DOES NOT COVER PACKING MATERIALS, ANY ACCESSORIES (EXCEPT REMOTE CONTROL), ANY COSMETIC PARTS, COMPLETE ASSEMBLY PARTS, DEMO OR FLOOR MODELS. ALL WARRANTY INSPECTIONS AND REPAIRS MUST BE PERFORMED BY AN AUTHORIZED SERVICE CENTER.
... and used in China 1VMN22173 / E7A61UD FUNAI CORP. A purchase receipt or other person or transferee. THIS WARRANTY DOES NOT COVER PACKING MATERIALS, ANY ACCESSORIES (EXCEPT REMOTE CONTROL), ANY COSMETIC PARTS, COMPLETE ASSEMBLY PARTS, DEMO OR FLOOR MODELS. ALL WARRANTY INSPECTIONS AND REPAIRS MUST BE PERFORMED BY AN AUTHORIZED SERVICE CENTER.


