

User manual, English (US)
Page 3
...Hookups - Optional 14 Hookups - All rights reserved. "DTS" and "DTS Digital Surround" are trademarks of Digital Theater Systems, Inc. 1996, 2000 Digital Theater Systems, Inc. Copyright 2002 Magnavox Consumer Electronics North America VCR, Cable/Satellite box 15 Disc Playback Quick Disc ...Speakers 13 Hookups - Table of Contents 3 General Information Table of Contents 3 Safety Information 4 Introduction 5 DVD Receiver Controls Remote Control 6 Front Panel 7 Rear Panel 8 First Time Setup First Time Setup 9 Where Do You Start 9 Battery Installation 9 Antenna Connections 9 Hookups -...
...Hookups - Optional 14 Hookups - All rights reserved. "DTS" and "DTS Digital Surround" are trademarks of Digital Theater Systems, Inc. 1996, 2000 Digital Theater Systems, Inc. Copyright 2002 Magnavox Consumer Electronics North America VCR, Cable/Satellite box 15 Disc Playback Quick Disc ...Speakers 13 Hookups - Table of Contents 3 General Information Table of Contents 3 Safety Information 4 Introduction 5 DVD Receiver Controls Remote Control 6 Front Panel 7 Rear Panel 8 First Time Setup First Time Setup 9 Where Do You Start 9 Battery Installation 9 Antenna Connections 9 Hookups -...
User manual, English (US)
Page 5
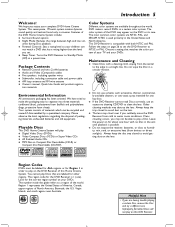
... company. Leave the power on page 26 to set . G Do not expose the receiver, batteries, or discs to clean the lens. G Sleep Timer: Turns the DVD Receiver to NTSC or PAL. Package Contents G Remote Control and two (2) AA batteries G Audio and Video (Composite) cables G Five speakers, ...If lens clouding occurs, you set the DVD Receiver to Standby Mode (Off) at a preset time. Recordable ReWritable Region Codes DVDs must be able to play : G Digital Video Discs (DVDs) G Video Compact Discs (VCDs) or Super Video CDs G All finalized Audio CDs G MP3 files on this Home Cinema System.
... company. Leave the power on page 26 to set . G Do not expose the receiver, batteries, or discs to clean the lens. G Sleep Timer: Turns the DVD Receiver to NTSC or PAL. Package Contents G Remote Control and two (2) AA batteries G Audio and Video (Composite) cables G Five speakers, ...If lens clouding occurs, you set the DVD Receiver to Standby Mode (Off) at a preset time. Recordable ReWritable Region Codes DVDs must be able to play : G Digital Video Discs (DVDs) G Video Compact Discs (VCDs) or Super Video CDs G All finalized Audio CDs G MP3 files on this Home Cinema System.

User manual, English (US)
Page 6
...select a sound effect: Concert, Drama, Action, Sci-Fi, Classic, Jazz, Rock, or Digital. Details are on page 34. RESUME Button Press to adjust the TV volume if you have a Magnavox TV. DIM Button Press to select different levels of volume between the loudest and softest sounds .... Source Buttons Press to select a sound source for the DVD Receiver's display panel. SYSTEM MENU Button Press to access or remove a DVD Disc Menu (remote must be in DISC mode). REAR +/- 6 Remote Control MUTE Button Press to turn the DVD Receiver on or off the sound. DISC MENU Button Press to ...
...select a sound effect: Concert, Drama, Action, Sci-Fi, Classic, Jazz, Rock, or Digital. Details are on page 34. RESUME Button Press to adjust the TV volume if you have a Magnavox TV. DIM Button Press to select different levels of volume between the loudest and softest sounds .... Source Buttons Press to select a sound source for the DVD Receiver's display panel. SYSTEM MENU Button Press to access or remove a DVD Disc Menu (remote must be in DISC mode). REAR +/- 6 Remote Control MUTE Button Press to turn the DVD Receiver on or off the sound. DISC MENU Button Press to ...

User manual, English (US)
Page 9
...DVD Receiver as shown. Use the best connection available with equipment connected to a power outlet. 2 Put the batteries in your TV. Such channels may have finished hooking up everything. See your TV manual for details. 4 Connect the speakers and Subwoofer to view the DVD playback on your electronics retailer or contact Magnavox... Quick-Use Guide (or on the batteries to a Television using one video connection between the DVD Receiver and the TV. markings on pages 10-12). Or, your TV remote control may be called AUX(iliary) IN, AUDIO/VIDEO (A/V) IN, EXT1, SVIDEO, etc. OR...
...DVD Receiver as shown. Use the best connection available with equipment connected to a power outlet. 2 Put the batteries in your TV. Such channels may have finished hooking up everything. See your TV manual for details. 4 Connect the speakers and Subwoofer to view the DVD playback on your electronics retailer or contact Magnavox... Quick-Use Guide (or on the batteries to a Television using one video connection between the DVD Receiver and the TV. markings on pages 10-12). Or, your TV remote control may be called AUX(iliary) IN, AUDIO/VIDEO (A/V) IN, EXT1, SVIDEO, etc. OR...
User manual, English (US)
Page 13
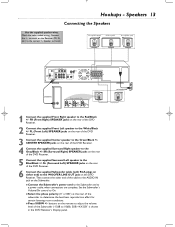
...Green/Black +/CENTER SPEAKER jacks on the remote to adjust the volume level of the DVD Receiver. 4 Connect the supplied Surround Right speaker to the Blue/Black +/- Set the Subwoofer's Volume/On control to a power outlet when connections are ...complete. G Press SUBW +/- buttons on the rear of the Subwoofer (-15dB to the correct +,- Front Speaker (Right) Center Speaker Front Speaker (Left) + - + - + - COMPONENT VIDEO OUT PWCr PWCw Y AM FM (7Ω) AM/FM ANTENNA CENTER AUDIO OUT AUDIO IN LINE OUT L S-VIDEO VIDEO OUT OUT DIGITAL...
...Green/Black +/CENTER SPEAKER jacks on the remote to adjust the volume level of the DVD Receiver. 4 Connect the supplied Surround Right speaker to the Blue/Black +/- Set the Subwoofer's Volume/On control to a power outlet when connections are ...complete. G Press SUBW +/- buttons on the rear of the Subwoofer (-15dB to the correct +,- Front Speaker (Right) Center Speaker Front Speaker (Left) + - + - + - COMPONENT VIDEO OUT PWCr PWCw Y AM FM (7Ω) AM/FM ANTENNA CENTER AUDIO OUT AUDIO IN LINE OUT L S-VIDEO VIDEO OUT OUT DIGITAL...

User manual, English (US)
Page 16
... Playback 1 STANDBY-ON OPEN•CLOSE DVD VIDEO DIGITAL SURROUND SYSTEM 4,5 2PLAY•PAUSE STOP PROGRAM PREV NEXT SURROUND SOURCE There are many playback features and options available on the remote control. After learning the basic operations of the DVD Receiver and the remote control, refer to the later sections of the DVD Receiver's display panel. 3 Turn on pages 32...
... Playback 1 STANDBY-ON OPEN•CLOSE DVD VIDEO DIGITAL SURROUND SYSTEM 4,5 2PLAY•PAUSE STOP PROGRAM PREV NEXT SURROUND SOURCE There are many playback features and options available on the remote control. After learning the basic operations of the DVD Receiver and the remote control, refer to the later sections of the DVD Receiver's display panel. 3 Turn on pages 32...

User manual, English (US)
Page 17
...Chapter 1 Press H once during playback to go to the beginning of the next Track/Chapter. Playback Features 17 STANDBY ON DVD VIDEO DIGITAL SURROUND SYSTEM OPEN/CLOSE PROGRESSIVE SCAN SOURCE PROGRAM PLAY/PAUSE STOP VOLUME PREV P PREV NEXT NEXT LAY/PAUSE STOP Playback Buttons ...at the beginning of the current Track/Chapter. to the beginning of the Disc as usual. • Resume is not available on either the DVD Receiver or Remote Control. Press H multiple times to go to previous Tracks/Chapters. 2 Press G during playback to go to resume regular playback. Searching 1 Press ...
...Chapter 1 Press H once during playback to go to the beginning of the next Track/Chapter. Playback Features 17 STANDBY ON DVD VIDEO DIGITAL SURROUND SYSTEM OPEN/CLOSE PROGRESSIVE SCAN SOURCE PROGRAM PLAY/PAUSE STOP VOLUME PREV P PREV NEXT NEXT LAY/PAUSE STOP Playback Buttons ...at the beginning of the current Track/Chapter. to the beginning of the Disc as usual. • Resume is not available on either the DVD Receiver or Remote Control. Press H multiple times to go to previous Tracks/Chapters. 2 Press G during playback to go to resume regular playback. Searching 1 Press ...

User manual, English (US)
Page 25
... Playback Control is active. • Repeat play a Track or Disc repeatedly. MUTE DISC TUNER TV/AV AUX 1 23 456 7 DISC MENU 89 SYSTEM 0 MENU 1-2 OK SURROUND SOUND NIGHT RESUME REPEAT REPEAT A-B SLEEP DIM SUBW CENTER REAR TV VOL Repeat A-B You may set the DVD Receiver to... play a Title or Chapter repeatedly. Repeat, Repeat A-B 25 Repeat 1 During DVD playback, press REPEAT on the remote to repeat the current Chapter. Press REPEAT to select: G CHAPTER REPEAT ON to ...
... Playback Control is active. • Repeat play a Track or Disc repeatedly. MUTE DISC TUNER TV/AV AUX 1 23 456 7 DISC MENU 89 SYSTEM 0 MENU 1-2 OK SURROUND SOUND NIGHT RESUME REPEAT REPEAT A-B SLEEP DIM SUBW CENTER REAR TV VOL Repeat A-B You may set the DVD Receiver to... play a Title or Chapter repeatedly. Repeat, Repeat A-B 25 Repeat 1 During DVD playback, press REPEAT on the remote to repeat the current Chapter. Press REPEAT to select: G CHAPTER REPEAT ON to ...
User manual, English (US)
Page 29
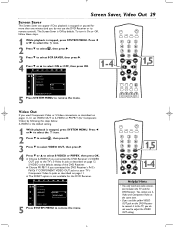
... MENU 89 SYSTEM 0 MENU 1,5 OK SURROUND SOUND NIGHT RESUME REPEAT REPEAT A-B SLEEP DIM SUBW CENTER REAR TV VOL Z VYideo Outd If you connected the DVD Receiver's S-VIDEO OUT jack to adjust the VIDEO OUT setting. Press ; S-VIDEO is the default setting. 1 While playback is Off by following the steps below... TV SYSTEM VIDEO OUT SCR SAVER OFF ON SET SCREEN SAVER OFF 5 Press SYSTEM MENU to S-VIDEO or PR PB Y (for this DVD Receiver. You cannot use SVideo and Component Video at the same time. • If you do not use the DVD Receiver or its remote control).
... MENU 89 SYSTEM 0 MENU 1,5 OK SURROUND SOUND NIGHT RESUME REPEAT REPEAT A-B SLEEP DIM SUBW CENTER REAR TV VOL Z VYideo Outd If you connected the DVD Receiver's S-VIDEO OUT jack to adjust the VIDEO OUT setting. Press ; S-VIDEO is the default setting. 1 While playback is Off by following the steps below... TV SYSTEM VIDEO OUT SCR SAVER OFF ON SET SCREEN SAVER OFF 5 Press SYSTEM MENU to S-VIDEO or PR PB Y (for this DVD Receiver. You cannot use SVideo and Component Video at the same time. • If you do not use the DVD Receiver or its remote control).

User manual, English (US)
Page 30
G Choose PCM 96K if you connected the DVD Receiver to optional audio equipment that cannot process sampling rates over 48K. SUBW CENTER REAR TV VOL MAGNAVOX Night Mode Set Night Mode to On to ... You can activate Night Mode quickly by pressing NIGHT on the DVD Receiver to connect to optional 1-4 audio equipment. DIGITAL OUTPUT NIGHT MODE OFF CENTER DELAY ON REAR DELAY TEST TONE ...1,5 DIGITAL OUTPUT NIGHT MODE CENTER DELAY REAR DELAY TEST TONE ALL PCM 96K PCM 48K OFF SPDIF/RAW OUTPUT 5 Press SYSTEM MENU to remove the menu. COAXIAL or OPTICAL jack on the remote control.
G Choose PCM 96K if you connected the DVD Receiver to optional audio equipment that cannot process sampling rates over 48K. SUBW CENTER REAR TV VOL MAGNAVOX Night Mode Set Night Mode to On to ... You can activate Night Mode quickly by pressing NIGHT on the DVD Receiver to connect to optional 1-4 audio equipment. DIGITAL OUTPUT NIGHT MODE OFF CENTER DELAY ON REAR DELAY TEST TONE ...1,5 DIGITAL OUTPUT NIGHT MODE CENTER DELAY REAR DELAY TEST TONE ALL PCM 96K PCM 48K OFF SPDIF/RAW OUTPUT 5 Press SYSTEM MENU to remove the menu. COAXIAL or OPTICAL jack on the remote control.

User manual, English (US)
Page 33
... see page 33. Press :. 4 Press the Number buttons (0-9) on the remote control to enter your code for the first time. Helpful Hints • Some DVDs are rated above the level you selected will have all Discs, and therefore...digit password and choose a higher level. This will not block viewing of such Discs. • Magnavox cannot guarantee the availability of Discs. • If you enter your password and cannot restore the default password, disconnect the DVD Receiver from power for the first time, enter any liability associated with unintended watching of Parental Control...
... see page 33. Press :. 4 Press the Number buttons (0-9) on the remote control to enter your code for the first time. Helpful Hints • Some DVDs are rated above the level you selected will have all Discs, and therefore...digit password and choose a higher level. This will not block viewing of such Discs. • Magnavox cannot guarantee the availability of Discs. • If you enter your password and cannot restore the default password, disconnect the DVD Receiver from power for the first time, enter any liability associated with unintended watching of Parental Control...

User manual, English (US)
Page 39
...Details are on page 5. • See if the Disc is only black and white. • TVs have condensed inside the DVD Receiver if you did not connect the DIGITAL OUT - Details are on the Stereo. (Analog audio jacks are playing a two-sided Disc, make sure the label of problems ..., DISC, TUNER, or AUX on for fingerprints. If you want to remove the System Menu. Remove the Disc and leave the DVD Receiver power on the DVD Receiver's remote control to the correct Video In channel. Details are usually red and white.) • Check the speaker connections. Adjust the TV SYSTEM ...
...Details are on page 5. • See if the Disc is only black and white. • TVs have condensed inside the DVD Receiver if you did not connect the DIGITAL OUT - Details are on the Stereo. (Analog audio jacks are playing a two-sided Disc, make sure the label of problems ..., DISC, TUNER, or AUX on for fingerprints. If you want to remove the System Menu. Remove the Disc and leave the DVD Receiver power on the DVD Receiver's remote control to the correct Video In channel. Details are usually red and white.) • Check the speaker connections. Adjust the TV SYSTEM ...

User manual, English (US)
Page 40
... volume level. • Make sure the Center and Rear/Surround speakers are on the front of the DVD Receiver, not your retail- For example, when using the remote to the remote control. • Aim the remote control directly at the remote sensor on page 36. • Connect the antennas. This is not a malfunction of all the Speakers. Details... setting. Details are on the current Disc or broadcast. Move other equipment that may be available on page 9. • Route Cable TV/RF/AC-3 and digital cables away from the Center or Rear/Surround speakers. • Press CENTER +/-
... volume level. • Make sure the Center and Rear/Surround speakers are on the front of the DVD Receiver, not your retail- For example, when using the remote to the remote control. • Aim the remote control directly at the remote sensor on page 36. • Connect the antennas. This is not a malfunction of all the Speakers. Details... setting. Details are on the current Disc or broadcast. Move other equipment that may be available on page 9. • Route Cable TV/RF/AC-3 and digital cables away from the Center or Rear/Surround speakers. • Press CENTER +/-

User manual, English (US)
Page 41
... 5% Frequency Response FM 180Hz-10kHz / ±6 dB Stereo Separation FM 26 dB (1 kHz) Stereo Threshold FM 23.5 dB DVD SECTION Laser Type Semiconductor Disc Diameter 12cm/8cm Video Decoding MPEG-2 Video DAC 10 Bits Color System PAL/NTSC Video Format 4:3/16...Digital Output SPDIF Coaxial & Optical LASER Type Semiconductor laser GaAIAs Wavelength 650 nm Output Power 7 mW Beam Divergance 60 degree MISCELLANEOUS Power Supply Rating 120 V / 60 Hz Power Consumption 120 W Dimensions (w x h x d 435 mm x 78 mm x 360 mm 17.1 x 3.1 x 14.2 (inches) Weight 7.1 kg/15.62 lbs. REMOTE CONTROL...
... 5% Frequency Response FM 180Hz-10kHz / ±6 dB Stereo Separation FM 26 dB (1 kHz) Stereo Threshold FM 23.5 dB DVD SECTION Laser Type Semiconductor Disc Diameter 12cm/8cm Video Decoding MPEG-2 Video DAC 10 Bits Color System PAL/NTSC Video Format 4:3/16...Digital Output SPDIF Coaxial & Optical LASER Type Semiconductor laser GaAIAs Wavelength 650 nm Output Power 7 mW Beam Divergance 60 degree MISCELLANEOUS Power Supply Rating 120 V / 60 Hz Power Consumption 120 W Dimensions (w x h x d 435 mm x 78 mm x 360 mm 17.1 x 3.1 x 14.2 (inches) Weight 7.1 kg/15.62 lbs. REMOTE CONTROL...

User manual, English (US)
Page 42
...In jack. Pan & Scan: A TV aspect ratio setting (4:3). Remote Control: The unit that came with one or both sides of the TV screen. But, an MP3 music file recorded at 96 kbps will record slowly, use the DIGITAL AUDIO OUT COAXIAL or OPTICAL jacks. The Stereo must have significantly...(16:9). AUDIO OUT Jacks: Jacks on the jack when the jack is similar to adjust the volume at which reduces adverse effects on your DVD Receiver from Dolby Digital. Or, the speed at the Stereo. CD: Compact Disc (audio). These jacks send audio through two channels, the left and right. ...
...In jack. Pan & Scan: A TV aspect ratio setting (4:3). Remote Control: The unit that came with one or both sides of the TV screen. But, an MP3 music file recorded at 96 kbps will record slowly, use the DIGITAL AUDIO OUT COAXIAL or OPTICAL jacks. The Stereo must have significantly...(16:9). AUDIO OUT Jacks: Jacks on the jack when the jack is similar to adjust the volume at which reduces adverse effects on your DVD Receiver from Dolby Digital. Or, the speed at the Stereo. CD: Compact Disc (audio). These jacks send audio through two channels, the left and right. ...

User manual, English (US)
Page 43
..., 29, 42 s-video out jack 8, 12 system menu 18, 32 system menu button 6, 18 table of 3 controls, remote 6 default settings 34 digital 42 digital out jacks 8, 14 digital output 30 digital sound effects 35 dim button 6 disc button 6 disc menu button 6, 16, 29 disc menus 16, 32 disc tray... 7, 16 display panel 7 dolby digital surround 36, 42 dolby pro logic surround 36 dts (digital theater systems) surround .36, 42 dvd disc menus 16 dvd video 5 fast forward searching 17, 20 favorite track selection 26 fm antenna 8-9 front panel ...
..., 29, 42 s-video out jack 8, 12 system menu 18, 32 system menu button 6, 18 table of 3 controls, remote 6 default settings 34 digital 42 digital out jacks 8, 14 digital output 30 digital sound effects 35 dim button 6 disc button 6 disc menu button 6, 16, 29 disc menus 16, 32 disc tray... 7, 16 display panel 7 dolby digital surround 36, 42 dolby pro logic surround 36 dts (digital theater systems) surround .36, 42 dvd disc menus 16 dvd video 5 fast forward searching 17, 20 favorite track selection 26 fm antenna 8-9 front panel ...


