

User manual, English (US)
Page 3
... designed to the point of cable entry as possible. All rights reserved. Features • Automatic Channel Setup • Automatic Head Cleaner • Automatic Tracking Adjustment • Closed Caption • Daylight-Savings Time • English or Spanish displays • High Quality (HQ) System • One-Touch Recording • Real-Time Tape Counter • Remote Control or Front Panel menu access • Rental Playback • Repeat Play • ShowGuardTM - However, there is...
... designed to the point of cable entry as possible. All rights reserved. Features • Automatic Channel Setup • Automatic Head Cleaner • Automatic Tracking Adjustment • Closed Caption • Daylight-Savings Time • English or Spanish displays • High Quality (HQ) System • One-Touch Recording • Real-Time Tape Counter • Remote Control or Front Panel menu access • Rental Playback • Repeat Play • ShowGuardTM - However, there is...
User manual, English (US)
Page 4
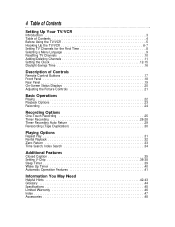
...Before Using the TV/VCR 5 Hooking Up the TV/VCR 6-7 Setting TV Channels for the First Time 8 Selecting a Menu Language 9 Resetting TV Channels 10 Adding/Deleting Channels 11 Setting the Clock 12-15 Daylight-Savings Time 16 Description of Controls Remote Control Buttons 17 Front Panel 18 Rear Panel 19 On-Screen Status Displays 20 Adjusting the Picture Controls 21 Basic Operations Playing 22 Playback Options 23 Recording 24 Recording Options One-Touch Recording 25 Timer Recording 26-28 Timer Recording Auto Return 29 Rerecording (Tape Duplication 30 Playing Options Repeat Play...
...Before Using the TV/VCR 5 Hooking Up the TV/VCR 6-7 Setting TV Channels for the First Time 8 Selecting a Menu Language 9 Resetting TV Channels 10 Adding/Deleting Channels 11 Setting the Clock 12-15 Daylight-Savings Time 16 Description of Controls Remote Control Buttons 17 Front Panel 18 Rear Panel 19 On-Screen Status Displays 20 Adjusting the Picture Controls 21 Basic Operations Playing 22 Playback Options 23 Recording 24 Recording Options One-Touch Recording 25 Timer Recording 26-28 Timer Recording Auto Return 29 Rerecording (Tape Duplication 30 Playing Options Repeat Play...

User manual, English (US)
Page 5
... Using the TV/VCR 5 1 2 3 Recording Prevention Video cassette tapes have record tabs to the unit: Install ALL batteries correctly, with their + and - This TV/VCR has an automatic head cleaning system. Your product uses batteries that can be recycled and reused. q Remove any light adhesive stick-on the unit; Specialized companies can jam the TV/VCR. Battery Safety q Battery Usage CAUTION - Removable labels can recycle your old product, batteries, manual, and packaging when you do not erase recordings...
... Using the TV/VCR 5 1 2 3 Recording Prevention Video cassette tapes have record tabs to the unit: Install ALL batteries correctly, with their + and - This TV/VCR has an automatic head cleaning system. Your product uses batteries that can be recycled and reused. q Remove any light adhesive stick-on the unit; Specialized companies can jam the TV/VCR. Battery Safety q Battery Usage CAUTION - Removable labels can recycle your old product, batteries, manual, and packaging when you do not erase recordings...

User manual, English (US)
Page 6
... the back of the TV/VCR. B Hooking Up Your TV/VCR With a Cable Box To view any channel, set the TV/VCR to the ANT(enna) Jack. Extend the antenna and adjust its length, direction, and angle for the clearest picture. Rod Antenna (not supplied) ANT. OUT IN RF coaxial cable (not supplied) ANT. ANT. C Hooking Up Your TV/VCR With an Indoor Antenna To install a rod antenna (not supplied...
... the back of the TV/VCR. B Hooking Up Your TV/VCR With a Cable Box To view any channel, set the TV/VCR to the ANT(enna) Jack. Extend the antenna and adjust its length, direction, and angle for the clearest picture. Rod Antenna (not supplied) ANT. OUT IN RF coaxial cable (not supplied) ANT. ANT. C Hooking Up Your TV/VCR With an Indoor Antenna To install a rod antenna (not supplied...

User manual, English (US)
Page 7
... Straight Pin Cable Plug Details are playing on the VCR or camcorder. Select channel 00 (AUX) at the TV/VCR when viewing tapes that you are complete, plug in the TV/VCR's power cord. 3 Before you want to copy tapes or view tapes that are on page 30. AUDIO/VIDEO OUT Jacks on the front of the TV/VCR. 2 When all other connections are playing on the VCR or camcorder. Helpful Hints • Before connecting an antenna...
... Straight Pin Cable Plug Details are playing on the VCR or camcorder. Select channel 00 (AUX) at the TV/VCR when viewing tapes that you are complete, plug in the TV/VCR's power cord. 3 Before you want to copy tapes or view tapes that are on page 30. AUDIO/VIDEO OUT Jacks on the front of the TV/VCR. 2 When all other connections are playing on the VCR or camcorder. Helpful Hints • Before connecting an antenna...

User manual, English (US)
Page 10
... below. 1 Press MENU. Use the Number buttons to select AUTO PRESET. CHANNEL SET UP - TIMER PROGRAMMING PICTURE CONTROL SETTING CLOCK B CHANNEL SET UP USER'S SET UP V-CHIP SET UP LANGUAGE [ENGLISH] CAPTION [OFF] ZERO RETURN TIME SEARCH INDEX SEARCH 2 Press PLAY/v or STOP/w to select non-memorized channels. - The TV/VCR scans and memorizes all the active channels in your area. RECORD SLOW TIME SEARCH MUTE Helpful Hint • The TV/VCR cannot control or change the channels of the Cable Box or Satellite Box. M E N U - When...
... below. 1 Press MENU. Use the Number buttons to select AUTO PRESET. CHANNEL SET UP - TIMER PROGRAMMING PICTURE CONTROL SETTING CLOCK B CHANNEL SET UP USER'S SET UP V-CHIP SET UP LANGUAGE [ENGLISH] CAPTION [OFF] ZERO RETURN TIME SEARCH INDEX SEARCH 2 Press PLAY/v or STOP/w to select non-memorized channels. - The TV/VCR scans and memorizes all the active channels in your area. RECORD SLOW TIME SEARCH MUTE Helpful Hint • The TV/VCR cannot control or change the channels of the Cable Box or Satellite Box. M E N U - When...
User manual, English (US)
Page 12
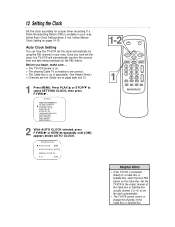
.../B. - TIMER PROGRAMMING PICTURE CONTROL B SETTING CLOCK CHANNEL SET UP USER'S SET UP V-CHIP SET UP LANGUAGE [ENGLISH] CAPTION [OFF] ZERO RETURN TIME SEARCH INDEX SEARCH 2 With AUTO CLOCK selected, press F.FWD/B or REW/s repeatedly until [ON] appears beside AUTO CLOCK. - RECORD SLOW TIME SEARCH MUTE Helpful Hints • If the TV/VCR is on pages 14-15. Auto Clock Setting You can have set . M E N U - Once you begin, make sure ... B AUTO CLOCK [ON] AUTO CLOCK CH [AUTO] MANUAL CLOCK SET D.S.T. [OFF] 1-2 POWER SLEEP/WAKE UP 1 REW PLAY STOP F.FWD MENU DISPLAY ALT...
.../B. - TIMER PROGRAMMING PICTURE CONTROL B SETTING CLOCK CHANNEL SET UP USER'S SET UP V-CHIP SET UP LANGUAGE [ENGLISH] CAPTION [OFF] ZERO RETURN TIME SEARCH INDEX SEARCH 2 With AUTO CLOCK selected, press F.FWD/B or REW/s repeatedly until [ON] appears beside AUTO CLOCK. - RECORD SLOW TIME SEARCH MUTE Helpful Hints • If the TV/VCR is on pages 14-15. Auto Clock Setting You can have set . M E N U - Once you begin, make sure ... B AUTO CLOCK [ON] AUTO CLOCK CH [AUTO] MANUAL CLOCK SET D.S.T. [OFF] 1-2 POWER SLEEP/WAKE UP 1 REW PLAY STOP F.FWD MENU DISPLAY ALT...

User manual, English (US)
Page 16
.../B. - TIMER PROGRAMMING PICTURE CONTROL B SETTING CLOCK CHANNEL SET UP USER'S SET UP V-CHIP SET UP LANGUAGE [ENGLISH] CAPTION [OFF] ZERO RETURN TIME SEARCH INDEX SEARCH 2 Press PLAY/v or STOP/w to select SETTING CLOCK. RECORD SLOW TIME SEARCH MUTE Then press F.FWD/B until [ON] or [OFF] appears. - Press PLAY/v or STOP/w to select D.S.T. SETTING CLOCK - AUTO CLOCK [ON] AUTO CLOCK CH [AUTO] MANUAL CLOCK SET B D.S.T. [ON] 3 Press MENU to remove the menu. 1-2 POWER SLEEP/WAKE UP 1,3 REW PLAY STOP F.FWD MENU DISPLAY ALT.CH 123 CH. 456 789 SPEED 0 RESET...
.../B. - TIMER PROGRAMMING PICTURE CONTROL B SETTING CLOCK CHANNEL SET UP USER'S SET UP V-CHIP SET UP LANGUAGE [ENGLISH] CAPTION [OFF] ZERO RETURN TIME SEARCH INDEX SEARCH 2 Press PLAY/v or STOP/w to select SETTING CLOCK. RECORD SLOW TIME SEARCH MUTE Then press F.FWD/B until [ON] or [OFF] appears. - Press PLAY/v or STOP/w to select D.S.T. SETTING CLOCK - AUTO CLOCK [ON] AUTO CLOCK CH [AUTO] MANUAL CLOCK SET B D.S.T. [ON] 3 Press MENU to remove the menu. 1-2 POWER SLEEP/WAKE UP 1,3 REW PLAY STOP F.FWD MENU DISPLAY ALT.CH 123 CH. 456 789 SPEED 0 RESET...
User manual, English (US)
Page 18
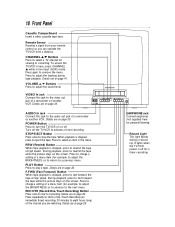
... change a setting of a camcorder or another VCR. Details are on page 25. It lights when the TV/VCR power is stopped, press to adjust the tracking during a recording. 18 Front Panel Cassette Compartment Insert a video cassette tape here. Remote Sensor Receives a signal from your remote control so you are watching. Details are on page 41. VIDEO In Jack Connect this jack to select a TV channel for a timer recording. Turn off . STOP/EJECT Button Press once to activate a timer recording. During playback...
... change a setting of a camcorder or another VCR. Details are on page 25. It lights when the TV/VCR power is stopped, press to adjust the tracking during a recording. 18 Front Panel Cassette Compartment Insert a video cassette tape here. Remote Sensor Receives a signal from your remote control so you are watching. Details are on page 41. VIDEO In Jack Connect this jack to select a TV channel for a timer recording. Turn off . STOP/EJECT Button Press once to activate a timer recording. During playback...

User manual, English (US)
Page 21
... adjustment within five seconds of selecting a control, the Picture Control menu will disappear. • The original settings will probably give you the best picture quality. • The TV/VCR will retain the Picture Control settings even if the power fails. You can select BRIGHT, CONTRAST, COLOR, TINT, or SHARPNESS. 1-3 POWER SLEEP/WAKE UP 1 REW PLAY STOP F.FWD MENU DISPLAY ALT.CH 123 4 5 6 CH. 789 SPEED 0 RESET +100 PAUSE/STILL VOL. TIMER PROGRAMMING B PICTURE CONTROL SETTING CLOCK CHANNEL SET...
... adjustment within five seconds of selecting a control, the Picture Control menu will disappear. • The original settings will probably give you the best picture quality. • The TV/VCR will retain the Picture Control settings even if the power fails. You can select BRIGHT, CONTRAST, COLOR, TINT, or SHARPNESS. 1-3 POWER SLEEP/WAKE UP 1 REW PLAY STOP F.FWD MENU DISPLAY ALT.CH 123 4 5 6 CH. 789 SPEED 0 RESET +100 PAUSE/STILL VOL. TIMER PROGRAMMING B PICTURE CONTROL SETTING CLOCK CHANNEL SET...

User manual, English (US)
Page 24
... resume recording automatically to turn on the TV/VCR, if necessary. 2 Press SPEED until the desired tape speed appears on the tape. SLP is in the TV/VCR. The Record light will eject the tape. POWER SLEEP/WAKE UP 6 REW PLAY STOP F.FWD MENU DISPLAY ALT.CH 123 CH. 456 789 SPEED 0 RESET +100 PAUSE/STILL VOL. RECORD SLOW TIME SEARCH MUTE 3 3 25 Tape Speeds This chart shows the recording/playback time for more programming you can change the tape speed using the SPEED button...
... resume recording automatically to turn on the TV/VCR, if necessary. 2 Press SPEED until the desired tape speed appears on the tape. SLP is in the TV/VCR. The Record light will eject the tape. POWER SLEEP/WAKE UP 6 REW PLAY STOP F.FWD MENU DISPLAY ALT.CH 123 CH. 456 789 SPEED 0 RESET +100 PAUSE/STILL VOL. RECORD SLOW TIME SEARCH MUTE 3 3 25 Tape Speeds This chart shows the recording/playback time for more programming you can change the tape speed using the SPEED button...

User manual, English (US)
Page 26
... the Cable Box/Satellite Box. - B-- - - - - Set CH as 03 or 04 in the TV/VCR. 1 Press MENU. Or, to set the clock, then set . Example: one -time recording, press PLAY/v until the desired channel number appears. (Example: CH61) Then press F.FWD/B. TIMER PROGRAMMING - 26 Timer Recording Follow the steps below to program the TV/VCR to select a program position. If the clock is removed, the cassette will eject when you begin, make sure ... q Channels are on the cassette must put tape...
... the Cable Box/Satellite Box. - B-- - - - - Set CH as 03 or 04 in the TV/VCR. 1 Press MENU. Or, to set the clock, then set . Example: one -time recording, press PLAY/v until the desired channel number appears. (Example: CH61) Then press F.FWD/B. TIMER PROGRAMMING - 26 Timer Recording Follow the steps below to program the TV/VCR to select a program position. If the clock is removed, the cassette will eject when you begin, make sure ... q Channels are on the cassette must put tape...

User manual, English (US)
Page 28
... to set the recording. Press REW/s to turn on the TV/VCR. 2 Press MENU. The program details will shift forward the end time only. Cancelling Timer Recordings To cancel a timer recording that has not started: 1 Press POWER to turn on the TV/VCR, then press STOP/EJECT on the TV/VCR. 2 Press MENU. Press PLAY/v or STOP/w to remove the menu. Press F.FWD/B. 3 Press PLAY/v or STOP/w to select a timer recording, then press F.FWD/B. 4 Press RESET. 5 Press MENU...
... to set the recording. Press REW/s to turn on the TV/VCR. 2 Press MENU. The program details will shift forward the end time only. Cancelling Timer Recordings To cancel a timer recording that has not started: 1 Press POWER to turn on the TV/VCR, then press STOP/EJECT on the TV/VCR. 2 Press MENU. Press PLAY/v or STOP/w to remove the menu. Press F.FWD/B. 3 Press PLAY/v or STOP/w to select a timer recording, then press F.FWD/B. 4 Press RESET. 5 Press MENU...

User manual, English (US)
Page 30
... now in Line Input or Auxiliary mode. 5 Point the TV/VCR remote control at the same time. The TV/VCR power will record your tape. Copying will play your TV/VCR at the TV/VCR. The TV/VCR is intact. Press SPEED until the desired tape speed (SP or SLP) appears on the screen. 6 Press PLAY on the source unit and REC(ord)/OTR on your tape. Connect the source unit (VCR or camcorder) to VIDEO In 1 Make the connections shown above, using audio and video cables (not...
... now in Line Input or Auxiliary mode. 5 Point the TV/VCR remote control at the same time. The TV/VCR power will record your tape. Copying will play your TV/VCR at the TV/VCR. The TV/VCR is intact. Press SPEED until the desired tape speed (SP or SLP) appears on the screen. 6 Press PLAY on the source unit and REC(ord)/OTR on your tape. Connect the source unit (VCR or camcorder) to VIDEO In 1 Make the connections shown above, using audio and video cables (not...
User manual, English (US)
Page 35
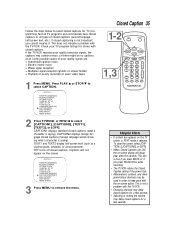
This does not indicate a problem with the TV/VCR. • Changing channels may delay closed captions for a few seconds. • Adjusting or muting the volume may delay closed captions. TIMER PROGRAMMING PICTURE CONTROL SETTING CLOCK CHANNEL SET UP USER'S SET UP V-CHIP SET UP LANGUAGE [ENGLISH] B CAPTION [CAPTION1] ZERO RETURN TIME SEARCH INDEX SEARCH 3 Press MENU to select CAPTION. - Press PLAY/v or STOP/w to remove the menu. CAPTION1 displays standard closed captions (what a character is selected...
This does not indicate a problem with the TV/VCR. • Changing channels may delay closed captions for a few seconds. • Adjusting or muting the volume may delay closed captions. TIMER PROGRAMMING PICTURE CONTROL SETTING CLOCK CHANNEL SET UP USER'S SET UP V-CHIP SET UP LANGUAGE [ENGLISH] B CAPTION [CAPTION1] ZERO RETURN TIME SEARCH INDEX SEARCH 3 Press MENU to select CAPTION. - Press PLAY/v or STOP/w to remove the menu. CAPTION1 displays standard closed captions (what a character is selected...

User manual, English (US)
Page 42
... TV/VCR. If the power fails, timer recordings will block the ventilation openings. • Avoid locations subject to assist you. TV/VCR will not occur only if it away from direct sunlight and keep the TV/VCR power on pages 12-15. • Put a tape in your hookups. Details are on a carpet, as this list of problems and possible solutions before you call a customer service representative, please know the model number...
... TV/VCR. If the power fails, timer recordings will block the ventilation openings. • Avoid locations subject to assist you. TV/VCR will not occur only if it away from direct sunlight and keep the TV/VCR power on pages 12-15. • Put a tape in your hookups. Details are on a carpet, as this list of problems and possible solutions before you call a customer service representative, please know the model number...
User manual, English (US)
Page 43
... 10-11. TV/VCR does not display closed captions. • Make sure closed captioning is destroyed. • Adjust the tracking. Refer to an AC (alternating current) outlet. • If a timer recording is missing. Remote control does not operate TV/VCR. • Aim the remote control directly at least two hours, but do not have Cable TV service, only channels 2-69 will eject the tape if the record tab is programmed, turn off , the TV/VCR will be available...
... 10-11. TV/VCR does not display closed captions. • Make sure closed captioning is destroyed. • Adjust the tracking. Refer to an AC (alternating current) outlet. • If a timer recording is missing. Remote control does not operate TV/VCR. • Aim the remote control directly at least two hours, but do not have Cable TV service, only channels 2-69 will eject the tape if the record tab is programmed, turn off , the TV/VCR will be available...

User manual, English (US)
Page 44
... received without a Cable Box. Dubbing: copying a tape using a VCR. playback only. • SLP (super long play ) - Auxiliary (AUX): the channel to which provides enhanced picture detail. VIDEO In Jack: jack on the screen. a timed recording that is connected to record audio from another source. fastest tape speed (recording time for a T120 tape is used to the TV/VCR (for example, a camcorder or VCR). best picture quality. • LP (long play) - slowest tape speed (recording time for a T120 tape is always channel 00 (AUX). Picture: adjusting increases or decreases...
... received without a Cable Box. Dubbing: copying a tape using a VCR. playback only. • SLP (super long play ) - Auxiliary (AUX): the channel to which provides enhanced picture detail. VIDEO In Jack: jack on the screen. a timed recording that is connected to record audio from another source. fastest tape speed (recording time for a T120 tape is used to the TV/VCR (for example, a camcorder or VCR). best picture quality. • LP (long play) - slowest tape speed (recording time for a T120 tape is always channel 00 (AUX). Picture: adjusting increases or decreases...

User manual, English (US)
Page 46
... the product to this owner's manual and keep the original box and packing material in for all replaced and repaired parts also expires. Please record below the model and serial numbers found on all labor charges. MODEL SERIAL This warranty gives you a service call. From 90 days to one to provide service (although there may be carried in case you need to you pay for...
... the product to this owner's manual and keep the original box and packing material in for all replaced and repaired parts also expires. Please record below the model and serial numbers found on all labor charges. MODEL SERIAL This warranty gives you a service call. From 90 days to one to provide service (although there may be carried in case you need to you pay for...
User manual, English (US)
Page 47
... language selection 9 line input mode . . . . . .7, 30, 44 long play 24, 44 lp 24, 44 menu button 17 front panel button access . .18 mute button 17 number buttons 17 one-touch recording 25 pause/still button 17, 23 picture, adjusting 21 play button 17, 18 playback options 23 playing 22 power button 17, 18 cord 7, 19 ratings movie 38-39 tv 36-37 rear panel 19 rec/otr button 18, 25 record light 18 recording 24 recording prevention 5 remote control buttons 17 using 5 remote sensor 18 repeat play 31 rerecording...
... language selection 9 line input mode . . . . . .7, 30, 44 long play 24, 44 lp 24, 44 menu button 17 front panel button access . .18 mute button 17 number buttons 17 one-touch recording 25 pause/still button 17, 23 picture, adjusting 21 play button 17, 18 playback options 23 playing 22 power button 17, 18 cord 7, 19 ratings movie 38-39 tv 36-37 rear panel 19 rec/otr button 18, 25 record light 18 recording 24 recording prevention 5 remote control buttons 17 using 5 remote sensor 18 repeat play 31 rerecording...


