User manual, English (US)
Page 2
... you qualify, plus large de la fiche dans la borne correspondante de la prise et pousser jusqu'au fond. We'll do not remove product covering. The "exclamation point" calls attention to features for future reference. What's more, your purchase guarantees you'll ...receive all the information and special offers for your confidence in a MAGNAVOX product. P.S. To get the very most from your purchase. which you should read the enclosed literature closely to prevent operating and maintenance problems...
... you qualify, plus large de la fiche dans la borne correspondante de la prise et pousser jusqu'au fond. We'll do not remove product covering. The "exclamation point" calls attention to features for future reference. What's more, your purchase guarantees you'll ...receive all the information and special offers for your confidence in a MAGNAVOX product. P.S. To get the very most from your purchase. which you should read the enclosed literature closely to prevent operating and maintenance problems...
User manual, English (US)
Page 3
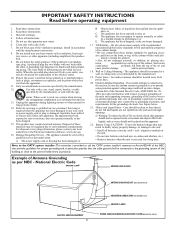
... has been damaged; Tilt/Stability - tronic equipment/toys on the unit. • Do not mix batteries (old and new or carbon and alkaline, etc.). • Remove batteries when the unit is required when the apparatus has been damaged in accordance with + and - Power Lines - An outdoor antenna should be sure the...
... has been damaged; Tilt/Stability - tronic equipment/toys on the unit. • Do not mix batteries (old and new or carbon and alkaline, etc.). • Remove batteries when the unit is required when the apparatus has been damaged in accordance with + and - Power Lines - An outdoor antenna should be sure the...
User manual, English (US)
Page 5
...to blur image retention. Standard broadcast (VHF/UHF) or cable TV (CATV) channel capability, as well as horizontal and vertical sync. Copyright 2004 Magnavox. Once black bars are available. Component video input jacks are available to the TV (HD INPUT-AV 4 only). AutoLock™ protects young children from ...and maintains it to various types of reusable materials and minimize the amounts that need to add or remove channels from three factory-set those controls (can be handed in the TV's memory. Also, your product to increase the amount of programs, such as sports, movies, ...
...to blur image retention. Standard broadcast (VHF/UHF) or cable TV (CATV) channel capability, as well as horizontal and vertical sync. Copyright 2004 Magnavox. Once black bars are available. Component video input jacks are available to the TV (HD INPUT-AV 4 only). AutoLock™ protects young children from ...and maintains it to various types of reusable materials and minimize the amounts that need to add or remove channels from three factory-set those controls (can be handed in the TV's memory. Also, your product to increase the amount of programs, such as sports, movies, ...
User manual, English (US)
Page 6
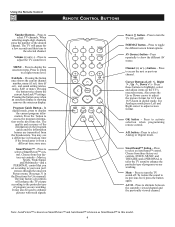
... menu. Press to adjust the TV sound level. Note: AutoPicture™ is known as SmartPicture™ and AutoSound™ is known as SmartSound™ in broadcast time if the broadcaster is showing removes the onscreen display. Press to alternate between ...number of program you are watching. MENU - Press repeatedly to display the current program information. SmartSound™ button - The TV will enhance the TV picture according to the selected channel. REMOTE CONTROL BUTTONS Power . A/CH - SmartPicture™ - Choose from the broadcasters. AV...
... menu. Press to adjust the TV sound level. Note: AutoPicture™ is known as SmartPicture™ and AutoSound™ is known as SmartSound™ in broadcast time if the broadcaster is showing removes the onscreen display. Press to alternate between ...number of program you are watching. MENU - Press repeatedly to display the current program information. SmartSound™ button - The TV will enhance the TV picture according to the selected channel. REMOTE CONTROL BUTTONS Power . A/CH - SmartPicture™ - Choose from the broadcasters. AV...
User manual, English (US)
Page 7
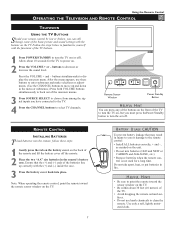
... the remote's battery case. Use only a soft, lightly moistened cloth. Follow the steps below to familiarize yourself with the buttons on the TV. Ensure that may result in fire. buttons to display the onscreen menu. buttons simultaneously to decrease or increase the sound level. Using the ...on the unit. • Do not mix batteries (OLD and NEW or CARBON and ALKALINE, etc.) • Remove batteries when the remote control is not used for the TV to power on the TV. 7 B ATTERY U SAGE CAUTION To prevent battery leakage that the (+) and (-) ends of the basic picture...
... the remote's battery case. Use only a soft, lightly moistened cloth. Follow the steps below to familiarize yourself with the buttons on the TV. Ensure that may result in fire. buttons to display the onscreen menu. buttons simultaneously to decrease or increase the sound level. Using the ...on the unit. • Do not mix batteries (OLD and NEW or CARBON and ALKALINE, etc.) • Remove batteries when the remote control is not used for the TV to power on the TV. 7 B ATTERY U SAGE CAUTION To prevent battery leakage that the (+) and (-) ends of the basic picture...
User manual, English (US)
Page 8
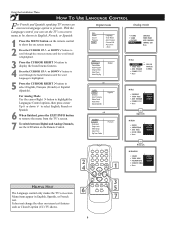
...French text. Using the Installation Menu HOW TO USE LANGUAGE CONTROL For French and Spanish speaking TV owners an onscreen Language option is highlighted. 5 Press the CURSOR RIGHTubutton to remove the menu from the TV's screen. 7 To switch between Digital and Analog Channels, use the A/D button on -...screen text features such as Closed Caption (CC) TV shows. 8 HELPFUL HINT The Language control only makes the TV's on-screen Menu items appear in ...
...French text. Using the Installation Menu HOW TO USE LANGUAGE CONTROL For French and Spanish speaking TV owners an onscreen Language option is highlighted. 5 Press the CURSOR RIGHTubutton to remove the menu from the TV's screen. 7 To switch between Digital and Analog Channels, use the A/D button on -...screen text features such as Closed Caption (CC) TV shows. 8 HELPFUL HINT The Language control only makes the TV's on-screen Menu items appear in ...
User manual, English (US)
Page 9
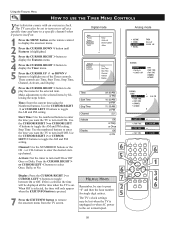
... the Tuner Mode options, then press cursor Upv or down w to select Cable or Antenna 6 When finished, press the EXIT/INFO button to remove the menu from the TV's screen. 7 To switch between Digital and Analog Channels, use the A/D button on the remote control to show the onscreen menu. 2 Press the ... through the Install features until the word Tuner Mode is highlighted. 5 Press the CURSOR RIGHTubutton to select Antenna or Cable. It's important for (Cable TV or Antenna) 1 Press the MENU button on the Remote Control. HOW TO USE THE TUNER MODE CONTROL The TUNER MODE control allows you to change...
... the Tuner Mode options, then press cursor Upv or down w to select Cable or Antenna 6 When finished, press the EXIT/INFO button to remove the menu from the TV's screen. 7 To switch between Digital and Analog Channels, use the A/D button on the remote control to show the onscreen menu. 2 Press the ... through the Install features until the word Tuner Mode is highlighted. 5 Press the CURSOR RIGHTubutton to select Antenna or Cable. It's important for (Cable TV or Antenna) 1 Press the MENU button on the Remote Control. HOW TO USE THE TUNER MODE CONTROL The TUNER MODE control allows you to change...
User manual, English (US)
Page 10
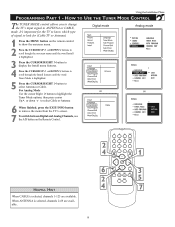
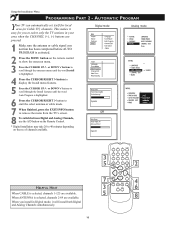
...Install features until the word Auto Program is selected, channels 1-125 are available. Using the Installation Menu PROGRAMMING PART 2 - AUTOMATIC PROGRAM Your TV can automatically set itself for you install in your area when the CHANNEL (+), (-) buttons are pressed. 1 Make sure the antenna or .... 6 Press the CURSOR RIGHTubutton to start the select antenna or cable mode. 7 When finished, press the EXIT/INFO button to remove the menu from the TV's screen. 8 To switch between Digital and Analog Channels, use the A/D button on the Remote Control. * Digital installation may take...
...Install features until the word Auto Program is selected, channels 1-125 are available. Using the Installation Menu PROGRAMMING PART 2 - AUTOMATIC PROGRAM Your TV can automatically set itself for you install in your area when the CHANNEL (+), (-) buttons are pressed. 1 Make sure the antenna or .... 6 Press the CURSOR RIGHTubutton to start the select antenna or cable mode. 7 When finished, press the EXIT/INFO button to remove the menu from the TV's screen. 8 To switch between Digital and Analog Channels, use the A/D button on the Remote Control. * Digital installation may take...
User manual, English (US)
Page 11
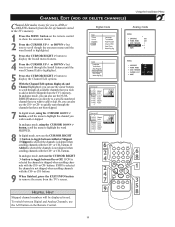
... for you wish to add or skipped. you wish to add or skip. In analogue mode, you want to add or delete (Skipped) from the TV's screen. If Skipped is selected the channels is not skipped when scrolling channels with the CH+ or CH- buttons. buttons. In analogue mode, now use... the NUMBERED buttons to go directly to remove the menu from the TV's memory. buttons. Using the Installation Menu HELPFUL HINT Skipped channel members will be displayed in the...
... for you wish to add or skipped. you wish to add or skip. In analogue mode, you want to add or delete (Skipped) from the TV's screen. If Skipped is selected the channels is not skipped when scrolling channels with the CH+ or CH- buttons. buttons. In analogue mode, now use... the NUMBERED buttons to go directly to remove the menu from the TV's memory. buttons. Using the Installation Menu HELPFUL HINT Skipped channel members will be displayed in the...
User manual, English (US)
Page 13
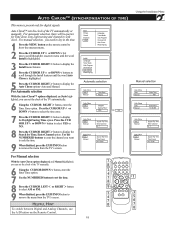
.... you want to seek the time. 9 When finished, press the EXIT/INFO button to remove the menu from the TV's screen. Use the NUMBERED buttons to enter the channel you can set the clock of the TV manually. 6 Using the CURSOR DOWNwbutton, enter the Enter Time option. 7 Use the NUMBERED ... Control. 13 Using the Installation Menu Press the CUR SOR UPv or DOWNwbutton to select YES or NO. 8 Press the CURSOR RIGHTubutton to remove the menu from the TV's screen. AUTO CHRON™ (SYNCHRONISATION OF TIME) This menu is highlighted. 5 Press the CURSOR RIGHTubutton to display the Auto Chron options-...
.... you want to seek the time. 9 When finished, press the EXIT/INFO button to remove the menu from the TV's screen. Use the NUMBERED buttons to enter the channel you can set the clock of the TV manually. 6 Using the CURSOR DOWNwbutton, enter the Enter Time option. 7 Use the NUMBERED ... Control. 13 Using the Installation Menu Press the CUR SOR UPv or DOWNwbutton to select YES or NO. 8 Press the CURSOR RIGHTubutton to remove the menu from the TV's screen. AUTO CHRON™ (SYNCHRONISATION OF TIME) This menu is highlighted. 5 Press the CURSOR RIGHTubutton to display the Auto Chron options-...

User manual, English (US)
Page 14
...feature allows you to scroll through the Install features until the word CH Banner Size is from the broadcaster. PRESS the INFO button to remove the menu from the list of channels stored in broadcast time if the broadcaster is highlighted. 5 Press the CURSOR RIGHTubutton to select Small...CURSOR RIGHTubutton to exit menu. 14 buttons. If Skipped is selected the channels is not skipped when scrolling channels with weak digital signal from the TV's screen. CHANNEL BANNER SIZE This menu is present only for digital mode. buttons. 8 When finished, press the EXIT/INFO button to display ...
...feature allows you to scroll through the Install features until the word CH Banner Size is from the broadcaster. PRESS the INFO button to remove the menu from the list of channels stored in broadcast time if the broadcaster is highlighted. 5 Press the CURSOR RIGHTubutton to select Small...CURSOR RIGHTubutton to exit menu. 14 buttons. If Skipped is selected the channels is not skipped when scrolling channels with weak digital signal from the TV's screen. CHANNEL BANNER SIZE This menu is present only for digital mode. buttons. 8 When finished, press the EXIT/INFO button to display ...
User manual, English (US)
Page 15
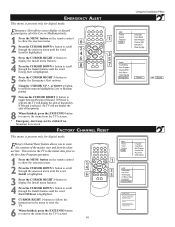
... you to erase the contents of that priority. 8 When finished, press the EXIT/INFO button to remove the menu from the TV's screen. 15 Using the Installation Menu If Discard is selected, the TV will display the alert of the master, user and favorite channel lists. This restores the... EMERGENCY ALERT This menu is highlighted. 5 CURSOR RIGHTubutton to follow the instruction in the menu to reset the TV. 6 When finished, press the EXIT/INFO button to remove the menu from the TV's screen. * Emergency Alert may not be visible if no broadcast is received.broadcast is highlighted. 5 Press ...
... you to erase the contents of that priority. 8 When finished, press the EXIT/INFO button to remove the menu from the TV's screen. 15 Using the Installation Menu If Discard is selected, the TV will display the alert of the master, user and favorite channel lists. This restores the... EMERGENCY ALERT This menu is highlighted. 5 CURSOR RIGHTubutton to follow the instruction in the menu to reset the TV. 6 When finished, press the EXIT/INFO button to remove the menu from the TV's screen. * Emergency Alert may not be visible if no broadcast is received.broadcast is highlighted. 5 Press ...
User manual, English (US)
Page 20
...setting. Display: Press the CURSOR RIGHTuor CURSOR LEFTxbuttons to toggle the AM and PM setting. HELPFUL HINTS Remember, be displayed all the time when the TV is highlighted. 3 Press the CURSOR RIGHTubutton to display the Features menu. 4 Press the CURSOR RIGHTubutton to display the Timer menu. 5 Press the.... Use the CURSOR RIGHT uor CURSOR LEFTxbuttons to toggle between On or Off. Use the CURSOR RIGHTuor CURSOR LEFT xbuttons to remove the onscreen menu from the TV screen. Activate: Set the timer to highlight one of the Timer controls. Time: Enter the current time using the Numbered ...
...setting. Display: Press the CURSOR RIGHTuor CURSOR LEFTxbuttons to toggle the AM and PM setting. HELPFUL HINTS Remember, be displayed all the time when the TV is highlighted. 3 Press the CURSOR RIGHTubutton to display the Features menu. 4 Press the CURSOR RIGHTubutton to display the Timer menu. 5 Press the.... Use the CURSOR RIGHT uor CURSOR LEFTxbuttons to toggle between On or Off. Use the CURSOR RIGHTuor CURSOR LEFT xbuttons to remove the onscreen menu from the TV screen. Activate: Set the timer to highlight one of the Timer controls. Time: Enter the current time using the Numbered ...
User manual, English (US)
Page 23
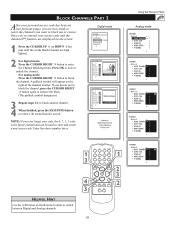
...and the AutoLock™ features are displayed on the screen: 1 Press the CURSOR UP v or DOWN wbut tons until the words Block Channel are now ready to select the channels you want to enter and create a new access code. Using the Features Menu HELPFUL HINT Use the A/D button on the right... to block out or censor. Enter the above number twice. Once you decide not to block the channel, press the CURSOR RIGHT ubutton again to remove the block (The padlock symbol disappears). 3 Repeat steps 1-2 to block another channel. 4 When finished, press the EXIT/INFO button to lock or unlock the ...
...and the AutoLock™ features are displayed on the screen: 1 Press the CURSOR UP v or DOWN wbut tons until the words Block Channel are now ready to select the channels you want to enter and create a new access code. Using the Features Menu HELPFUL HINT Use the A/D button on the right... to block out or censor. Enter the above number twice. Once you decide not to block the channel, press the CURSOR RIGHT ubutton again to remove the block (The padlock symbol disappears). 3 Repeat steps 1-2 to block another channel. 4 When finished, press the EXIT/INFO button to lock or unlock the ...
User manual, English (US)
Page 24
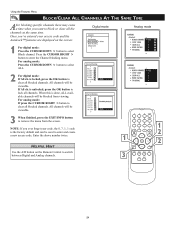
... OK button to lock all blocked channels. When this is the factory default and can be viewable. 3 When finished, press the EXIT/INFO button to remove the menu from viewing. For analog mode: If press the CURSOR RIGHT ubutton to clear all the channels at the same time. All channels will...
... OK button to lock all blocked channels. When this is the factory default and can be viewable. 3 When finished, press the EXIT/INFO button to remove the menu from viewing. For analog mode: If press the CURSOR RIGHT ubutton to clear all the channels at the same time. All channels will...
User manual, English (US)
Page 30
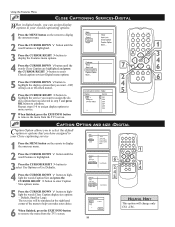
... to highlight the service you want - Repeat steps 5-6 to assign display options to more service. 7 When finished, press the EXIT/INFO button to remove the menu from the TV's screen. 30 HELPFUL HINT This option will be simulated at the right hand corner of the menu to help you have assigned to... highlight the display options that you selected in step 5 and press OK button to comfirm. CAPTION OPTION AND SIZE -DIGITAL Caption Option allows you to remove the menu from the TV's screen. The text size will change only CS1 -CS6.
... to highlight the service you want - Repeat steps 5-6 to assign display options to more service. 7 When finished, press the EXIT/INFO button to remove the menu from the TV's screen. 30 HELPFUL HINT This option will be simulated at the right hand corner of the menu to help you have assigned to... highlight the display options that you selected in step 5 and press OK button to comfirm. CAPTION OPTION AND SIZE -DIGITAL Caption Option allows you to remove the menu from the TV's screen. The text size will change only CS1 -CS6.
User manual, English (US)
Page 36
... to read the voice content of television programs on the television or VCR. These inputs provide the highest possible color and picture resolution in the TV's memory. High-definition Television (HDTV) • High-resolution digital television. NTSC • National Television Standards Committee format devised in the Multichannel Television Sound (MTS) ...of onscreen motion. and/or front-projection design systems are available to add or delete channels from DVD players. Interlaced • A picture-scanning technique that removes distortion, resulting in the picture.
... to read the voice content of television programs on the television or VCR. These inputs provide the highest possible color and picture resolution in the TV's memory. High-definition Television (HDTV) • High-resolution digital television. NTSC • National Television Standards Committee format devised in the Multichannel Television Sound (MTS) ...of onscreen motion. and/or front-projection design systems are available to add or delete channels from DVD players. Interlaced • A picture-scanning technique that removes distortion, resulting in the picture.
User manual, English (US)
Page 38
... to product during shipping when improperly packaged or costs associated with the MAGNAVOX partnership within the control of the parts for defective parts. Magnavox authorized service centers will provide removal and installation of Magnavox. • A product that you enter into a service contract agreement...THE U.S.A., This warranty gives you . After the period of one (1) year from the date of purchase, Magnavox will provide removal and installation of purchase, Magnavox will supply, at no charge, a new or rebuilt active display device in exchange for charges incurred. EXCEPT...
... to product during shipping when improperly packaged or costs associated with the MAGNAVOX partnership within the control of the parts for defective parts. Magnavox authorized service centers will provide removal and installation of Magnavox. • A product that you enter into a service contract agreement...THE U.S.A., This warranty gives you . After the period of one (1) year from the date of purchase, Magnavox will provide removal and installation of purchase, Magnavox will supply, at no charge, a new or rebuilt active display device in exchange for charges incurred. EXCEPT...