User Manual
Page 1
24-Inch Built-In Wall Oven User's Manual Model MCSWOE24S PLEASE READ THIS MANUAL CAREFULLY BEFORE USING YOUR WALL OVEN AND KEEP IT FOR FUTURE REFERENCE. 1
24-Inch Built-In Wall Oven User's Manual Model MCSWOE24S PLEASE READ THIS MANUAL CAREFULLY BEFORE USING YOUR WALL OVEN AND KEEP IT FOR FUTURE REFERENCE. 1

User Manual
Page 3
CONTENTS PRODUCT REGISTRATION 2 PRECAUTIONS 4 IMPORTANT SAFETY INSTRUCTIONS 5 SPECIFICATIONS 7 PARTS AND FEATURES 8 INSTALLATION INSTRUCTIONS 9 BEFORE USE 13 OPERATION INSTRUCTIONS 14 CARE AND MAINTENANCE 18 TROUBLESHOOTING 21 LIMITED WARRANTY 22 3
CONTENTS PRODUCT REGISTRATION 2 PRECAUTIONS 4 IMPORTANT SAFETY INSTRUCTIONS 5 SPECIFICATIONS 7 PARTS AND FEATURES 8 INSTALLATION INSTRUCTIONS 9 BEFORE USE 13 OPERATION INSTRUCTIONS 14 CARE AND MAINTENANCE 18 TROUBLESHOOTING 21 LIMITED WARRANTY 22 3
User Manual
Page 4
PRECAUTIONS EXPLANATION OF SYMBOLS WARNING Hazards or unsafe practices which COULD result in minor personal injury. WARNING: Read and understand all possible conditions and situations that may result in electric shock, fire and/or serious personal injury. The warnings, cautions and instructions discussed in this user manual may occur. 4 Failure to follow all instructions described in severe personal injury or death. CAUTION Hazards or unsafe practices which COULD result in this user manual cannot cover all safety precautions.
PRECAUTIONS EXPLANATION OF SYMBOLS WARNING Hazards or unsafe practices which COULD result in minor personal injury. WARNING: Read and understand all possible conditions and situations that may result in electric shock, fire and/or serious personal injury. The warnings, cautions and instructions discussed in this user manual may occur. 4 Failure to follow all instructions described in severe personal injury or death. CAUTION Hazards or unsafe practices which COULD result in this user manual cannot cover all safety precautions.
User Manual
Page 5
... "Installation Instructions" on grease fires. • Smother the fire or flame. NEVER use the appliance for storage. • ALWAYS have any part of electric shock or fire. • If materials inside an oven should ignite, keep door closed. If the flames do not go out immediately, evacuate and call the fire department. • NEVER pick up a flaming pan. Connect only...
... "Installation Instructions" on grease fires. • Smother the fire or flame. NEVER use the appliance for storage. • ALWAYS have any part of electric shock or fire. • If materials inside an oven should ignite, keep door closed. If the flames do not go out immediately, evacuate and call the fire department. • NEVER pick up a flaming pan. Connect only...
User Manual
Page 6
... oven doors. • Exercise caution when opening and make sure there are oven vent openings, surfaces near the unit. After the release of the opening the appliance. Heating elements may be stored in an appliance, in cabinets above an appliance or on any part of the appliance, especially a door, warming drawer or storage drawer. Keep your face clear of hot air and/or steam, proceed with your cooking...
... oven doors. • Exercise caution when opening and make sure there are oven vent openings, surfaces near the unit. After the release of the opening the appliance. Heating elements may be stored in an appliance, in cabinets above an appliance or on any part of the appliance, especially a door, warming drawer or storage drawer. Keep your face clear of hot air and/or steam, proceed with your cooking...
User Manual
Page 8
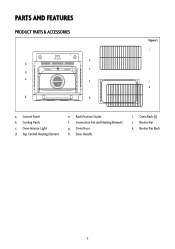
Oven Rack (2) j. Cooling Vents c. Convection Fan and Heating Element g. Broiler Pan k. Broiler Pan Rack 8 Control Panel b. Oven Interior Light d. Door Handle i. Top Central Heating Element e. Rack Position Guide f. Oven Door h. PARTS AND FEATURES PRODUCT PARTS & ACCESSORIES a b c d e f g h Figure 1 i j k a.
Oven Rack (2) j. Cooling Vents c. Convection Fan and Heating Element g. Broiler Pan k. Broiler Pan Rack 8 Control Panel b. Oven Interior Light d. Door Handle i. Top Central Heating Element e. Rack Position Guide f. Oven Door h. PARTS AND FEATURES PRODUCT PARTS & ACCESSORIES a b c d e f g h Figure 1 i j k a.
User Manual
Page 9
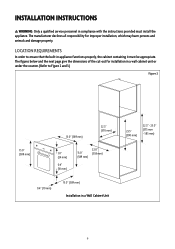
... the instructions provided must be appropriate. The figures below and the next page give the dimensions of the cut-out for improper installation, which may harm persons and animals and damage property. The manufacturer declines all responsibility for installation in a wall cabinet unit or under the counter. (Refer to ensure that the built-in appliance functions properly, the cabinet containing...
... the instructions provided must be appropriate. The figures below and the next page give the dimensions of the cut-out for improper installation, which may harm persons and animals and damage property. The manufacturer declines all responsibility for installation in a wall cabinet unit or under the counter. (Refer to ensure that the built-in appliance functions properly, the cabinet containing...
User Manual
Page 10
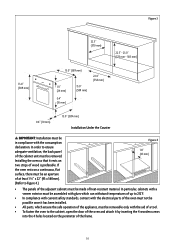
...electrical parts of the oven must not be possible once it rests on the perimeter of the frame. 10 Installing the oven so that it has been installed. • All parts, which ensure the safe operation of the appliance, must be removable only with the consumption declaration. In order to ensure adequate ventilation, the back panel of the cabinet...mm) Installation Under the Counter IMPORTANT: Installation must be in compliance with the aid of a tool. • To fasten the oven to Figure 4.) Figure 4 1.8" (45 mm) • The panels of the adjacent cabinets must be made of heat-resistant ...
...electrical parts of the oven must not be possible once it rests on the perimeter of the frame. 10 Installing the oven so that it has been installed. • All parts, which ensure the safe operation of the appliance, must be removable only with the consumption declaration. In order to ensure adequate ventilation, the back panel of the cabinet...mm) Installation Under the Counter IMPORTANT: Installation must be in compliance with the aid of a tool. • To fasten the oven to Figure 4.) Figure 4 1.8" (45 mm) • The panels of the adjacent cabinets must be made of heat-resistant ...
User Manual
Page 11
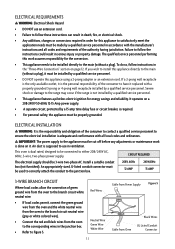
... Power Supply Figure 5 Black Wires UL Listed Conduit Cable from the oven to the corresponding wires in the junction box. • Refer to the main (without a plug). If you wish to have it . This oven is the responsibility and obligation of the consumer to install this appliance using a 2-prong adapter or an extension cord. CIRCUIT REQUIRED The electrical supply should be installed by a 15 amp time delay fuse or circuit breaker...
... Power Supply Figure 5 Black Wires UL Listed Conduit Cable from the oven to the corresponding wires in the junction box. • Refer to the main (without a plug). If you wish to have it . This oven is the responsibility and obligation of the consumer to install this appliance using a 2-prong adapter or an extension cord. CIRCUIT REQUIRED The electrical supply should be installed by a 15 amp time delay fuse or circuit breaker...
User Manual
Page 12
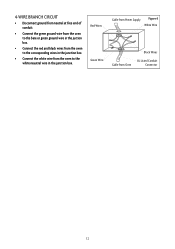
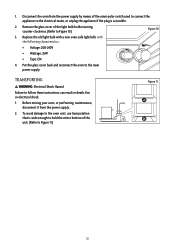
Red Wires Green Wire Cable from Power Supply Figure 6 White Wire Black Wires UL Listed Conduit Cable from the oven to the corresponding wires in the junction box. • Connect the white wire from Oven Connector 12 4-WIRE BRANCH CIRCUIT • Disconnect ground from neutral at free end of conduit. • Connect the green ground wire from the oven to the bare or green ground wire in the juction box. • Connect the red and black wires from the oven to the white neautral wire in the junction box.
Red Wires Green Wire Cable from Power Supply Figure 6 White Wire Black Wires UL Listed Conduit Cable from the oven to the corresponding wires in the junction box. • Connect the white wire from Oven Connector 12 4-WIRE BRANCH CIRCUIT • Disconnect ground from neutral at free end of conduit. • Connect the green ground wire from the oven to the bare or green ground wire in the juction box. • Connect the red and black wires from the oven to the white neautral wire in the junction box.
User Manual
Page 13
... different cooking modes. Then open the oven door and let the room air in it, with the oven door shut. IMPORTANT: The first time you to the highest setting and leave the oven on for about half an hour with nothing in . The odor that allows you use the bottom shelf and NEVER place anything on the bottom of the oven when it is installed...
... different cooking modes. Then open the oven door and let the room air in it, with the oven door shut. IMPORTANT: The first time you to the highest setting and leave the oven on for about half an hour with nothing in . The odor that allows you use the bottom shelf and NEVER place anything on the bottom of the oven when it is installed...
User Manual
Page 14
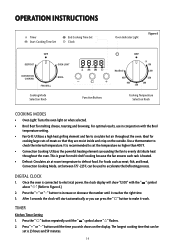
... each rack is connected to make it reaches the right time. 3. OPERATION INSTRUCTIONS Timer Start Cooking Time Set End Cooking Time Set Clock OFF DEFROST OVEN LIGHT CONVECTION COOKING HIGH BROIL FAN GRILL Cooking Mode Selection Knob Function Buttons Oven Indicator Light Figure 6 OFF Max/Broil °F 150 200 450 250 400 300 350 Cooking Temperature Selection Knob COOKING MODES • Oven Light: Turns the oven light on the display. After 5 seconds the clock will show "12:00" with the Broil temperature setting. • Fan Grill: Utilizes a high heat grilling element...
... each rack is connected to make it reaches the right time. 3. OPERATION INSTRUCTIONS Timer Start Cooking Time Set End Cooking Time Set Clock OFF DEFROST OVEN LIGHT CONVECTION COOKING HIGH BROIL FAN GRILL Cooking Mode Selection Knob Function Buttons Oven Indicator Light Figure 6 OFF Max/Broil °F 150 200 450 250 400 300 350 Cooking Temperature Selection Knob COOKING MODES • Oven Light: Turns the oven light on the display. After 5 seconds the clock will show "12:00" with the Broil temperature setting. • Fan Grill: Utilizes a high heat grilling element...
User Manual
Page 15
... time countdown begins. 5. Adjust knobs to select cooking mode and temperature. 4. It indicates the cooking timer has been set the finish of baking at "2:00": 1. The proper time (hour/minute) and the " " symbol will start and finish as per programmed into the timer. When the clock shows "1:15", the oven will switch on automatically and cooking will show on the display, you will need to set it reaches the set...
... time countdown begins. 5. Adjust knobs to select cooking mode and temperature. 4. It indicates the cooking timer has been set the finish of baking at "2:00": 1. The proper time (hour/minute) and the " " symbol will start and finish as per programmed into the timer. When the clock shows "1:15", the oven will switch on automatically and cooking will show on the display, you will need to set it reaches the set...
User Manual
Page 16
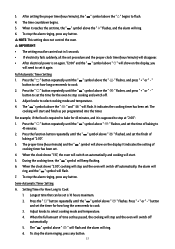
... throughout the oven. 3. The rear heating element and fan will come on the surface, allowing the heat to rise and for cooking fish steaks like beef steaks, veal, rib steak, filets, and hamburgers. B. Setting timer with meats and vegetables, sausages, ribs lamb chops, chicken in to select cooking mode and temperature. 4. Longest time that need to penetrate right into the food. 5. Press the " " button repeatedly...
... throughout the oven. 3. The rear heating element and fan will come on the surface, allowing the heat to rise and for cooking fish steaks like beef steaks, veal, rib steak, filets, and hamburgers. B. Setting timer with meats and vegetables, sausages, ribs lamb chops, chicken in to select cooking mode and temperature. 4. Longest time that need to penetrate right into the food. 5. Press the " " button repeatedly...

User Manual
Page 17
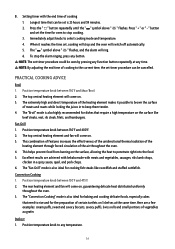
.... 3. This is equipped with a cooling fan, which do not require heat, such as ice cream cakes, cream or custard desserts, and fruitcakes. 4. By using the "Convection Cooking" and setting the temperature between the oven door and the control panel. In case of meat, fish and bread, it is possible to cool down the exterior of the appliance, this model is recommended for defrosting of...
.... 3. This is equipped with a cooling fan, which do not require heat, such as ice cream cakes, cream or custard desserts, and fruitcakes. 4. By using the "Convection Cooking" and setting the temperature between the oven door and the control panel. In case of meat, fish and bread, it is possible to cool down the exterior of the appliance, this model is recommended for defrosting of...
User Manual
Page 18
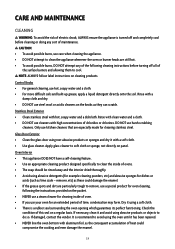
... concentrations of maintenance. CAUTION: • To avoid possible burns, use hot, soapy water and a cloth. • For more difficult soils and built-up grease, apply a liquid detergent directly onto the soil. NOTE: ALWAYS follow label instructions on panel. Control Knobs • For general cleaning, use care when cleaning the appliance. • DO NOT attempt to soft cloth or sponge, not directly on cleaning products.
... concentrations of maintenance. CAUTION: • To avoid possible burns, use hot, soapy water and a cloth. • For more difficult soils and built-up grease, apply a liquid detergent directly onto the soil. NOTE: ALWAYS follow label instructions on panel. Control Knobs • For general cleaning, use care when cleaning the appliance. • DO NOT attempt to soft cloth or sponge, not directly on cleaning products.
User Manual
Page 19
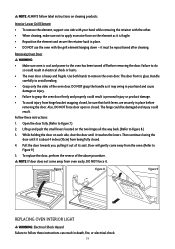
... these instructions: 1. The door front is cool and power to Figure 8.) 3. Interior Lower Grill Element • To remove the element, support one side with your hand and cause damage or injury. • Failure to remove the oven door. To replace the door, perform the reverse of its seat. Use both levers are securely in place. • DO NOT use the oven with the other. • When cleaning...
... these instructions: 1. The door front is cool and power to Figure 8.) 3. Interior Lower Grill Element • To remove the element, support one side with your hand and cause damage or injury. • Failure to remove the oven door. To replace the door, perform the reverse of its seat. Use both levers are securely in place. • DO NOT use the oven with the other. • When cleaning...
User Manual
Page 20
... the light bulb holder turning counter-clockwise. (Refer to Figure 10.) Figure 10 3. To avoid damage to Figure 11.) Figure 11 20 Put the glass cover back and reconnect the oven to follow these instructions can result in death, fire, or electrical shock. 1. TRANSPORTING WARNING: Electrical Shock Hazard Failure to the main power supply. 1. Remove the glass cover of the unit. (Refer to the oven vent, use...
... the light bulb holder turning counter-clockwise. (Refer to Figure 10.) Figure 10 3. To avoid damage to Figure 11.) Figure 11 20 Put the glass cover back and reconnect the oven to follow these instructions can result in death, fire, or electrical shock. 1. TRANSPORTING WARNING: Electrical Shock Hazard Failure to the main power supply. 1. Remove the glass cover of the unit. (Refer to the oven vent, use...
User Manual
Page 21
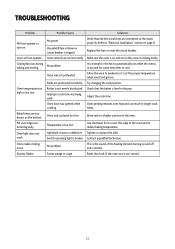
.... Oven controls are set on the correct cooking mode. Cooling fan runs during baking and broiling. Racks are browning early. Try changing the rack position. Oven rack is tripped. Light bulb is not evenly distributed. Power outage or surge Reset the clock. Replace the fuse or reset the circuit breaker. Batter is loose or defective. Oven door was not preheated. Temperature is on page 11. Oven makes clicking noise. Make sure the oven is too hot. Oven was opened while cooking. Adjust the cook time. Move rack...
.... Oven controls are set on the correct cooking mode. Cooling fan runs during baking and broiling. Racks are browning early. Try changing the rack position. Oven rack is tripped. Light bulb is not evenly distributed. Power outage or surge Reset the clock. Replace the fuse or reset the circuit breaker. Batter is loose or defective. Oven door was not preheated. Temperature is on page 11. Oven makes clicking noise. Make sure the oven is too hot. Oven was opened while cooking. Adjust the cook time. Move rack...
User Manual
Page 22
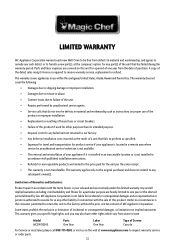
... Repairs performed by unauthorized service agents� • Service calls that do not involve defects in material and workmanship such as instructions on proper use of the product or improper installation� • Replacement or resetting of house fuses or circuit breakers� • Failure of this product if used ... on implied warranties� This warranty gives you specific legal rights, and you may also have other rights which vary from state to state� Model MCSWOE24S Parts One Year Labor One Year Type of Service Carry In For Service or Assistance please...
... Repairs performed by unauthorized service agents� • Service calls that do not involve defects in material and workmanship such as instructions on proper use of the product or improper installation� • Replacement or resetting of house fuses or circuit breakers� • Failure of this product if used ... on implied warranties� This warranty gives you specific legal rights, and you may also have other rights which vary from state to state� Model MCSWOE24S Parts One Year Labor One Year Type of Service Carry In For Service or Assistance please...
