User Manual
Page 1
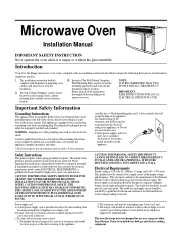
...over the counter top or tabletop where it will accept the plug on the power outlet box before installing your cabinets and microwave oven for the electric current. II. IMPORTANT: KEEP INSTRUCTIONS FOR LOCAL ELECTRICAL INSPECTOR'S USE. Safety Instructions This product requires...the instructions thoroughly before beginning the installation to correct any deficiencies. Microwave Oven Installation Manual IMPORTANT SAFETY INSTRUCTION Never operate the oven when it . Introduction Your Over-the-Range microwave oven comes complete with an installation instruction kit which contains the ...
...over the counter top or tabletop where it will accept the plug on the power outlet box before installing your cabinets and microwave oven for the electric current. II. IMPORTANT: KEEP INSTRUCTIONS FOR LOCAL ELECTRICAL INSPECTOR'S USE. Safety Instructions This product requires...the instructions thoroughly before beginning the installation to correct any deficiencies. Microwave Oven Installation Manual IMPORTANT SAFETY INSTRUCTION Never operate the oven when it . Introduction Your Over-the-Range microwave oven comes complete with an installation instruction kit which contains the ...
User Manual
Page 2
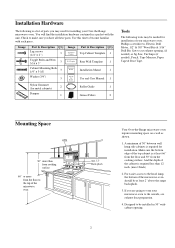
...you may be needed ), Pencil, Tape Measure, Paper Tape & Duct Tape. Installation Hardware The following tools may need for installing your Over-the-Range microwave oven. You will find the installation hardware contained in 30" wide cabinet opening , (if needed) or Jig Saw, Tin Snips (if needed for ... more from the floor to be at least 66" from the floor and 30" from the cooking surface. Make sure the bottom edge of the microwave oven should be installed in a packet with each piece. Phillips screwdrivers, Electric Drill Motor, 1/2" & 5/8" Wood Bits & 3/16" Drill Bit, Saw...
...you may be needed ), Pencil, Tape Measure, Paper Tape & Duct Tape. Installation Hardware The following tools may need for installing your Over-the-Range microwave oven. You will find the installation hardware contained in 30" wide cabinet opening , (if needed) or Jig Saw, Tin Snips (if needed for ... more from the floor to be at least 66" from the floor and 30" from the cooking surface. Make sure the bottom edge of the microwave oven should be installed in a packet with each piece. Phillips screwdrivers, Electric Drill Motor, 1/2" & 5/8" Wood Bits & 3/16" Drill Bit, Saw...
User Manual
Page 3
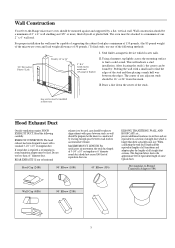
Wall Construction Your Over-the-Range microwave oven should be mounted against and supported by leaving enough space between the edges. Wall construction should be a minimum of any adjacent studs should be ... resistance to air flow and are equivalent to a section of all transitions and adaptors plus a minimum of 135 pounds, (the 85 pound weight of the microwave oven and load weight allowance of 50 pounds.) To find studs, use less than their actual physical size. The oven must be attached to find...
Wall Construction Your Over-the-Range microwave oven should be mounted against and supported by leaving enough space between the edges. Wall construction should be a minimum of any adjacent studs should be ... resistance to air flow and are equivalent to a section of all transitions and adaptors plus a minimum of 135 pounds, (the 85 pound weight of the microwave oven and load weight allowance of 50 pounds.) To find studs, use less than their actual physical size. The oven must be attached to find...
User Manual
Page 4
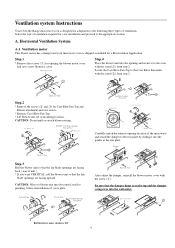
... CAUTION: Wires to blower unit must be routed avoid to the following three types of ventilation. Select the type of ventilation required for your microwave oven is shipped assembled for a Recirculation Application. Step.2 * Remove the screws (2 and 3) for Case Blow Fan Top and Blower attachment ...motor cover with the screw(2) from step 2. Roll the blower motor clockwise 180˚ 4 Ventilation system Instructions Your Over-the-Range microwave oven is designed for adaptation to pinching, before reinstallation of cover plate. Step.4 Place the blower unit into the opening the blower ...
... CAUTION: Wires to blower unit must be routed avoid to the following three types of ventilation. Select the type of ventilation required for your microwave oven is shipped assembled for a Recirculation Application. Step.2 * Remove the screws (2 and 3) for Case Blow Fan Top and Blower attachment ...motor cover with the screw(2) from step 2. Roll the blower motor clockwise 180˚ 4 Ventilation system Instructions Your Over-the-Range microwave oven is designed for adaptation to pinching, before reinstallation of cover plate. Step.4 Place the blower unit into the opening the blower ...
User Manual
Page 6
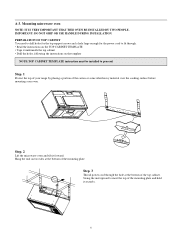
Mounting microwave oven NOTE: IT IS VERY IMPORTANT THAT THIS OVEN BE INSTALLED BY TWO PEOPLE. Step. 1 Protect the top of your range by placing a portion of ... large enough for the power cord to fit through the hole at the bottom of the mounting plate and hold it securely. 6 Step. 2 Lift the microwave oven and tilt it underneath the top cabinet • Drill the holes, following the instructions on two tabs at the bottom of the carton or...
Mounting microwave oven NOTE: IT IS VERY IMPORTANT THAT THIS OVEN BE INSTALLED BY TWO PEOPLE. Step. 1 Protect the top of your range by placing a portion of ... large enough for the power cord to fit through the hole at the bottom of the mounting plate and hold it securely. 6 Step. 2 Lift the microwave oven and tilt it underneath the top cabinet • Drill the holes, following the instructions on two tabs at the bottom of the carton or...
User Manual
Page 7
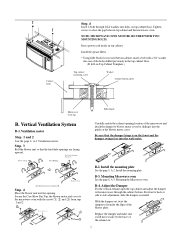
... 7 Ventilation motor Step. 1 and 2 See the page 4, A-1 Ventilation motor. Install the mounting plate. For front to back or side to the microwave through 2 flat washers into holes on the front and the damper swings free into the opening location of the holes drilled previously in top cabinet...and adjust the damper to side adjustment, slide the damper as needed. Cabinet front Step. 4 Insert 2 bolts through the cabinet bottom. NOTE: MICROWAVE OVEN MUST BE SECURED WITH TWO MOUNTING BOLTS. Step. 3 Roll the blower unit so that the damper hinge is on top cabinet floor. ...
... 7 Ventilation motor Step. 1 and 2 See the page 4, A-1 Ventilation motor. Install the mounting plate. For front to back or side to the microwave through 2 flat washers into holes on the front and the damper swings free into the opening location of the holes drilled previously in top cabinet...and adjust the damper to side adjustment, slide the damper as needed. Cabinet front Step. 4 Insert 2 bolts through the cabinet bottom. NOTE: MICROWAVE OVEN MUST BE SECURED WITH TWO MOUNTING BOLTS. Step. 3 Roll the blower unit so that the damper hinge is on top cabinet floor. ...
User Manual
Page 8
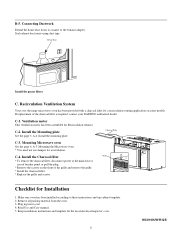
...authorized dealer. B-5. C-4. Make sure oven has been installed according to the exhaust adapter. Plug in power cord. 4. C-1. Mounting the Microwave oven. * You need not use . 8 MCO160UW/B/Q/S Seal exhaust duct joints using duct tape. If replacement of the grille and remove... filter. * Replace the grille and screws. House Duct Install the grease filters C. Recirculation Ventilation System Your over the range microwave oven has been provided with a charcoal filter for Installation 1. C-2. Ventilation motor This ventilation motor has been assembled for recirculation....
...authorized dealer. B-5. C-4. Make sure oven has been installed according to the exhaust adapter. Plug in power cord. 4. C-1. Mounting the Microwave oven. * You need not use . 8 MCO160UW/B/Q/S Seal exhaust duct joints using duct tape. If replacement of the grille and remove... filter. * Replace the grille and screws. House Duct Install the grease filters C. Recirculation Ventilation System Your over the range microwave oven has been provided with a charcoal filter for Installation 1. C-2. Ventilation motor This ventilation motor has been assembled for recirculation....


