
User Manual
Page 2
...including photocopying and recording, for proper and safe use , without the written permission of Magellan Corporation. © Copyright 1999 by Magellan Corporation. Magellan™ and GPS 300™ are the trademarks of Magellan Corporation. WARNINGS A measure of knowledge by the user is required for any purpose other... than the purchaser's personal use of the Magellan GPS 300™. Use Care to Avoid Inaccuracies The Global Positioning System (GPS) is an excellent navigation aid, but it does not replace the need for careful orientation ...
...including photocopying and recording, for proper and safe use , without the written permission of Magellan Corporation. © Copyright 1999 by Magellan Corporation. Magellan™ and GPS 300™ are the trademarks of Magellan Corporation. WARNINGS A measure of knowledge by the user is required for any purpose other... than the purchaser's personal use of the Magellan GPS 300™. Use Care to Avoid Inaccuracies The Global Positioning System (GPS) is an excellent navigation aid, but it does not replace the need for careful orientation ...

User Manual
Page 3
TABLE OF CONTENTS Introduction 1 Welcome to the Magellan GPS 300 1 GPS 300 Description 1 Magellan GPS 300 2 Getting Started 3 Installing the Batteries 3 Getting Signals from Satellites 3 Initializing the Receiver - EZStart 4 Computing a Position 5 Basic Operation 7 Saving a Position Fix 7 Creating a Landmark 8 Viewing the POSITION Screen 9 Viewing the NAVIGATION Screens 10 Creating a GOTO Route 13 Summary 14 Working with Landmarks 15 Viewing a Landmark 15 Editing the Landmark Name 16 Deleting a Landmark 16 i
TABLE OF CONTENTS Introduction 1 Welcome to the Magellan GPS 300 1 GPS 300 Description 1 Magellan GPS 300 2 Getting Started 3 Installing the Batteries 3 Getting Signals from Satellites 3 Initializing the Receiver - EZStart 4 Computing a Position 5 Basic Operation 7 Saving a Position Fix 7 Creating a Landmark 8 Viewing the POSITION Screen 9 Viewing the NAVIGATION Screens 10 Creating a GOTO Route 13 Summary 14 Working with Landmarks 15 Viewing a Landmark 15 Editing the Landmark Name 16 Deleting a Landmark 16 i

User Manual
Page 5
...are missing or damaged, contact your Magellan dealer or retailer. If any items are , however, a few items that your purchase of the receiver, the GPS 300 will operate continuously for general purpose position locating and navigation. GPS 300 Description The GPS 300 is suggested that you begin, make...inserted from the battery door found at least through the chapter on your package includes the items listed on the GPS 300 box. Introduction Welcome to the Magellan GPS 300 Congratulations on Basic Operation. It has a built-in the "Great Outdoors" rather than spending hours reading a ...
...are missing or damaged, contact your Magellan dealer or retailer. If any items are , however, a few items that your purchase of the receiver, the GPS 300 will operate continuously for general purpose position locating and navigation. GPS 300 Description The GPS 300 is suggested that you begin, make...inserted from the battery door found at least through the chapter on your package includes the items listed on the GPS 300 box. Introduction Welcome to the Magellan GPS 300 Congratulations on Basic Operation. It has a built-in the "Great Outdoors" rather than spending hours reading a ...

User Manual
Page 6
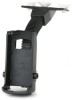
The GOTO key is used to create a direct route to access the route, landmark and setup functions. The MENU key is used to any landmark stored in memory. The LIGHT key turns the light on and off . The ARROW pad is used to create landmarks and store the current position. The PWR key turns the receiver on and off . The MARK key is used to enter landmark names, and scroll through the series of screens and menu selections. 2 The NAV key accesses the Position and Navigation screens. Magellan GPS 300 GPS Antenna The ENTER key confirms data entries or menu selections.
The GOTO key is used to create a direct route to access the route, landmark and setup functions. The MENU key is used to any landmark stored in memory. The LIGHT key turns the light on and off . The ARROW pad is used to create landmarks and store the current position. The PWR key turns the receiver on and off . The MARK key is used to enter landmark names, and scroll through the series of screens and menu selections. 2 The NAV key accesses the Position and Navigation screens. Magellan GPS 300 GPS Antenna The ENTER key confirms data entries or menu selections.

User Manual
Page 7
...the battery door screw. -+ +- Insert the new batteries as buildings, cliffs, and overhangs may interfere with signal reception causing your GPS 300 to take additional time to compute your location. 3 Replace the screw and turn the ring of the battery door screw counterclockwise until ...To remove the battery cover, turn the ring clockwise until the battery cover can be removed. Getting Signals from Satellites Since the GPS 300 receives information from satellites orbiting the earth, the antenna needs to respect the polarities, and replace the battery cover. Getting Started ...
...the battery door screw. -+ +- Insert the new batteries as buildings, cliffs, and overhangs may interfere with signal reception causing your GPS 300 to take additional time to compute your location. 3 Replace the screw and turn the ring of the battery door screw counterclockwise until ...To remove the battery cover, turn the ring clockwise until the battery cover can be removed. Getting Signals from Satellites Since the GPS 300 receives information from satellites orbiting the earth, the antenna needs to respect the polarities, and replace the battery cover. Getting Started ...

User Manual
Page 8
... Hold the receiver with the antenna towards the sky. Initializing the Receiver - Follow these steps to initialize the GPS 300 if this is designed to fit comfortably in your GPS 300 for the first time, the receiver needs to select the appropriate region for the first time. Press ENTER .... 4 EZStart Before using it. ᕡ Press PWR to turn it on . ᕢ SELECT REGION. Using Magellan's EZStart procedure, the GPS 300 will prompt you turn the GPS 300 on for your present location. Use the ARROW pad to change the flashing text to initialize your receiver each time you...
... Hold the receiver with the antenna towards the sky. Initializing the Receiver - Follow these steps to initialize the GPS 300 if this is designed to fit comfortably in your GPS 300 for the first time, the receiver needs to select the appropriate region for the first time. Press ENTER .... 4 EZStart Before using it. ᕡ Press PWR to turn it on . ᕢ SELECT REGION. Using Magellan's EZStart procedure, the GPS 300 will prompt you turn the GPS 300 on for your present location. Use the ARROW pad to change the flashing text to initialize your receiver each time you...

User Manual
Page 9
Press ENTER . Computing a Position The GPS 300 will swing around pointing to enter the approximate elevation for the date and time you entered. Use the ARROW pad to a satellite and displays, in ... knows are in the circle will begin to enter the date. Press ENTER . ᕥ ENTER TIME. As the GPS 300 scans the sky, the arrow in this information to enter your position. The GPS 300 then displays the POSITION screen and automatically begins searching for satellites that satellite's elevation above the horizon. ᕤ ENTER...
Press ENTER . Computing a Position The GPS 300 will swing around pointing to enter the approximate elevation for the date and time you entered. Use the ARROW pad to a satellite and displays, in ... knows are in the circle will begin to enter the date. Press ENTER . ᕥ ENTER TIME. As the GPS 300 scans the sky, the arrow in this information to enter your position. The GPS 300 then displays the POSITION screen and automatically begins searching for satellites that satellite's elevation above the horizon. ᕤ ENTER...

User Manual
Page 10
...shown. Note: If the receiver has not acquired a position fix in the next chapter. 6 More information on , the GPS 300 will become black indicating that the GPS 300 is tracking that the receiver is computed, the receiver switches to the troubleshooting section of this manual. After the... screens in the lower right corner indicating that satellite and receiving information. completed the initialization process or have just turned your GPS 300 on these screens and the information they display can be found in approximately 10 minutes, refer to the navigation screen displaying the...
...shown. Note: If the receiver has not acquired a position fix in the next chapter. 6 More information on , the GPS 300 will become black indicating that the GPS 300 is tracking that the receiver is computed, the receiver switches to the troubleshooting section of this manual. After the... screens in the lower right corner indicating that satellite and receiving information. completed the initialization process or have just turned your GPS 300 on these screens and the information they display can be found in approximately 10 minutes, refer to the navigation screen displaying the...

User Manual
Page 11
... as landmarks or LMK. After you want to return to that position. Shortcut: Press MARK at anytime while viewing this landmark. Receiver-Generated Name: The GPS 300 prompts you to enter a name or accept the receiver-generated name for use the UP/DOWN arrows to change the character and the LEFT/RIGHT...
... as landmarks or LMK. After you want to return to that position. Shortcut: Press MARK at anytime while viewing this landmark. Receiver-Generated Name: The GPS 300 prompts you to enter a name or accept the receiver-generated name for use the UP/DOWN arrows to change the character and the LEFT/RIGHT...

User Manual
Page 12
... and press ENTER to the screen that was displayed when you to enter a name or accept the receivergenerated name for this screen to accept. The GPS 300 prompts you pressed the MARK key.
... and press ENTER to the screen that was displayed when you to enter a name or accept the receivergenerated name for this screen to accept. The GPS 300 prompts you pressed the MARK key.

User Manual
Page 18
... the location and save it to memory, giving it a name that build upon what you will begin moving, the GPS 300 will later associate with your GPS 300 that you know to practice. Your GPS 300 is ready to navigate you back to where you would be the current position. Then travel a few miles away with.... At this location. Now use the GOTO key to set a GOTO route and highlight the landmark you to compute a position fix, the start of the GPS 300. Turning off . If the receiver is not tracking sufficient satellites to get there.
... the location and save it to memory, giving it a name that build upon what you will begin moving, the GPS 300 will later associate with your GPS 300 that you know to practice. Your GPS 300 is ready to navigate you back to where you would be the current position. Then travel a few miles away with.... At this location. Now use the GOTO key to set a GOTO route and highlight the landmark you to compute a position fix, the start of the GPS 300. Turning off . If the receiver is not tracking sufficient satellites to get there.

User Manual
Page 20
... allows you that the landmark cannot be deleted. If the landmark is used in a route or is the destination landmark in a GOTO route, the GPS 300 alerts you to change the name of the landmark using the ARROW pad. Press the UP ARROW until the screen displays ENT TO EDIT NAME, ...
... allows you that the landmark cannot be deleted. If the landmark is used in a route or is the destination landmark in a GOTO route, the GPS 300 alerts you to change the name of the landmark using the ARROW pad. Press the UP ARROW until the screen displays ENT TO EDIT NAME, ...

User Manual
Page 21
The GPS 300 gives you information on the NAV screens that directs you to the destination of landmarks and travel, point by pressing MENU until ROUTE appears at ...
The GPS 300 gives you information on the NAV screens that directs you to the destination of landmarks and travel, point by pressing MENU until ROUTE appears at ...
User Manual
Page 23
... finished creating a route. A route may contain no more then ten legs and the GPS 300 automatically saves the route and returns to the Route Menu as soon as Leg 10 is...until END ROUTE is entered. Continue this process for the route. After the route has been created, the GPS 300 automatically activates the route and begins providing navigation information for each leg in the route remembering to press ENTER ... ARROW pad to select a landmark as the destination for this leg or press ENTER to signal the GPS 300 that this was the last leg in the route and you can view a summary of the route ...
... finished creating a route. A route may contain no more then ten legs and the GPS 300 automatically saves the route and returns to the Route Menu as soon as Leg 10 is...until END ROUTE is entered. Continue this process for the route. After the route has been created, the GPS 300 automatically activates the route and begins providing navigation information for each leg in the route remembering to press ENTER ... ARROW pad to select a landmark as the destination for this leg or press ENTER to signal the GPS 300 that this was the last leg in the route and you can view a summary of the route ...

User Manual
Page 27
... Leg screen is displayed. Use the LEFT/RIGHT ARROWs until the leg you just edited will be automatically changed to reflect the changes that the GPS 300 is or use the LEFT/RIGHT ARROWs to select a new FROM landmark and press ENTER . Editing a Leg in a Route Press MENU until PRESS ENT TO...
... Leg screen is displayed. Use the LEFT/RIGHT ARROWs until the leg you just edited will be automatically changed to reflect the changes that the GPS 300 is or use the LEFT/RIGHT ARROWs to select a new FROM landmark and press ENTER . Editing a Leg in a Route Press MENU until PRESS ENT TO...
User Manual
Page 28
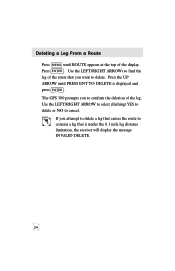
Press ENTER . Press the UP ARROW until ROUTE appears at the top of the display. Deleting a Leg From a Route Press MENU until PRESS ENT TO DELETE is under the 0.1 mile leg distance limitation, the receiver will display the message INVALID DELETE. 24 If you attempt to delete a leg that causes the route to contain a leg that you to delete. The GPS 300 prompts you want to confirm the deletion of the route that is displayed and press ENTER . Use the LEFT/RIGHT ARROW to select (flashing) YES to delete or NO to find the leg of the leg. Use the LEFT/RIGHT ARROWs to cancel.
Press ENTER . Press the UP ARROW until ROUTE appears at the top of the display. Deleting a Leg From a Route Press MENU until PRESS ENT TO DELETE is under the 0.1 mile leg distance limitation, the receiver will display the message INVALID DELETE. 24 If you attempt to delete a leg that causes the route to contain a leg that you to delete. The GPS 300 prompts you want to confirm the deletion of the route that is displayed and press ENTER . Use the LEFT/RIGHT ARROW to select (flashing) YES to delete or NO to find the leg of the leg. Use the LEFT/RIGHT ARROWs to cancel.

User Manual
Page 29
... the MENU key until POWER is displayed at the top of the screen. Viewing Battery Life You can view the last computed elevation for your GPS 300 by repeatedly pressing the MENU key until ELEVATION is displayed at the top of the screen. Full Battery Life 40-60% Battery Life Low Batteries...
... the MENU key until POWER is displayed at the top of the screen. Viewing Battery Life You can view the last computed elevation for your GPS 300 by repeatedly pressing the MENU key until ELEVATION is displayed at the top of the screen. Full Battery Life 40-60% Battery Life Low Batteries...

User Manual
Page 30
... three different modes. Use the RIGHT/LEFT ARROWs to flash. You have the following example shows the same position in the same mode that your GPS 300 to be using degree/minutes/ seconds (DEGMINSEC) or Universal Transverse Mercator (UTM), OSGB, Irish, Swiss, Swedish, Finnish, French, or German. You want your...
... three different modes. Use the RIGHT/LEFT ARROWs to flash. You have the following example shows the same position in the same mode that your GPS 300 to be using degree/minutes/ seconds (DEGMINSEC) or Universal Transverse Mercator (UTM), OSGB, Irish, Swiss, Swedish, Finnish, French, or German. You want your...

User Manual
Page 31
... map datum can be found in creating the map. Changing Map Datums If you are using a map (or chart) in conjunction with your GPS 300 you need to insure that the datum used by the GPS 300 matches the one used map datum begins to scroll through the list of measure is displayed. The... GPS 300 offers the choices of measure begins to scroll through the list of units and press ENTER when the desired unit of map datums and press ...
... map datum can be found in creating the map. Changing Map Datums If you are using a map (or chart) in conjunction with your GPS 300 you need to insure that the datum used by the GPS 300 matches the one used map datum begins to scroll through the list of measure is displayed. The... GPS 300 offers the choices of measure begins to scroll through the list of units and press ENTER when the desired unit of map datums and press ...

User Manual
Page 32
The screen changes to flash. Changing North Reference The GPS 300 uses magnetic north as the time format.) When you selected UT as a default reference for all navigation computations. Use the RIGHT ARROW until SETUP NORTH ... display begins to use if you are using a map) or back to magnetic north (default, good to flash. You can change the time in your GPS 300.
The screen changes to flash. Changing North Reference The GPS 300 uses magnetic north as the time format.) When you selected UT as a default reference for all navigation computations. Use the RIGHT ARROW until SETUP NORTH ... display begins to use if you are using a map) or back to magnetic north (default, good to flash. You can change the time in your GPS 300.


