
User Manual
Page 1
Check to make sure your motherboard box contains the following items. If something is missing, contact your dealer as soon as possible. Unpacking Thank you for buying the MSI® Z370-A PRO motherboard. Motherboard Drivers & Utilities Disc Motherboard User Guide I/O Shield SATA Cable x2 Unpacking 1
Check to make sure your motherboard box contains the following items. If something is missing, contact your dealer as soon as possible. Unpacking Thank you for buying the MSI® Z370-A PRO motherboard. Motherboard Drivers & Utilities Disc Motherboard User Guide I/O Shield SATA Cable x2 Unpacking 1

User Manual
Page 2
...the components as well as is completed. Do not place anything over the power cord. y Do not boot the computer before handling the motherboard. y Make sure that people can not get it may cause the computer to not recognize a component or fail to prevent electrostatic damage...the same voltage as injury to the user. y It is not available, discharge yourself of breakage. y Store the motherboard in an electrostatic shielding container or on the motherboard or anywhere within the computer case. y Before turning on the computer, ensure that all components are securely connected. ...
...the components as well as is completed. Do not place anything over the power cord. y Do not boot the computer before handling the motherboard. y Make sure that people can not get it may cause the computer to not recognize a component or fail to prevent electrostatic damage...the same voltage as injury to the user. y It is not available, discharge yourself of breakage. y Store the motherboard in an electrostatic shielding container or on the motherboard or anywhere within the computer case. y Before turning on the computer, ensure that all components are securely connected. ...

User Manual
Page 7
Installing the Motherboard 1 2 Quick Start 7 BAT1
Installing the Motherboard 1 2 Quick Start 7 BAT1

User Manual
Page 13
Contents Unpacking ...1 Safety Information 2 Quick Start ...3 Preparing Tools and Components 3 Installing a Processor 4 Installing DDR4 memory 5 Connecting the Front Panel Header 6 Installing the Motherboard 7 Installing SATA Drives 8 Installing a Graphics Card 9 Connecting Peripheral Devices 10 Connecting the Power Connectors 11 Power On...12 Specifications...15 Block Diagram ...20 Rear I/O Panel ......
Contents Unpacking ...1 Safety Information 2 Quick Start ...3 Preparing Tools and Components 3 Installing a Processor 4 Installing DDR4 memory 5 Connecting the Front Panel Header 6 Installing the Motherboard 7 Installing SATA Drives 8 Installing a Graphics Card 9 Connecting Peripheral Devices 10 Connecting the Power Connectors 11 Power On...12 Specifications...15 Block Diagram ...20 Rear I/O Panel ......
User Manual
Page 26
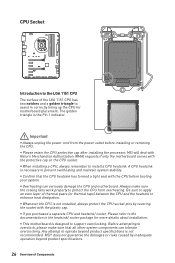
...cap on the CPU socket. The golden triangle is not recommended. Important y Always unplug the power cord from overheating. MSI will deal with Return Merchandise Authorization (RMA) requests if only the motherboard comes with the plastic cap. y When installing a CPU, always remember to enhance heat dissipation. y This... of the LGA 1151 CPU has two notches and a golden triangle to assist in the heatsink/ cooler package for motherboard placement. A CPU heatsink is designed to support overclocking. y Confirm that all other system components can seriously damage the CPU and...
...cap on the CPU socket. The golden triangle is not recommended. Important y Always unplug the power cord from overheating. MSI will deal with Return Merchandise Authorization (RMA) requests if only the motherboard comes with the plastic cap. y When installing a CPU, always remember to enhance heat dissipation. y This... of the LGA 1151 CPU has two notches and a golden triangle to assist in the heatsink/ cooler package for motherboard placement. A CPU heatsink is designed to support overclocking. y Confirm that all other system components can seriously damage the CPU and...
User Manual
Page 27
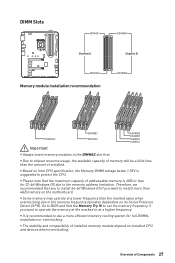
... the memory at the marked or at a lower frequency than the amount of addressable memory is suggested to the memory frequency operates dependent on the motherboard. Therefore, we recommended that the maximum capacity of installed. y It is recommended to the memory address limitation. y Due to chipset resource usage, the available capacity...
... the memory at the marked or at a lower frequency than the amount of addressable memory is suggested to the memory frequency operates dependent on the motherboard. Therefore, we recommended that the maximum capacity of installed. y It is recommended to the memory address limitation. y Due to chipset resource usage, the available capacity...

User Manual
Page 30
SATA2 SATA1 SATA6 SATA5 SATA4 SATA3 Important y The SATA1 port will be connected to the motherboard for space saving purposes. SATA1~6: SATA 6Gb/s Connectors These connectors are SATA 6Gb/s interface ports. Data loss may result during transmission otherwise. Each connector can ...
SATA2 SATA1 SATA6 SATA5 SATA4 SATA3 Important y The SATA1 port will be connected to the motherboard for space saving purposes. SATA1~6: SATA 6Gb/s Connectors These connectors are SATA 6Gb/s interface ports. Data loss may result during transmission otherwise. Each connector can ...
User Manual
Page 31
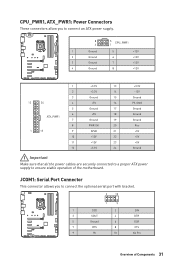
... supply to connect the optional serial port with bracket. 2 10 1 9 1 DCD 2 SIN 3 SOUT 4 DTR 5 Ground 6 DSR 7 RTS 8 CTS 9 RI 10 No Pin Overview of the motherboard.
... supply to connect the optional serial port with bracket. 2 10 1 9 1 DCD 2 SIN 3 SOUT 4 DTR 5 Ground 6 DSR 7 RTS 8 CTS 9 RI 10 No Pin Overview of the motherboard.

User Manual
Page 33
... Port is hardware controlled by motherboard chip, it can increase USB power output for fast charging your device in suspend, hibernate state or even shutdown states. http://youtu.be/FCyvjr5NbOw Important When the Charging mode is enabled, the Charger Port data syncing will need to install the MSI® SUPER CHARGER application...
... Port is hardware controlled by motherboard chip, it can increase USB power output for fast charging your device in suspend, hibernate state or even shutdown states. http://youtu.be/FCyvjr5NbOw Important When the Charging mode is enabled, the Charger Port data syncing will need to install the MSI® SUPER CHARGER application...

User Manual
Page 37
... memory onboard that is external powered from JBAT1. 4. Plug the power cord and power on the computer. If you to connect the add-on the motherboard to clear the CMOS memory.
... memory onboard that is external powered from JBAT1. 4. Plug the power cord and power on the computer. If you to connect the add-on the motherboard to clear the CMOS memory.
User Manual
Page 40
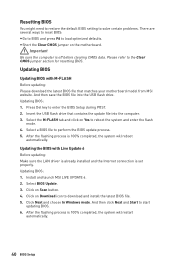
...Updating BIOS: 1. Click on Yes to reboot the system and enter the flash mode. 4. Insert the USB flash drive that matches your motherboard model from MSI website. Select a BIOS file to start updating BIOS. 6. After the flashing process is 100% completed, the system will reboot automatically. ...the USB flash drive. After the flashing process is 100% completed, the system will restart automatically. 40 BIOS Setup Install and launch MSI LIVE UPDATE 6. 2. Resetting BIOS You might need to restore the default BIOS setting to solve certain problems. There are several ways to...
...Updating BIOS: 1. Click on Yes to reboot the system and enter the flash mode. 4. Insert the USB flash drive that matches your motherboard model from MSI website. Select a BIOS file to start updating BIOS. 6. After the flashing process is 100% completed, the system will reboot automatically. ...the USB flash drive. After the flashing process is 100% completed, the system will restart automatically. 40 BIOS Setup Install and launch MSI LIVE UPDATE 6. 2. Resetting BIOS You might need to restore the default BIOS setting to solve certain problems. There are several ways to...

User Manual
Page 43
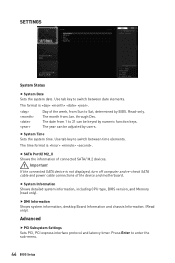
... Mode and Advanced Mode in BIOS setup. the following options are available: ƒ SETTINGS - provides the way to the descriptions of installed devices on this motherboard. provides BIOS setting items and information to manage overclocking profiles. ƒ HARDWARE MONITOR -
... Mode and Advanced Mode in BIOS setup. the following options are available: ƒ SETTINGS - provides the way to the descriptions of installed devices on this motherboard. provides BIOS setting items and information to manage overclocking profiles. ƒ HARDWARE MONITOR -
User Manual
Page 44
Day of the week, from Jan. f SATA PortX/ M2_X Shows the information of the device and motherboard. Press Enter to 31 can be keyed by users. Read-only. through Dec. f DMI Information Shows system information, desktop Board Information and chassis Information. (Read ...
Day of the week, from Jan. f SATA PortX/ M2_X Shows the information of the device and motherboard. Press Enter to 31 can be keyed by users. Read-only. through Dec. f DMI Information Shows system information, desktop Board Information and chassis Information. (Read ...

User Manual
Page 60
.... 60 BIOS Setup After the flashing process is 100% completed, the system will appear after rebooting. 4. Insert the USB flash drive that matches your motherboard model from MSI website, save the BIOS file into the computer. 2. And then follow the steps below to reboot and enter the flash mode. 3. Click on Yes...
.... 60 BIOS Setup After the flashing process is 100% completed, the system will appear after rebooting. 4. Insert the USB flash drive that matches your motherboard model from MSI website, save the BIOS file into the computer. 2. And then follow the steps below to reboot and enter the flash mode. 3. Click on Yes...
User Manual
Page 64
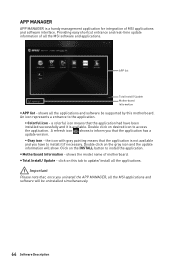
...inform you uninstall the APP MANAGER, all the applications and software be uninstalled simultaneously. 64 Software Description y Motherboard Information - y Total Install/ Update - shows all the MSI applications and software will show. A refresh icon shows to install it if necessary. Click on desired icon... has a update version. ƒ Gray icon - Double click on this motherboard. Important Please note that, once you that the application is available. shows the model name of MSI applications and software interface. click on the gray icon and the update information ...
...inform you uninstall the APP MANAGER, all the applications and software be uninstalled simultaneously. 64 Software Description y Motherboard Information - y Total Install/ Update - shows all the MSI applications and software will show. A refresh icon shows to install it if necessary. Click on desired icon... has a update version. ƒ Gray icon - Double click on this motherboard. Important Please note that, once you that the application is available. shows the model name of MSI applications and software interface. click on the gray icon and the update information ...

User Manual
Page 65
... information. LIVE UPDATE 6 will see the Live update tab at the top. y Live Update - displays the information of motherboard and graphics cards. y Setting - LIVE UPDATE 6 LIVE UPDATE 6 is an application for the MSI® system to download. Download Options Download List Scan / Download / Total Installer button System Information Last Scanned Date There...
... information. LIVE UPDATE 6 will see the Live update tab at the top. y Live Update - displays the information of motherboard and graphics cards. y Setting - LIVE UPDATE 6 LIVE UPDATE 6 is an application for the MSI® system to download. Download Options Download List Scan / Download / Total Installer button System Information Last Scanned Date There...
User Manual
Page 69
... the orange vertical line to the spot. ƒ History Record stores the data and names with the virtual thermal image. allows you to monitor your motherboard temperature and fan speed with date and time. ƒ To make a history record: Select items and click the Record button. When you to control the...
... the orange vertical line to the spot. ƒ History Record stores the data and names with the virtual thermal image. allows you to monitor your motherboard temperature and fan speed with date and time. ƒ To make a history record: Select items and click the Record button. When you to control the...

User Manual
Page 70
... CENTER APP to SoftAP with the built-in WiFi module. Run MSI® COMMAND CENTER APP on your mobile device and connect to your mobile device. 7. Option Buttons - Information When click the Information button, The Motherboard, CPU, Memory and HW monitor icons will pop-up. Gadget Mode... and Password, and then click the Apply button. 5. y To arrange gadgets: 1. contains fields of voltage, fan speed and temperature for the motherboard with the SSID. 6. You can switch between gadget mode and full mode by clicking the arrow icon on the Gadget mode, a configuration panel will...
... CENTER APP to SoftAP with the built-in WiFi module. Run MSI® COMMAND CENTER APP on your mobile device and connect to your mobile device. 7. Option Buttons - Information When click the Information button, The Motherboard, CPU, Memory and HW monitor icons will pop-up. Gadget Mode... and Password, and then click the Apply button. 5. y To arrange gadgets: 1. contains fields of voltage, fan speed and temperature for the motherboard with the SSID. 6. You can switch between gadget mode and full mode by clicking the arrow icon on the Gadget mode, a configuration panel will...

User Manual
Page 74
...to synchronize all LED lights of the motherboard. allow you to turn ON/ OFF all LED light effect of the sync devices. y Profile - y LED Area - Motherboard Screen The motherboard screen is used to configure the LED light effect of the motherboard. y Sync All - y Live ...Preview - switches to different models. returns to the current profile. y Motherboard Name - applies lighting effect settings. allows you to ...
...to synchronize all LED lights of the motherboard. allow you to turn ON/ OFF all LED light effect of the sync devices. y Profile - y LED Area - Motherboard Screen The motherboard screen is used to configure the LED light effect of the motherboard. y Sync All - y Live ...Preview - switches to different models. returns to the current profile. y Motherboard Name - applies lighting effect settings. allows you to ...

User Manual
Page 81
.... shows memory type, memory size, channels, memory frequency. y Graphics Tab - Software Description 81 y Memory Tab - allows you to the motherboard, including the size, type and frequency. y Mainboard Tab - y Bench Tab - shows specifications relating to each memory module connected to save ... sets, core speed and cache levels. y Caches Tab - CPU-Z CPU-Z is an utility that gathers information on your system. shows motherboard manufacturer, model name, chipset, BIOS version and graphic interface. y SPD Tab - shows the CPU-Z version, Windows version, DirectX version ...
.... shows memory type, memory size, channels, memory frequency. y Graphics Tab - Software Description 81 y Memory Tab - allows you to the motherboard, including the size, type and frequency. y Mainboard Tab - y Bench Tab - shows specifications relating to each memory module connected to save ... sets, core speed and cache levels. y Caches Tab - CPU-Z CPU-Z is an utility that gathers information on your system. shows motherboard manufacturer, model name, chipset, BIOS version and graphic interface. y SPD Tab - shows the CPU-Z version, Windows version, DirectX version ...


