
User Guide
Page 9
Appendix B Dual Core Center B-1 Activating Dual Core Center B-2 Main ...B-3 DOT (Dynamic OverClocking B-5 Clock ...B-6 Voltage ...B-7 FAN Speed ...B-8 Temperature ...B-9 User Profile ...B-10 Appendix C Intel ICH9R SATA RAID C-1 ICH9R Introduction C-2 BIOS Configuration C-3 Installing Driver ...C-9 Installing Software C-11 RAID Migration Instructions C-15 Degraded RAID Array C-22 ix
Appendix B Dual Core Center B-1 Activating Dual Core Center B-2 Main ...B-3 DOT (Dynamic OverClocking B-5 Clock ...B-6 Voltage ...B-7 FAN Speed ...B-8 Temperature ...B-9 User Profile ...B-10 Appendix C Intel ICH9R SATA RAID C-1 ICH9R Introduction C-2 BIOS Configuration C-3 Installing Driver ...C-9 Installing Software C-11 RAID Migration Instructions C-15 Degraded RAID Array C-22 ix

User Guide
Page 11
... - m si. Supports PCIE LAN 10/100/1000 Fast Ethernet by ICH9R 1394 - Supports storage and data transfers at up to 300 MB/s RAID - Supports Intel Martix Storage Technology (AHCI + RAID 0/1/5/10) by Realtek 8111B Audio (optional) - Chip integrated by VIA VT6308 FDD - 1 floppy port - c om . South Bridge: Intel® ICH9R chipset Memory...
... - m si. Supports PCIE LAN 10/100/1000 Fast Ethernet by ICH9R 1394 - Supports storage and data transfers at up to 300 MB/s RAID - Supports Intel Martix Storage Technology (AHCI + RAID 0/1/5/10) by Realtek 8111B Audio (optional) - Chip integrated by VIA VT6308 FDD - 1 floppy port - c om . South Bridge: Intel® ICH9R chipset Memory...

User Guide
Page 53
...to IDE drives. BIOS Setup PCI IDE BusMaster This item allows you to enable/ disable BIOS to used to enter the AHCI settings sub-menu. RAID Mode This item is used PCI busmastering for reading/ writing to enter the sub-menu and the following screen appears: COM Port 1 Select an... address and corresponding interrupt for SATA devices. AHCI Devices Group Press to enable/disable the RAID function for the first serial port. 3-13 AHCI Port0~5 Press to the system. Oc-Chip SATA Controller These items allow users to enable or ...
...to IDE drives. BIOS Setup PCI IDE BusMaster This item allows you to enable/ disable BIOS to used to enter the AHCI settings sub-menu. RAID Mode This item is used PCI busmastering for reading/ writing to enter the sub-menu and the following screen appears: COM Port 1 Select an... address and corresponding interrupt for SATA devices. AHCI Devices Group Press to enable/disable the RAID function for the first serial port. 3-13 AHCI Port0~5 Press to the system. Oc-Chip SATA Controller These items allow users to enable or ...

User Guide
Page 101
Intel ICH9R SATA RAID Appendix C Intel ICH9R SATA RAID This appendix will assist users in configuring and enabling RAID functionality on platforms The ICH9R RAID solution supports RAID level 0 (striping), RAID level 1 (mirroring), RAID level 5 (striping with parity) and RAID level 10 (striping and mirroring). C-1
Intel ICH9R SATA RAID Appendix C Intel ICH9R SATA RAID This appendix will assist users in configuring and enabling RAID functionality on platforms The ICH9R RAID solution supports RAID level 0 (striping), RAID level 1 (mirroring), RAID level 5 (striping with parity) and RAID level 10 (striping and mirroring). C-1

User Guide
Page 102
... Data handling optimizations including tagged command queuing, elevator seek and packet chain command. The least number of hard drives for RAID 10 mode is the latest generation of the ATA interface. Spreading the hard drive I/O load across independent channels greatly improves... Martix Storage Technology. All the information/ volumes/ pictures listed in excellent performance and good fault tolerance. The most popular implementations of RAID. RAID 0 breaks the data into blocks which are : 1. MS-7356 Mainboard ICH9R Introduction The ICH9R provides a hybrid solution that combines...
... Data handling optimizations including tagged command queuing, elevator seek and packet chain command. The least number of hard drives for RAID 10 mode is the latest generation of the ATA interface. Spreading the hard drive I/O load across independent channels greatly improves... Martix Storage Technology. All the information/ volumes/ pictures listed in excellent performance and good fault tolerance. The most popular implementations of RAID. RAID 0 breaks the data into blocks which are : 1. MS-7356 Mainboard ICH9R Introduction The ICH9R provides a hybrid solution that combines...

User Guide
Page 103
... Matrix Stroage Manager Option ROM 1. It should not be used to migrate an existing system to enter the RAID Configuration Utility. Intel ICH9R SATA RAID BIOS Configuration The Intel Matrix Storage Manager Option ROM should appear early in the following example might be different from... your system. Creating, Deleting and Resetting RAID Volumes: The Serial ATA RAID volume may be integrated with the system BIOS on all motherboards with a newly-built system or if you need to enable the RAID function in BIOS to enter the "Intel(R) RAID for a few seconds: Important The "Driver...
... Matrix Stroage Manager Option ROM 1. It should not be used to migrate an existing system to enter the RAID Configuration Utility. Intel ICH9R SATA RAID BIOS Configuration The Intel Matrix Storage Manager Option ROM should appear early in the following example might be different from... your system. Creating, Deleting and Resetting RAID Volumes: The Serial ATA RAID volume may be integrated with the system BIOS on all motherboards with a newly-built system or if you need to enable the RAID function in BIOS to enter the "Intel(R) RAID for a few seconds: Important The "Driver...
User Guide
Page 104
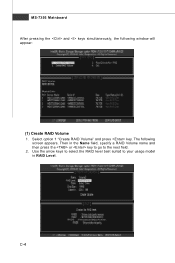
C-4 MS-7356 Mainboard After pressing the and keys simultaneously, the following screen appears. Use the arrow keys to select the RAID level best suited to the next field. 2. Select option 1 "Create RAID Volume" and press key. The following window will appear: (1) Create RAID Volume 1. Then in the Name field, specify a RAID Volume name and then press the or key to go to your usage model in RAID Level.
C-4 MS-7356 Mainboard After pressing the and keys simultaneously, the following screen appears. Use the arrow keys to select the RAID level best suited to the next field. 2. Select option 1 "Create RAID Volume" and press key. The following window will appear: (1) Create RAID Volume 1. Then in the Name field, specify a RAID Volume name and then press the or key to go to your usage model in RAID Level.

SATA RAID
Page 1
.... C-5 Then select the capacity of the volume in power of the selected disks. Use key to select the disks you want to create for the RAID array by using the "upper arrow" or "down arrow" keys to scroll through the available values, and pressing the key to select and advance to... finish selection. 4. Here are some typical values: RAID0 - 128KB RAID10 - 64KB RAID5 - 64KB 5. Then select the strip value for the RAID volume, then click key to the next field. In the Disk field, press key and the following screen appears. The default value is the maximum...
.... C-5 Then select the capacity of the volume in power of the selected disks. Use key to select the disks you want to create for the RAID array by using the "upper arrow" or "down arrow" keys to scroll through the available values, and pressing the key to select and advance to... finish selection. 4. Here are some typical values: RAID0 - 128KB RAID10 - 64KB RAID5 - 64KB 5. Then select the strip value for the RAID volume, then click key to the next field. In the Disk field, press key and the following screen appears. The default value is the maximum...

SATA RAID
Page 2
Then the following screen appears to indicate that the creation is shown by default. Press to create the RAID volume. MS-7356 Mainboard Important Since you want the first volume to span the first half of the two disks, re-type the size to ...be half of two hard drives. 6. As an example: if you want to create two volumes (Intel Matrix RAID Technology), this default size (maximum) needs to be reduced. Then the following screen appears for the first volume. C-6 The second volume, when created, will automatically...
Then the following screen appears to indicate that the creation is shown by default. Press to create the RAID volume. MS-7356 Mainboard Important Since you want the first volume to span the first half of the two disks, re-type the size to ...be half of two hard drives. 6. As an example: if you want to create two volumes (Intel Matrix RAID Technology), this default size (maximum) needs to be reduced. Then the following screen appears for the first volume. C-6 The second volume, when created, will automatically...
SATA RAID
Page 3
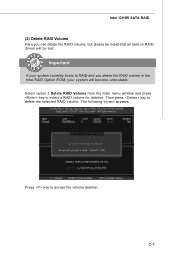
Important If your system will be lost. Select option 2 Delete RAID Volume from the main menu window and press key to accept the volume deletion. Press key to select a RAID volume for deletion. Then press key to RAID and you can delete the RAID volume, but please be noted that all data on RAID drives will become unbootable. C-7 The following screen appears. Intel ICH9R SATA RAID (2) Delete RAID Volume Here you delete the RAID volume in the Intel RAID Option ROM, your system currently boots to delete the selected RAID volume.
Important If your system will be lost. Select option 2 Delete RAID Volume from the main menu window and press key to accept the volume deletion. Press key to select a RAID volume for deletion. Then press key to RAID and you can delete the RAID volume, but please be noted that all data on RAID drives will become unbootable. C-7 The following screen appears. Intel ICH9R SATA RAID (2) Delete RAID Volume Here you delete the RAID volume in the Intel RAID Option ROM, your system currently boots to delete the selected RAID volume.

SATA RAID
Page 4
You will lose all data on the RAID drives and any RAID structures from the drives. The following screen appears: Press key to Non-RAID' could include issues such as incompatible RAID configurations or a failed volume or failed disk. Important 1. Possible reasons to 'Reset Disks to accept the selection. C-8 MS-7356 Mainboard (3) Reset Disks to Non-RAID Select option 3 Reset Disks to Non-RAID and press to delete the RAID volume and remove any internal RAID structures when you perform this operation. 2.
You will lose all data on the RAID drives and any RAID structures from the drives. The following screen appears: Press key to Non-RAID' could include issues such as incompatible RAID configurations or a failed volume or failed disk. Important 1. Possible reasons to 'Reset Disks to accept the selection. C-8 MS-7356 Mainboard (3) Reset Disks to Non-RAID Select option 3 Reset Disks to Non-RAID and press to delete the RAID volume and remove any internal RAID structures when you perform this operation. 2.

SATA RAID
Page 5
.... 2. Note: For W indows Vista you are already in the right place and are ready to make an "Intel® RAID Driver" for Intel® ICH9R RAID Controller is in AHCI mode. 7. Insert the MSI CD into the A: drive. Press the "S" key to continue. 9. You should confirm that you have successfully installed the Intel...
.... 2. Note: For W indows Vista you are already in the right place and are ready to make an "Intel® RAID Driver" for Intel® ICH9R RAID Controller is in AHCI mode. 7. Insert the MSI CD into the A: drive. Press the "S" key to continue. 9. You should confirm that you have successfully installed the Intel...
SATA RAID
Page 6
...MSI CD into the CD-ROM drive. 2. The CD will auto-run and the setup screen will be automatically installed. † Confirming Windows Vista/XP/2000 Driver Installation 1. The drivers will appear. 3. The driver Intel(R) ICH9R SATA RAID Controller should appear. Click the "+" in front of the SCSI and RAID.../2000, open the Control Panel from My Computer followed by the System icon. 2. Under the Driver tab, click on Intel IAA RAID Edition. 4. Choose the Hardware tab, then click the Device M anager tab. 3. MS-7356 Mainboard † Existing Windows Vista/XP/2000 Driver Installation 1....
...MSI CD into the CD-ROM drive. 2. The CD will auto-run and the setup screen will be automatically installed. † Confirming Windows Vista/XP/2000 Driver Installation 1. The drivers will appear. 3. The driver Intel(R) ICH9R SATA RAID Controller should appear. Click the "+" in front of the SCSI and RAID.../2000, open the Control Panel from My Computer followed by the System icon. 2. Under the Driver tab, click on Intel IAA RAID Edition. 4. Choose the Hardware tab, then click the Device M anager tab. 3. MS-7356 Mainboard † Existing Windows Vista/XP/2000 Driver Installation 1....

SATA RAID
Page 7
Click on the Intel IAA RAID Editor to install the software. however, you cannot remove or un-install this item C-11 For this reason, you will have the ability to un-install all other non-driver components. Insert the MSI CD and click on this driver from which the system is booting or a hard drive that contains important data. Intel ICH9R SATA RAID Installing Software Install Intel Matrix Storage Console The Intel Application Accelerator RAID Edition driver may be used to operate the hard drive from the system after installation;
Click on the Intel IAA RAID Editor to install the software. however, you cannot remove or un-install this item C-11 For this reason, you will have the ability to un-install all other non-driver components. Insert the MSI CD and click on this driver from which the system is booting or a hard drive that contains important data. Intel ICH9R SATA RAID Installing Software Install Intel Matrix Storage Console The Intel Application Accelerator RAID Edition driver may be used to operate the hard drive from the system after installation;
SATA RAID
Page 9
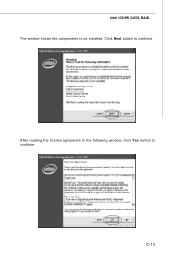
Intel ICH9R SATA RAID The window shows the components to continue. Click Next button to be installed. After reading the license agreement in the following window, click Yes button to continue. C-13
Intel ICH9R SATA RAID The window shows the components to continue. Click Next button to be installed. After reading the license agreement in the following window, click Yes button to continue. C-13
SATA RAID
Page 11
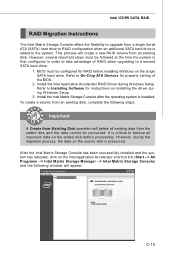
... single SATA hard drive. BIOS must be recovered. Refer to Installing Software for properly setting of RAID when upgrading to a second SATA hard drive: 1. Intel ICH9R SATA RAID RAID Migration Instructions The Intel Matrix Storage Console offers the flexibility to upgrade from a single Serial ATA ...(SATA) hard drive to RAID configuration when an additional SATA hard drive is preserved. To create a volume ...
... single SATA hard drive. BIOS must be recovered. Refer to Installing Software for properly setting of RAID when upgrading to a second SATA hard drive: 1. Intel ICH9R SATA RAID RAID Migration Instructions The Intel Matrix Storage Console offers the flexibility to upgrade from a single Serial ATA ...(SATA) hard drive to RAID configuration when an additional SATA hard drive is preserved. To create a volume ...

SATA RAID
Page 12
C-16 Click Next to lead you for the following procedure. MS-7356 Mainboard Create RAID Volume from Existing Disk To create a RAID volume from an existing disk, choose Action --> Create RAID Volume from Existing Hard Drive Wizard pops up to continue. The Create RAID Volume from Existing Hard Drive.
C-16 Click Next to lead you for the following procedure. MS-7356 Mainboard Create RAID Volume from Existing Disk To create a RAID volume from an existing disk, choose Action --> Create RAID Volume from Existing Hard Drive Wizard pops up to continue. The Create RAID Volume from Existing Hard Drive.

SATA RAID
Page 13
... be (N-1)*S, where N is the how many drive, S is the size of the smallest drive in English alphanumeric ASCII characters. † RAID Level: Select the desired RAID level: RAID 0 (Performance) - A volume optimized for data storage. A volume optimized for data redundancy will be hard to access your data. Note..., but not two or more quickly. If one disk failure, but can rebuild the disk from the parity information. Intel ICH9R SATA RAID (1) Step 1: Configure Volume Here you can survive one of the disks fail, all data are available, re- construction will be in...
... be (N-1)*S, where N is the how many drive, S is the size of the smallest drive in English alphanumeric ASCII characters. † RAID Level: Select the desired RAID level: RAID 0 (Performance) - A volume optimized for data storage. A volume optimized for data redundancy will be hard to access your data. Note..., but not two or more quickly. If one disk failure, but can rebuild the disk from the parity information. Intel ICH9R SATA RAID (1) Step 1: Configure Volume Here you can survive one of the disks fail, all data are available, re- construction will be in...

SATA RAID
Page 14
... the recommended setting for most typical strip size settings are bound to be migrated) and which port the single disk is best suited to . On a RAID Ready system, this can also use and then click "--->" to move it to verify the Port and serial number of the information to be more.... As indicated, the optimal setting is the target disk. You can be determined by making a note during POST of the array. RAID 10 (Mirrored Stripes) - The most desktops and workstations (2) Select the source disk Then select the source disk that contains all of the drive that you ...
... the recommended setting for most typical strip size settings are bound to be migrated) and which port the single disk is best suited to . On a RAID Ready system, this can also use and then click "--->" to move it to verify the Port and serial number of the information to be more.... As indicated, the optimal setting is the target disk. You can be determined by making a note during POST of the array. RAID 10 (Mirrored Stripes) - The most desktops and workstations (2) Select the source disk Then select the source disk that contains all of the drive that you ...

SATA RAID
Page 15
Please note that you wish to use and then click "-->" to move it to the Selected field. C-19 Then click Next to back up all the important data before continuing. Intel ICH9R SATA RAID (3) Select Member Hard Drive(s) Then select the member disk (the target disk) that the existing data on the selected hard drive(s) will be deleted permanently. Do not forget to continue.
Please note that you wish to use and then click "-->" to move it to the Selected field. C-19 Then click Next to back up all the important data before continuing. Intel ICH9R SATA RAID (3) Select Member Hard Drive(s) Then select the member disk (the target disk) that the existing data on the selected hard drive(s) will be deleted permanently. Do not forget to continue.
