
User Manual
Page 15
Audio Tab ...79 Microphone Tab ...80 Sound Tracker Tab 81 Settings Tab ...81 AMD RAID Configuration 82 Enabling RAIDXpert2 Configuration Utility 82 Initializing Disks 83 Creating Arrays...84 Deleting Arrays ...85 Installing RAID Driver 86 Troubleshooting 87 Contents 15
Audio Tab ...79 Microphone Tab ...80 Sound Tracker Tab 81 Settings Tab ...81 AMD RAID Configuration 82 Enabling RAIDXpert2 Configuration Utility 82 Initializing Disks 83 Creating Arrays...84 Deleting Arrays ...85 Installing RAID Driver 86 Troubleshooting 87 Contents 15

User Manual
Page 17
Wireless LAN & Bluetooth® Audio Storage RAID Continued from previous page Intel® Wi-Fi 6 AX200 ƒ Supports 802.11 a/b/g/n/ac/ax, ...is pre-install in the M2_4 (Key-E) slot Realtek® ALC1220 Codec y 7.1-Channel High Definition Audio y Supports Optical S/PDIF output AMD® X570 Chipset y 4x SATA 6Gb/s ports y 2x M.2 slots (M2_2/ M2_3, Key M)* ƒ Support PCIe 4.0/ 3.0 x4 and SATA 6Gb/s ...2242/ 2260 /2280/ 22110 storage devices *The speeds may vary for different devices AMD® X570 Chipset y Supports RAID 0, RAID 1 and RAID 10 Continued on next page Specifications 17
Wireless LAN & Bluetooth® Audio Storage RAID Continued from previous page Intel® Wi-Fi 6 AX200 ƒ Supports 802.11 a/b/g/n/ac/ax, ...is pre-install in the M2_4 (Key-E) slot Realtek® ALC1220 Codec y 7.1-Channel High Definition Audio y Supports Optical S/PDIF output AMD® X570 Chipset y 4x SATA 6Gb/s ports y 2x M.2 slots (M2_2/ M2_3, Key M)* ƒ Support PCIe 4.0/ 3.0 x4 and SATA 6Gb/s ...2242/ 2260 /2280/ 22110 storage devices *The speeds may vary for different devices AMD® X570 Chipset y Supports RAID 0, RAID 1 and RAID 10 Continued on next page Specifications 17

User Manual
Page 61
... menu that allows you to a favorite page (Favorite 1~5) 1. Choose Delete and click on search page. 2. enable or disable the LAN Option ROM, ErP Ready, AHCI/ RAID, Indication LED Control, BIOS UEFI/CSM Mode and RGB Light Control by percentage. allows you to add the frequently-used BIOS setting items. ƒƒ...
... menu that allows you to a favorite page (Favorite 1~5) 1. Choose Delete and click on search page. 2. enable or disable the LAN Option ROM, ErP Ready, AHCI/ RAID, Indication LED Control, BIOS UEFI/CSM Mode and RGB Light Control by percentage. allows you to add the frequently-used BIOS setting items. ƒƒ...

User Manual
Page 65
... the system power consumption according to enhance the speed and performance of SATA storage device, such as Native Command Queuing (NCQ) and hot-plugging. [RAID Mode] Enables RAID function for SATA storage devices. This item will not support S4 & S5 wake up by USB, PCI and PCIe devices. [Disabled] Disables this function...
... the system power consumption according to enhance the speed and performance of SATA storage device, such as Native Command Queuing (NCQ) and hot-plugging. [RAID Mode] Enables RAID function for SATA storage devices. This item will not support S4 & S5 wake up by USB, PCI and PCIe devices. [Disabled] Disables this function...

User Manual
Page 82
... not provide performance benefits or data redundancy. Press F10 to save configuration and exit, and then reboot and press Delete key to RAID Mode. 4. RAIDABLE (also known as RAID Ready) allows the user to UEFI. 5. Go to BIOS > SETTINGS > Advanced > Windows OS Configuration > BIOS UEFI/ CSM... Mode and change setting to enter BIOS Setup menu. 6. RAID 10 (Striped RAID1 Sets) uses four hard drives to create a combination of the space on those disks. Power on disks unused by mirroring data between...
... not provide performance benefits or data redundancy. Press F10 to save configuration and exit, and then reboot and press Delete key to RAID Mode. 4. RAIDABLE (also known as RAID Ready) allows the user to UEFI. 5. Go to BIOS > SETTINGS > Advanced > Windows OS Configuration > BIOS UEFI/ CSM... Mode and change setting to enter BIOS Setup menu. 6. RAID 10 (Striped RAID1 Sets) uses four hard drives to create a combination of the space on those disks. Power on disks unused by mirroring data between...

User Manual
Page 83
...To initialize disks 1. Go to Enabled. 4. AMD RAID Configuration 83 To initial the disk anyway, delete the AMD-RAID array. Select OK, then press Enter. 5. During initialization, a complete rescan of an AMD-RAID array, the disk cannot be selected for initialization. Select... want to a disk. Initializing Disks New disks and legacy disks must be initialized before they can contain valid data. Initialization writes AMD-RAID configuration information (metadata) to proceed, select YES, then press Enter. 6. Data on the disk is done automatically. As previously mentioned,...
...To initialize disks 1. Go to Enabled. 4. AMD RAID Configuration 83 To initial the disk anyway, delete the AMD-RAID array. Select OK, then press Enter. 5. During initialization, a complete rescan of an AMD-RAID array, the disk cannot be selected for initialization. Select... want to a disk. Initializing Disks New disks and legacy disks must be initialized before they can contain valid data. Initialization writes AMD-RAID configuration information (metadata) to proceed, select YES, then press Enter. 6. Data on the disk is done automatically. As previously mentioned,...

User Manual
Page 84
...initialized. Enter Select Physical Disks sub-menu, select member disks by pressing ESC. Important y For redundant arrays, the Create process is booted from an AMD-RAID bootable array, the first array in the procedure, return to a prior window by changing the Physical Disk setting to use the RAIDXpert2 Web GUI Array... Naming feature. y At any point in the Arrays section must be created after the operating system and AMD-RAID OS drivers have been installed and the system has booted to previous submenu. 6. The system boots only from the Select...
...initialized. Enter Select Physical Disks sub-menu, select member disks by pressing ESC. Important y For redundant arrays, the Create process is booted from an AMD-RAID bootable array, the first array in the procedure, return to a prior window by changing the Physical Disk setting to use the RAIDXpert2 Web GUI Array... Naming feature. y At any point in the Arrays section must be created after the operating system and AMD-RAID OS drivers have been installed and the system has booted to previous submenu. 6. The system boots only from the Select...

User Manual
Page 85
To delete an array 1. y Do not delete the first array listed in the Arrays section, if it is very unlikely that is the AMD-RAID bootable array. Go to Enabled. 4. Select the desired array and change the setting to Enabled. 6. Enter Delete Array(s) sub-menu. 5. Deleting Arrays ...and it is on the array. As previously mentioned, enable RAIDXpert2 Configuration Utility. 2. AMD RAID Configuration 85 This action cannot be recovered. Doing this deletes the operating system and AMD-RAID files. Review the warning message, if you want to proceed, Select Confirm and change the...
To delete an array 1. y Do not delete the first array listed in the Arrays section, if it is very unlikely that is the AMD-RAID bootable array. Go to Enabled. 4. Select the desired array and change the setting to Enabled. 6. Enter Delete Array(s) sub-menu. 5. Deleting Arrays ...and it is on the array. As previously mentioned, enable RAIDXpert2 Configuration Utility. 2. AMD RAID Configuration 85 This action cannot be recovered. Doing this deletes the operating system and AMD-RAID files. Review the warning message, if you want to proceed, Select Confirm and change the...
User Manual
Page 86
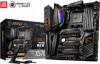
... icon to open the installer. You have successfully installed the RAID driver, and Windows setup should continue. 9. AMD RAIDXpert2 Management Suite Installation 1. Insert the MSI Driver Disc into the optical drive. admin 9. Insert the MSI Driver Disc into the optical drive. 3. When prompted, click... open the RAIDXpert2 Web GUI. ƒ Default credentials are: ˜ Username - Installing RAID Driver New Operating System Installation The following details the installation of the MSI Driver Disc. 4. Click the Select to choose what happens with this disc pop-up notification...
... icon to open the installer. You have successfully installed the RAID driver, and Windows setup should continue. 9. AMD RAIDXpert2 Management Suite Installation 1. Insert the MSI Driver Disc into the optical drive. admin 9. Insert the MSI Driver Disc into the optical drive. 3. When prompted, click... open the RAIDXpert2 Web GUI. ƒ Default credentials are: ˜ Username - Installing RAID Driver New Operating System Installation The following details the installation of the MSI Driver Disc. 4. Click the Select to choose what happens with this disc pop-up notification...
