User Manual
Page 14
... Code LED 50 Hexadecimal Character Table 51 Boot Phases...51 Debug Code LED Table 51 ACPI States Codes 55 Installing OS, Drivers & Utilities 56 Installing Windows® 10 56 Installing Drivers 56 Installing Utilities 56 BIOS Setup ...57 Entering BIOS Setup 57 Resetting BIOS...58 Updating BIOS...58 EZ Mode ...60 Advanced...
... Code LED 50 Hexadecimal Character Table 51 Boot Phases...51 Debug Code LED Table 51 ACPI States Codes 55 Installing OS, Drivers & Utilities 56 Installing Windows® 10 56 Installing Drivers 56 Installing Utilities 56 BIOS Setup ...57 Entering BIOS Setup 57 Resetting BIOS...58 Updating BIOS...58 EZ Mode ...60 Advanced...

User Manual
Page 15
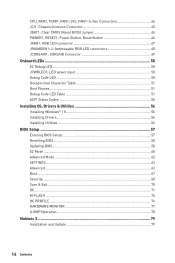
Audio Tab ...79 Microphone Tab ...80 Sound Tracker Tab 81 Settings Tab ...81 AMD RAID Configuration 82 Enabling RAIDXpert2 Configuration Utility 82 Initializing Disks 83 Creating Arrays...84 Deleting Arrays ...85 Installing RAID Driver 86 Troubleshooting 87 Contents 15
Audio Tab ...79 Microphone Tab ...80 Sound Tracker Tab 81 Settings Tab ...81 AMD RAID Configuration 82 Enabling RAIDXpert2 Configuration Utility 82 Initializing Disks 83 Creating Arrays...84 Deleting Arrays ...85 Installing RAID Driver 86 Troubleshooting 87 Contents 15

User Manual
Page 20
... A ports y 5x OFC audio jacks y 1x Optical S/PDIF Out connector y 1x 256 Mb flash y UEFI AMI BIOS y ACPI 6.1, SM BIOS 2.8 y Multi-language y Drivers y DRAGON CENTER y Nahimic Audio y CPU-Z MSI GAMING y MSI App Player (BlueStacks) y Google Chrome™ ,Google Toolbar, Google Drive y Norton™ Internet Security Solution y DRAGON OPTIMIZATION y OC Performance y Hardware Monitor y True...
... A ports y 5x OFC audio jacks y 1x Optical S/PDIF Out connector y 1x 256 Mb flash y UEFI AMI BIOS y ACPI 6.1, SM BIOS 2.8 y Multi-language y Drivers y DRAGON CENTER y Nahimic Audio y CPU-Z MSI GAMING y MSI App Player (BlueStacks) y Google Chrome™ ,Google Toolbar, Google Drive y Norton™ Internet Security Solution y DRAGON OPTIMIZATION y OC Performance y Hardware Monitor y True...
User Manual
Page 23
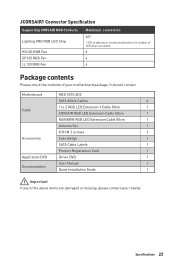
... your motherboard package. It should contain: Motherboard MEG X570 ACE SATA 6Gb/s Cables 4 Cable 1 to 2 RGB LED Extension Y Cable 80cm 1 CORSAIR RGB LED Extension Cable 50cm 1 RAINBOW RGB LED Extension Cable 80cm 1 Antenna Set 1 8.5H M.2 screws 3 Accessories Case Badge 1 SATA Cable Labels 1 Product Registration Card 1 Application DVD Driver DVD 1 User Manual 1 Documentation Quick Installation...
... your motherboard package. It should contain: Motherboard MEG X570 ACE SATA 6Gb/s Cables 4 Cable 1 to 2 RGB LED Extension Y Cable 80cm 1 CORSAIR RGB LED Extension Cable 50cm 1 RAINBOW RGB LED Extension Cable 80cm 1 Antenna Set 1 8.5H M.2 screws 3 Accessories Case Badge 1 SATA Cable Labels 1 Product Registration Card 1 Application DVD Driver DVD 1 User Manual 1 Documentation Quick Installation...

User Manual
Page 35
..., install two graphics cards into the PCI_E1 and PCI_E3 slots. 2. Overview of Components 35 Reconnect the power cord, power up the computer and install the drivers and software included in the SLI configuration menu, and then click Apply.
..., install two graphics cards into the PCI_E1 and PCI_E3 slots. 2. Overview of Components 35 Reconnect the power cord, power up the computer and install the drivers and software included in the SLI configuration menu, and then click Apply.

User Manual
Page 51
memory initialization Driver Execution Environment (DXE) - system setup, pre-OS user interface & selecting a bootable device (CD/DVD, HDD, USB, Network, Shell, ...) Debug Code LED Table SEC Progress Codes ...
memory initialization Driver Execution Environment (DXE) - system setup, pre-OS user interface & selecting a bootable device (CD/DVD, HDD, USB, Network, Shell, ...) Debug Code LED Table SEC Progress Codes ...

User Manual
Page 52
... specific) 78 ACPI module initialization 79 CSM initialization 7A - 7F Reserved for future AMI DXE codes 90 Boot Device Selection (BDS) phase is started 91 Driver connecting is started 92 PCI Bus initialization is started 52 Onboard LEDs 2C Memory initialization.
... specific) 78 ACPI module initialization 79 CSM initialization 7A - 7F Reserved for future AMI DXE codes 90 Boot Device Selection (BDS) phase is started 91 Driver connecting is started 92 PCI Bus initialization is started 52 Onboard LEDs 2C Memory initialization.

User Manual
Page 56
.... 6. Click the Install button in progress, after it has finished it will prompt you to boot from the root path of the MSI Driver Disc. 4. Installing Utilities Before you install utilities, you want to finish. 7. The utilities installation will then be in the lower-right...USB into Boot Menu. 5. Press any key when screen shows Press any key to restart. 6. Installing OS, Drivers & Utilities Please download and update the latest utilities and drivers at www.msi.com Installing Windows® 10 1. Power on the computer case. 4. Press the Restart button on the computer....
.... 6. Click the Install button in progress, after it has finished it will prompt you to boot from the root path of the MSI Driver Disc. 4. Installing Utilities Before you install utilities, you want to finish. 7. The utilities installation will then be in the lower-right...USB into Boot Menu. 5. Press any key when screen shows Press any key to restart. 6. Installing OS, Drivers & Utilities Please download and update the latest utilities and drivers at www.msi.com Installing Windows® 10 1. Power on the computer case. 4. Press the Restart button on the computer....
User Manual
Page 58
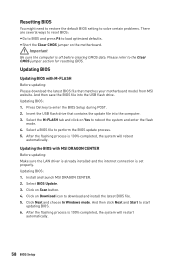
... and press F6 to the Clear CMOS jumper section for resetting BIOS. Insert the USB flash drive that matches your motherboard model from MSI website. After the flashing process is set properly. yyShort the Clear CMOS jumper on Scan button. 4. Updating BIOS: 1. Updating BIOS...: 1. Updating BIOS Updating BIOS with MSI DRAGON CENTER Before updating: Make sure the LAN driver is already installed and the internet connection is 100% completed, the system will reboot automatically. And then save the...
... and press F6 to the Clear CMOS jumper section for resetting BIOS. Insert the USB flash drive that matches your motherboard model from MSI website. After the flashing process is set properly. yyShort the Clear CMOS jumper on Scan button. 4. Updating BIOS: 1. Updating BIOS...: 1. Updating BIOS Updating BIOS with MSI DRAGON CENTER Before updating: Make sure the LAN driver is already installed and the internet connection is 100% completed, the system will reboot automatically. And then save the...

User Manual
Page 66
... be defined by RTC Alarm. [Enabled] Enables the system to meet the system requirement. [CSM] For the non-UEFI driver add-on devices or non-UEFI mode OS. [UEFI] For the UEFI driver add-on a scheduled time/ date. [Disabled] Disables this function. ffDate (of these fields (using the + and - ffBIOS UEFI/CSM...
... be defined by RTC Alarm. [Enabled] Enables the system to meet the system requirement. [CSM] For the non-UEFI driver add-on devices or non-UEFI mode OS. [UEFI] For the UEFI driver add-on a scheduled time/ date. [Disabled] Disables this function. ffDate (of these fields (using the + and - ffBIOS UEFI/CSM...
User Manual
Page 79
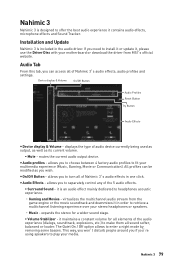
...ƒ Surround Sound - virtualizes the multichannel audio stream from the game engine or the movie soundtrack and downmixes it , please use the Driver Disc with your stereo headphones or speakers. ˜ Music - expands the stereo for all of Nahimic 3's audio effects in the audio...as well as you need to install it or update it in order to retrieve a multichannel listening experience over your motherboard or download the driver from MSI's official website. displays the type of Nahimic 3's audio effects, audio profiles and settings. All profiles can access all sound softer, balanced ...
...ƒ Surround Sound - virtualizes the multichannel audio stream from the game engine or the movie soundtrack and downmixes it , please use the Driver Disc with your stereo headphones or speakers. ˜ Music - expands the stereo for all of Nahimic 3's audio effects in the audio...as well as you need to install it or update it in order to retrieve a multichannel listening experience over your motherboard or download the driver from MSI's official website. displays the type of Nahimic 3's audio effects, audio profiles and settings. All profiles can access all sound softer, balanced ...

User Manual
Page 84
... for a given boot and might be different in the Arrays section. Creating Arrays Arrays can be created after the operating system and AMD-RAID OS drivers have been installed and the system has booted to previous submenu. 6. y At any point in the Arrays section must be the bootable array.
... for a given boot and might be different in the Arrays section. Creating Arrays Arrays can be created after the operating system and AMD-RAID OS drivers have been installed and the system has booted to previous submenu. 6. y At any point in the Arrays section must be the bootable array.
User Manual
Page 86
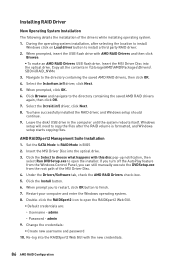
... should continue. 9. AMD RAIDXpert2 Management Suite Installation 1. Click the Install button. 6. Insert the MSI Driver Disc into the optical drive. 3. Select the (rcbottom.inf) driver, click Next. 5. Under the Drivers/Software tab, check the AMD RAID Drivers check-box. 5. Insert the MSI Driver Disc into the optical drive. Restart your computer and enter the Windows operating system...
... should continue. 9. AMD RAIDXpert2 Management Suite Installation 1. Click the Install button. 6. Insert the MSI Driver Disc into the optical drive. 3. Select the (rcbottom.inf) driver, click Next. 5. Under the Drivers/Software tab, check the AMD RAID Drivers check-box. 5. Insert the MSI Driver Disc into the optical drive. Restart your computer and enter the Windows operating system...
User Manual
Page 87
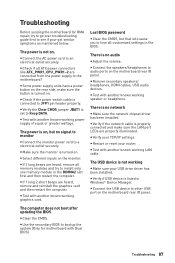
... cable is not working power supply of equal or greater wattage. Lost BIOS password y Clear the CMOS, but no network y Make sure the network chipset driver has been installed. y Verify your router. The USB device is connected to install only one memory module in the DIMMA2 slot first and then restart... USB device is no signal to monitor y Connect the monitor power cord to Keep DATA. y Connect the USB device to see if your USB drive driver has been installed. y Some power supply units have a power button on the rear side, make sure the LAN port LEDs are heard, remove and ...
... cable is not working power supply of equal or greater wattage. Lost BIOS password y Clear the CMOS, but no network y Make sure the network chipset driver has been installed. y Verify your router. The USB device is connected to install only one memory module in the DIMMA2 slot first and then restart... USB device is no signal to monitor y Connect the monitor power cord to Keep DATA. y Connect the USB device to see if your USB drive driver has been installed. y Some power supply units have a power button on the rear side, make sure the LAN port LEDs are heard, remove and ...
User Manual
Page 91
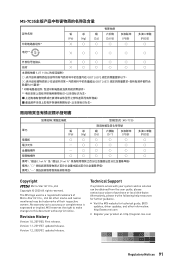
... with your place of Micro-Star Int'l Co., Ltd. Alternatively, please try the following help resources for technical guide, BIOS updates, driver updates, and other marks and names mentioned may be obtained from the user guide, please contact your system and no solution can be... the right to make changes to accuracy or completeness is a registered trademark of purchase or local distributor. yy Visit the MSI website for further guidance. MS-7C35 铅 汞 镉 (Pb) (Hg) (Cd) ╳ ○ ○ Cr(VI)) ○ PBB) ○ 电池...
... with your place of Micro-Star Int'l Co., Ltd. Alternatively, please try the following help resources for technical guide, BIOS updates, driver updates, and other marks and names mentioned may be obtained from the user guide, please contact your system and no solution can be... the right to make changes to accuracy or completeness is a registered trademark of purchase or local distributor. yy Visit the MSI website for further guidance. MS-7C35 铅 汞 镉 (Pb) (Hg) (Cd) ╳ ○ ○ Cr(VI)) ○ PBB) ○ 电池...


