User Guide
Page 4
The openings on the enclosure are for technical guide, BIOS updates, driver updates, and other information: http://www.msi.com.tw & http://www.msi. Always Unplug the Power Cord before setting it may damage the equipment. h Liquid has penetrated into the opening that ...the equipment should be - com.tw/program/service/faq/faq/esc_faq_list.php h Contact our technical staff at: support@msi.com.tw Safety Instructions 1. ment from humidity. 4. h Visit the MSI homepage & FAQ site for air convection hence protects the equip- Keep this equipment away from overheating. h The ...
The openings on the enclosure are for technical guide, BIOS updates, driver updates, and other information: http://www.msi.com.tw & http://www.msi. Always Unplug the Power Cord before setting it may damage the equipment. h Liquid has penetrated into the opening that ...the equipment should be - com.tw/program/service/faq/faq/esc_faq_list.php h Contact our technical staff at: support@msi.com.tw Safety Instructions 1. ment from humidity. 4. h Visit the MSI homepage & FAQ site for air convection hence protects the equip- Keep this equipment away from overheating. h The ...
User Guide
Page 7
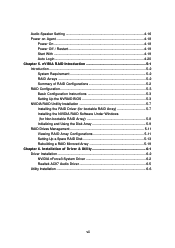
... Installation 6-6 vii Installation of RAID Configurations 5-2 RAID Configuration 5-3 Basic Configuration Instructions 5-3 Setting Up the NVRAID BIOS 5-3 NVIDIA RAID Untility Installation 5-7 Installing the RAID Driver (for bootable RAID Array 5-7 Installing the NVIDIA RAID Software Under Windows (for Non-bootable RAID Array 5-8 Initializing and Using the Disk Array 5-9 RAID Drives Management 5-...
... Installation 6-6 vii Installation of RAID Configurations 5-2 RAID Configuration 5-3 Basic Configuration Instructions 5-3 Setting Up the NVRAID BIOS 5-3 NVIDIA RAID Untility Installation 5-7 Installing the RAID Driver (for bootable RAID Array 5-7 Installing the NVIDIA RAID Software Under Windows (for Non-bootable RAID Array 5-8 Initializing and Using the Disk Array 5-9 RAID Drives Management 5-...
User Guide
Page 50
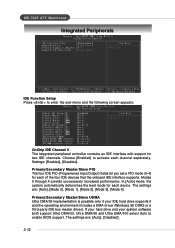
MS-7025 ATX Mainboard Integrated Peripherals IDE Function Setup Press to enter the sub-menu and the following screen appears: OnChip IDE Channel 0 The integrated peripheral controller contains ... onboard IDE interface supports. If your hard drive and your IDE hard drive supports it and the operating environment includes a DMA driver (Windows 95 OSR2 or a third-party IDE bus master driver). The settings are : [Auto], [Mode 0], [Mode 1], [Mode 2], [Mode 3], [Mode 4]. Primary/Secondary Master/Slave UDMA Ultra DMA/33 implementation is possible...
MS-7025 ATX Mainboard Integrated Peripherals IDE Function Setup Press to enter the sub-menu and the following screen appears: OnChip IDE Channel 0 The integrated peripheral controller contains ... onboard IDE interface supports. If your hard drive and your IDE hard drive supports it and the operating environment includes a DMA driver (Windows 95 OSR2 or a third-party IDE bus master driver). The settings are : [Auto], [Mode 0], [Mode 1], [Mode 2], [Mode 3], [Mode 4]. Primary/Secondary Master/Slave UDMA Ultra DMA/33 implementation is possible...

User Guide
Page 67
...and efforts to develop, helps users to DigiCell Chapter 24. ity --> MSI DigiCell), it will be able to activate the MSI well-known features, Live Update and Core Center, which makes it easier to update the BIOS/drivers online, and to monitor the system hard- Moreover, with your "Start...-up menu (path: Start-->Programs-->MSI-->DigiCell) 4-1 You may double-click on the desktop, and a short cut path in the ...
...and efforts to develop, helps users to DigiCell Chapter 24. ity --> MSI DigiCell), it will be able to activate the MSI well-known features, Live Update and Core Center, which makes it easier to update the BIOS/drivers online, and to monitor the system hard- Moreover, with your "Start...-up menu (path: Start-->Programs-->MSI-->DigiCell) 4-1 You may double-click on the desktop, and a short cut path in the ...
User Guide
Page 68
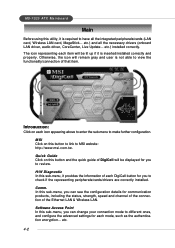
MSI Click on this button to link to have all the necessary drivers (onboard LAN driver, audio driver, CoreCenter, Live Update... The icon representing each DigiCell button for you to review. H/W Diagnostic In this sub-menu, it provides the information of each item..., Wireless LAN card, MegaStick... Software Access Point In this sub-menu, you can change your connection mode to check if the representing peripherals/cards/drivers are correctly installed. Introduction: Click on this button and the quick guide of DigiCell will be lit up if it is inserted/installed correctly and...
MSI Click on this button to link to have all the necessary drivers (onboard LAN driver, audio driver, CoreCenter, Live Update... The icon representing each DigiCell button for you to review. H/W Diagnostic In this sub-menu, it provides the information of each item..., Wireless LAN card, MegaStick... Software Access Point In this sub-menu, you can change your connection mode to check if the representing peripherals/cards/drivers are correctly installed. Introduction: Click on this button and the quick guide of DigiCell will be lit up if it is inserted/installed correctly and...

User Guide
Page 69
... In this sub-menu, you can take advantage of Core Center to monitor the health status of Live Update to detect and update BIOS and drivers online. MSI Reminds You... Introduction to DigiCell Live Update You can load media files from your MEGA STICK or the system, and edit the preferred playlist...
... In this sub-menu, you can take advantage of Core Center to monitor the health status of Live Update to detect and update BIOS and drivers online. MSI Reminds You... Introduction to DigiCell Live Update You can load media files from your MEGA STICK or the system, and edit the preferred playlist...

User Guide
Page 75
... the correct BIOS/driver version throughout the whole Web site. Double click the "MSI Live Update 3" icon, and the following screen will appear: Six buttons are placed on the screen. Live Driver - Live VGA Driver - If the product you don't need to install the "MSI Live Update 3" application.... After the installation, the "MSI Live Update 3" icon (as shown on the right) will be enabled. Live OSD...
... the correct BIOS/driver version throughout the whole Web site. Double click the "MSI Live Update 3" icon, and the following screen will appear: Six buttons are placed on the screen. Live Driver - Live VGA Driver - If the product you don't need to install the "MSI Live Update 3" application.... After the installation, the "MSI Live Update 3" icon (as shown on the right) will be enabled. Live OSD...
User Guide
Page 89
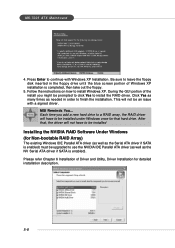
... exit. The default RAID Mode is set to Mirroring and Striping Block is set to set up the NVRAID BIOS. After that has the RAID driver to copy and install the nForce RAID software. (Check Chapter 5, NVidia RAID Utility Installation, for details.) 4. The PC will appear. Setting Up the NVRAID BIOS...
... exit. The default RAID Mode is set to Mirroring and Striping Block is set to set up the NVRAID BIOS. After that has the RAID driver to copy and install the nForce RAID software. (Check Chapter 5, NVidia RAID Utility Installation, for details.) 4. The PC will appear. Setting Up the NVRAID BIOS...
User Guide
Page 92
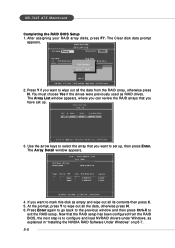
... as empty and wipe out all its contents then press C. 5. If you want to wipe out all the data, otherwise press N. 6. MS-7025 ATX Mainboard Completing the RAID BIOS Setup 1. You must choose Yes if the drives were previously used as explained in "Installing the NVIDIA RAID Software Under... Windows" on p5-7. 5-6 Now that you want to configure and load NVRAID drivers under Windows, as RAID drives. Press Y if you have set up . 3. Press Enter again to go back to the previous window and then ...
... as empty and wipe out all its contents then press C. 5. If you want to wipe out all the data, otherwise press N. 6. MS-7025 ATX Mainboard Completing the RAID BIOS Setup 1. You must choose Yes if the drives were previously used as explained in "Installing the NVIDIA RAID Software Under... Windows" on p5-7. 5-6 Now that you want to configure and load NVRAID drivers under Windows, as RAID drives. Press Y if you have set up . 3. Press Enter again to go back to the previous window and then ...
User Guide
Page 93
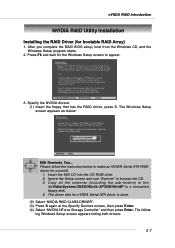
Specify the NVIDIA drivers: (1) Insert the floppy that has the RAID driver, press S. After you complete the RAID BIOS setup, boot from the Windows CD, and the Windows Setup program starts. 2. Press F6 and wait for yourself. 1. Insert the MSI CD into the CD-ROM drive. 2. ...nVIDIA RAID Introduction NVIDIA RAID Utility Installation Installing the RAID Driver (for nVIDIA Serial ATA driver is done. (2) Select "NVIDIA RAID CLASS DRIVER". (3) Press S again at the Specify Devices screen, then press ...
Specify the NVIDIA drivers: (1) Insert the floppy that has the RAID driver, press S. After you complete the RAID BIOS setup, boot from the Windows CD, and the Windows Setup program starts. 2. Press F6 and wait for yourself. 1. Insert the MSI CD into the CD-ROM drive. 2. ...nVIDIA RAID Introduction NVIDIA RAID Utility Installation Installing the RAID Driver (for nVIDIA Serial ATA driver is done. (2) Select "NVIDIA RAID CLASS DRIVER". (3) Press S again at the Specify Devices screen, then press ...
User Guide
Page 94
...Driver and Utility, Driver Installation for Non-bootable RAID Array) The existing Windows IDE Parallel ATA driver (as well as the Serial ATA driver if SATA is enabled) must be upgraded to use the NVIDIA IDE Parallel ATA driver... drive to a RAID array, the RAID driver will not have to finish the installation. Click Yes as many times as the NV Serial ATA driver if SATA is completed, then take out ... description. 5-8 MSI Reminds You... Each time you might be prompted to click Yes to be installed under Windows once for that , the driver will have to install the RAID driver. Press Enter...
...Driver and Utility, Driver Installation for Non-bootable RAID Array) The existing Windows IDE Parallel ATA driver (as well as the Serial ATA driver if SATA is enabled) must be upgraded to use the NVIDIA IDE Parallel ATA driver... drive to a RAID array, the RAID driver will not have to finish the installation. Click Yes as many times as the NV Serial ATA driver if SATA is completed, then take out ... description. 5-8 MSI Reminds You... Each time you might be prompted to click Yes to be installed under Windows once for that , the driver will have to install the RAID driver. Press Enter...

User Guide
Page 108
Installation of Driver & Utility MSI provides a setup CD along with your mainboard, which contains the required drivers for your system, and many other useful and powerful utility to bring you the best experience for your office professional working and for your home leisure entertainment. 6-1 Installation of Driver & Utility Installation of Driver and Utility Chapter 6.
Installation of Driver & Utility MSI provides a setup CD along with your mainboard, which contains the required drivers for your system, and many other useful and powerful utility to bring you the best experience for your office professional working and for your home leisure entertainment. 6-1 Installation of Driver & Utility Installation of Driver and Utility Chapter 6.
User Guide
Page 109
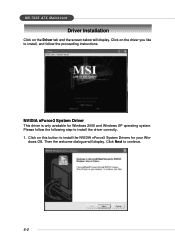
MS-7025 ATX Mainboard Driver Installation Click on the Driver tab and the screen below will display. Please follow the proceeding instructions. dows OS. NVIDIA nForce3 System Driver This driver is only available for your Win- Then the welcome dialogue will display. Click Next to install the NVIDIA nForce3 System Drivers for Windows 2000 and Windows XP operating system. Click on the driver you like to install, and follow the following step to install the driver correctly. 1. Click on this button to continue. 6-2
MS-7025 ATX Mainboard Driver Installation Click on the Driver tab and the screen below will display. Please follow the proceeding instructions. dows OS. NVIDIA nForce3 System Driver This driver is only available for your Win- Then the welcome dialogue will display. Click Next to install the NVIDIA nForce3 System Drivers for Windows 2000 and Windows XP operating system. Click on the driver you like to install, and follow the following step to install the driver correctly. 1. Click on this button to continue. 6-2

User Guide
Page 110
The system will be selected to be installed by default. Installation of Driver and Utility 2. Then click Next. 3. Click Next to install. Then the following screen displays the available components to continue. 6-3 Then the following screen displays the information for the NVIDIA IDE SW Driver installation. All the components shown here will start installing the selected driver components automatically. 4.
The system will be selected to be installed by default. Installation of Driver and Utility 2. Then click Next. 3. Click Next to install. Then the following screen displays the available components to continue. 6-3 Then the following screen displays the information for the NVIDIA IDE SW Driver installation. All the components shown here will start installing the selected driver components automatically. 4.
User Guide
Page 111
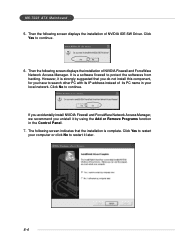
Click No to continue. 6. It is complete. Then the following screen displays the installation of NVIDIA IDE SW Driver. The following screen indicates that you do not install this component, for you unistall it later. 6-4 If you accidentally install NVIDIA Firewall and ForceWare Network ... to restart it by using the Add or Remove Programs function in your computer or click No to protect the softwares from hacking. MS-7025 ATX Mainboard 5.
Click No to continue. 6. It is complete. Then the following screen displays the installation of NVIDIA IDE SW Driver. The following screen indicates that you do not install this component, for you unistall it later. 6-4 If you accidentally install NVIDIA Firewall and ForceWare Network ... to restart it by using the Add or Remove Programs function in your computer or click No to protect the softwares from hacking. MS-7025 ATX Mainboard 5.

User Guide
Page 112
Click on this button to restart it later. 6-5 The installation process will display. Click Yes to restart your computer or click No to install the Realtek AC97 Audio Driver. The following screen indicates the installation is complete. Click Next to continue. Then the welcome dialogue will launch automatically. 2. Installation of Driver and Utility Realtek AC97 Audio Driver 1.
Click on this button to restart it later. 6-5 The installation process will display. Click Yes to restart your computer or click No to install the Realtek AC97 Audio Driver. The following screen indicates the installation is complete. Click Next to continue. Then the welcome dialogue will launch automatically. 2. Installation of Driver and Utility Realtek AC97 Audio Driver 1.


