User Guide
Page 5
...Introduction to DDR SDRAM 2-7 DIMM Module Combination 2-7 Recommended Memory Combination List 2-8 Installing DDR Modules 2-9 Power Supply 2-10 ATX 20-Pin Power Connector: ATX1 2-10 ATX 12V Power Connector: JPW1 2-10 Important Notification about Power Issue 2-11 Back Panel ...2-12 Mouse Connector (Green) / Keyboard... FDD1 2-16 Fan Power Connectors: CPUFAN1 / SFAN1 / SFAN2 / NBFAN1 2-16 Hard Disk Connectors: IDE1/IDE2 2-17 Serial ATA/Serial ATA RAID Connectors controlled by nForce3 Ultra: SATA1 / SATA2 / SATA3 / SATA4 2-18 CD-In Connector: JCD1 2-18 Front Panel Connectors: JFP1 / JFP2...
...Introduction to DDR SDRAM 2-7 DIMM Module Combination 2-7 Recommended Memory Combination List 2-8 Installing DDR Modules 2-9 Power Supply 2-10 ATX 20-Pin Power Connector: ATX1 2-10 ATX 12V Power Connector: JPW1 2-10 Important Notification about Power Issue 2-11 Back Panel ...2-12 Mouse Connector (Green) / Keyboard... FDD1 2-16 Fan Power Connectors: CPUFAN1 / SFAN1 / SFAN2 / NBFAN1 2-16 Hard Disk Connectors: IDE1/IDE2 2-17 Serial ATA/Serial ATA RAID Connectors controlled by nForce3 Ultra: SATA1 / SATA2 / SATA3 / SATA4 2-18 CD-In Connector: JCD1 2-18 Front Panel Connectors: JFP1 / JFP2...
User Guide
Page 7
... BIOS 5-3 NVIDIA RAID Untility Installation 5-7 Installing the RAID Driver (for bootable RAID Array 5-7 Installing the NVIDIA RAID Software Under Windows (for Non-bootable RAID Array 5-8 Initializing and Using the Disk Array 5-9 RAID Drives Management 5-11 Viewing RAID Array Configurations 5-11 Setting Up a Spare RAID Disk 5-13 Rebuilding a RAID Mirrored Array 5-19 Chapter 6. nVIDIA RAID Introduction 5-1 Introduction ...5-2 System Requirement 5-2 RAID Arrays 5-2 Summary...
... BIOS 5-3 NVIDIA RAID Untility Installation 5-7 Installing the RAID Driver (for bootable RAID Array 5-7 Installing the NVIDIA RAID Software Under Windows (for Non-bootable RAID Array 5-8 Initializing and Using the Disk Array 5-9 RAID Drives Management 5-11 Viewing RAID Array Configurations 5-11 Setting Up a Spare RAID Disk 5-13 Rebuilding a RAID Mirrored Array 5-19 Chapter 6. nVIDIA RAID Introduction 5-1 Introduction ...5-2 System Requirement 5-2 RAID Arrays 5-2 Summary...

User Guide
Page 10
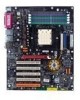
...* 1 / Front * 2)(Optional) - 8 USB1.1/2.0 ports (Rear * 4 / Front * 4) BIOS h The mainboard BIOS provides "Plug & Play" BIOS which records your mainboard specifications. RAID 0 or 1, 0+1, JBOD is up to 400Mbps Audio h Chip integrated by Realtek or 8110S (1000Mbps) or 8100C (10/100Mbps) IEEE 1394 (Optional) h Supports up to three...Realtek 8201B/CL PHY - 2nd LAN supports 10/100/1000 Fast Ethernet by Realtek ALC850 (7.1 ch H/W audio) - Getting Started NV RAID (Software) h Supports up to 4 SATA and 4 ATA133 Hard drives - h The mainboard provides a Desktop Management Interface (DMI) ...
...* 1 / Front * 2)(Optional) - 8 USB1.1/2.0 ports (Rear * 4 / Front * 4) BIOS h The mainboard BIOS provides "Plug & Play" BIOS which records your mainboard specifications. RAID 0 or 1, 0+1, JBOD is up to 400Mbps Audio h Chip integrated by Realtek or 8110S (1000Mbps) or 8100C (10/100Mbps) IEEE 1394 (Optional) h Supports up to three...Realtek 8201B/CL PHY - 2nd LAN supports 10/100/1000 Fast Ethernet by Realtek ALC850 (7.1 ch H/W audio) - Getting Started NV RAID (Software) h Supports up to 4 SATA and 4 ATA133 Hard drives - h The mainboard provides a Desktop Management Interface (DMI) ...

User Guide
Page 11
...the following website: http://www.microsoft.com/windows2000/downloads/ servicepacks/sp4/HFdeploy.htm 1-4 MS-7025 ATX Mainboard Dimension h ATX Form Factor (30.4 cm X 24.4 cm) Mounting h 9 mounting holes MSI Reminds You... 1. As the end user cannot boot without SP4, a combination installation CD ...must be used as a normal storage device. 2. To create a bootable RAID volume for a Windows 2000 environment, Microsoft's Windows ...
...the following website: http://www.microsoft.com/windows2000/downloads/ servicepacks/sp4/HFdeploy.htm 1-4 MS-7025 ATX Mainboard Dimension h ATX Form Factor (30.4 cm X 24.4 cm) Mounting h 9 mounting holes MSI Reminds You... 1. As the end user cannot boot without SP4, a combination installation CD ...must be used as a normal storage device. 2. To create a bootable RAID volume for a Windows 2000 environment, Microsoft's Windows ...
User Guide
Page 31
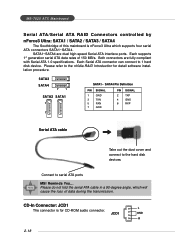
...MSI Reminds You... SATA3 SATA4 7 1 SATA2 SATA1 1 7 SATA1~ SATA4 Pin Definition PIN SIGNAL 1 GND 3 TXN 5 RXN 7 GND PIN SIGNAL 2 TXP 4 GND 6 RXP Serial ATA cable Take out the dust cover and connect to the hard disk devices Connect to 1 hard disk device. MS-7025 ATX Mainboard Serial ATA/Serial ATA RAID... Connectors controlled by nForce3 Ultra: SATA1 / SATA2 / SATA3 / SATA4 The Southbridge of this mainboard is for detail software installation procedure. Please refer to the nVidia RAID Introduction for CD...
...MSI Reminds You... SATA3 SATA4 7 1 SATA2 SATA1 1 7 SATA1~ SATA4 Pin Definition PIN SIGNAL 1 GND 3 TXN 5 RXN 7 GND PIN SIGNAL 2 TXP 4 GND 6 RXP Serial ATA cable Take out the dust cover and connect to the hard disk devices Connect to 1 hard disk device. MS-7025 ATX Mainboard Serial ATA/Serial ATA RAID... Connectors controlled by nForce3 Ultra: SATA1 / SATA2 / SATA3 / SATA4 The Southbridge of this mainboard is for detail software installation procedure. Please refer to the nVidia RAID Introduction for CD...
User Guide
Page 51
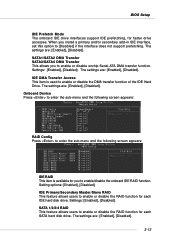
...DMA Transfer Access This item is available for each IDE hard disk drive. SATA 1/2/3/4 RAID This feature allows users to enable or disable the RAID function for you to enable/disable the onboard IDE RAID function. SATA1/SATA2 DMA Transfer SATA3/SATA4 DMA Transfer This allows you install a ... IDE drive interfaces support IDE prefetching, for each SATA hard disk drive. Setting options: [Enabled], [Disabled]. IDE Primary/Secondary Master/Slave RAID This feature allows users to enable or disable the DMA transfer function of the IDE Hard Drive. When you to [Disabled] if the ...
...DMA Transfer Access This item is available for each IDE hard disk drive. SATA 1/2/3/4 RAID This feature allows users to enable or disable the RAID function for you to enable/disable the onboard IDE RAID function. SATA1/SATA2 DMA Transfer SATA3/SATA4 DMA Transfer This allows you install a ... IDE drive interfaces support IDE prefetching, for each SATA hard disk drive. Setting options: [Enabled], [Disabled]. IDE Primary/Secondary Master/Slave RAID This feature allows users to enable or disable the DMA transfer function of the IDE Hard Drive. When you to [Disabled] if the ...

User Guide
Page 87
nVidia RAID Introduction nVidia RAID Introduction nVIDIA brings Redundant Array of Independent Disks (RAID) technology- which is used by using multiple disks grouped together and treating them as a single storage resource. 5-1 For all levels, RAID techniques optimize storage solutions by the world's leading businesses-to offer data protection. This technology uses multiple drives to either increase total disk space or to the common PC desktop. nVIDIA RAID Introduction Chapter 5.
nVidia RAID Introduction nVidia RAID Introduction nVIDIA brings Redundant Array of Independent Disks (RAID) technology- which is used by using multiple disks grouped together and treating them as a single storage resource. 5-1 For all levels, RAID techniques optimize storage solutions by the world's leading businesses-to offer data protection. This technology uses multiple drives to either increase total disk space or to the common PC desktop. nVIDIA RAID Introduction Chapter 5.
User Guide
Page 88
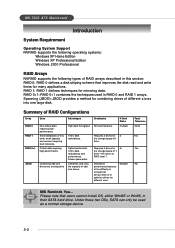
... Yes Yes No MSI Reminds You... MS-7025 ATX Mainboard Introduction System Requirement Operating System Support NVRAID supports the following operating systems: Windows XP Home Edition Windows XP Professional Edition Windows 2000 Professional RAID Arrays NVRAID supports the following types of RAID Configurations Array RAID 0 RAID 1 RAID 0+1 JBOD Uses Non-critical data requiring high performance. RAID 1: RAID 1 defines techniques...
... Yes Yes No MSI Reminds You... MS-7025 ATX Mainboard Introduction System Requirement Operating System Support NVRAID supports the following operating systems: Windows XP Home Edition Windows XP Professional Edition Windows 2000 Professional RAID Arrays NVRAID supports the following types of RAID Configurations Array RAID 0 RAID 1 RAID 0+1 JBOD Uses Non-critical data requiring high performance. RAID 1: RAID 1 defines techniques...
User Guide
Page 89
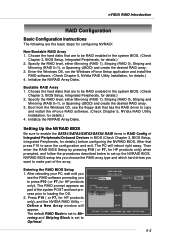
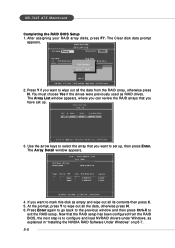
...set up the NVRAID BIOS. The PC will appear. Specify the RAID level, either Mirroring (RAID 1), Striping (RAID 0), Striping and Mirroring (RAID 0+1), or Spanning (JBOD) and create the desired RAID array. 3. Then enter the RAID BIOS Setup by pressing F10 ( or F7, for HP products ... Press F10 ( or F7, for details.) 4. Specify the RAID level, either Mirroring (RAID 1), Striping (RAID 0), Striping and Mirroring (RAID 0+1), or Spanning (JBOD) and create the desired RAID array. 3. Choose the hard disks that are to be RAID enabled in the system BIOS. (Check Chapter 3, BIOS Setup, ...
...set up the NVRAID BIOS. The PC will appear. Specify the RAID level, either Mirroring (RAID 1), Striping (RAID 0), Striping and Mirroring (RAID 0+1), or Spanning (JBOD) and create the desired RAID array. 3. Then enter the RAID BIOS Setup by pressing F10 ( or F7, for HP products ... Press F10 ( or F7, for details.) 4. Specify the RAID level, either Mirroring (RAID 1), Striping (RAID 0), Striping and Mirroring (RAID 0+1), or Spanning (JBOD) and create the desired RAID array. 3. Choose the hard disks that are to be RAID enabled in the system BIOS. (Check Chapter 3, BIOS Setup, ...
User Guide
Page 90
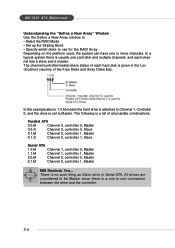
...of each channel has a slave and a master. MS-7025 ATX Mainboard Understanding the "Define a New Array" Window Use the Define a New Array window to • Select the RAID Mode • Set up the Striping Block • Specify ... 0.1.S Channel 0, controller 1, Slave Serial ATA 1.0.M Channel 1, controller 0, Master 1.1.M Channel 1, controller 1, Master 2.0.M Channel 2, controller 0, Master 2.1.M Channel 2, controller 1, Master MSI Reminds You... There is given in Serial ATA. The channel/controller/master/slave status of the Free Disks and Array Disks lists. In the example...
...of each channel has a slave and a master. MS-7025 ATX Mainboard Understanding the "Define a New Array" Window Use the Define a New Array window to • Select the RAID Mode • Set up the Striping Block • Specify ... 0.1.S Channel 0, controller 1, Slave Serial ATA 1.0.M Channel 1, controller 0, Master 1.1.M Channel 1, controller 1, Master 2.0.M Channel 2, controller 0, Master 2.1.M Channel 2, controller 1, Master MSI Reminds You... There is given in Serial ATA. The channel/controller/master/slave status of the Free Disks and Array Disks lists. In the example...

User Guide
Page 91
...free disk to be moved. 3. The first disk in the Free Disks block. Tab to a different RAID mode, press the down arrow key until the appropriate field is highlighted. • Selecting the RAID Mode By default, this value at the default [Optimal], which is arranged on the disk. Move ...it from field to field until the mode that you want appears in the RAID Mode box-either [Mirroring], [Striping], [Spanning], or [Stripe Mirroring]. • Selecting the Striping Block Size Striping Block size is given in kilobytes...
...free disk to be moved. 3. The first disk in the Free Disks block. Tab to a different RAID mode, press the down arrow key until the appropriate field is highlighted. • Selecting the RAID Mode By default, this value at the default [Optimal], which is arranged on the disk. Move ...it from field to field until the mode that you want appears in the RAID Mode box-either [Mirroring], [Striping], [Spanning], or [Stripe Mirroring]. • Selecting the Striping Block Size Striping Block size is given in kilobytes...
User Guide
Page 92
... drivers under Windows, as empty and wipe out all its contents then press C. 5. At the prompt, press Y to wipe out all the data from the RAID BIOS, the next step is to set up , then press Enter. Press Enter again to go back to the previous window and then press Ctrl...+X to wipe out all the data, otherwise press N. 6. MS-7025 ATX Mainboard Completing the RAID BIOS Setup 1. Use the arrow keys to mark this disk as explained in "Installing the NVIDIA...
... drivers under Windows, as empty and wipe out all its contents then press C. 5. At the prompt, press Y to wipe out all the data from the RAID BIOS, the next step is to set up , then press Enter. Press Enter again to go back to the previous window and then press Ctrl...+X to wipe out all the data, otherwise press N. 6. MS-7025 ATX Mainboard Completing the RAID BIOS Setup 1. Use the arrow keys to mark this disk as explained in "Installing the NVIDIA...
User Guide
Page 93
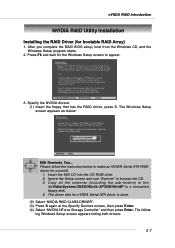
Specify the NVIDIA drivers: (1) Insert the floppy that has the RAID driver, press S. Please follow the instruction below : MSI Reminds You... Copy all the contents (including the sub-folders) in the \\nVidia\System\CK8S\Win2k-XP\IDE\WinXP to browse the CD. 3. The Windows ... at the Specify Devices screen, then press Enter. (4) Select "NVIDIA NForce Storage Controller" and then press Enter. Press F6 and wait for yourself. 1. Insert the MSI CD into the CD-ROM drive. 2. After you complete the RAID BIOS setup, boot from the Windows CD, and the Windows Setup program starts. 2.
Specify the NVIDIA drivers: (1) Insert the floppy that has the RAID driver, press S. Please follow the instruction below : MSI Reminds You... Copy all the contents (including the sub-folders) in the \\nVidia\System\CK8S\Win2k-XP\IDE\WinXP to browse the CD. 3. The Windows ... at the Specify Devices screen, then press Enter. (4) Select "NVIDIA NForce Storage Controller" and then press Enter. Press F6 and wait for yourself. 1. Insert the MSI CD into the CD-ROM drive. 2. After you complete the RAID BIOS setup, boot from the Windows CD, and the Windows Setup program starts. 2.
User Guide
Page 94
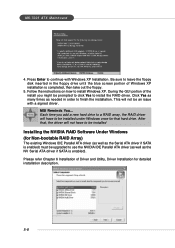
...sure to leave the floppy disk inserted in order to be installed Installing the NVIDIA RAID Software Under Windows (for detailed installation description. 5-8 Follow the instructions on how to continue with a signed driver. MS-7025 ATX Mainboard 4. This will not have to finish the installation. After that hard drive....prompted to click Yes to be installed under Windows once for that , the driver will not be an issue with Windows XP Installation. MSI Reminds You... Each time you might be upgraded to use the NVIDIA IDE Parallel ATA driver (as well as needed in the floppy ...
...sure to leave the floppy disk inserted in order to be installed Installing the NVIDIA RAID Software Under Windows (for detailed installation description. 5-8 Follow the instructions on how to continue with a signed driver. MS-7025 ATX Mainboard 4. This will not have to finish the installation. After that hard drive....prompted to click Yes to be installed under Windows once for that , the driver will not be an issue with Windows XP Installation. MSI Reminds You... Each time you might be upgraded to use the NVIDIA IDE Parallel ATA driver (as well as needed in the floppy ...

User Guide
Page 95
... appears. 3. The disks listed depend on "Computer Management". 2. Click "Disk Management" (under Windows. 1. The Select Disks to Convert window appears. 5-9 nVIDIA RAID Introduction Initializing and Using the Disk Array The RAID array is now ready to be initialized under the "Storage" section). The Select Disks to Initialize window appears. Click Next. Launch...
... appears. 3. The disks listed depend on "Computer Management". 2. Click "Disk Management" (under Windows. 1. The Select Disks to Convert window appears. 5-9 nVIDIA RAID Introduction Initializing and Using the Disk Array The RAID array is now ready to be initialized under the "Storage" section). The Select Disks to Initialize window appears. Click Next. Launch...

User Guide
Page 97
...RAID. • Viewing RAID Array Configurations View an array configuration (mirrored, striped, mirror-striped, JBOD, or any supported combination) • Setting Up a Spare RAID... Disk • View free and/or dedicated free disks • Designate a free disk to a particular array • Rebuilding a RAID Mirrored Array...shows an example of rebuilding an array Viewing RAID Array Configurations To view your system. The ...Programs -> NVIDIA Corporation ->RAID Manager -> RAID Manager ] The RAID configuration information appears in your RAID configuration from what it is 55.90...
...RAID. • Viewing RAID Array Configurations View an array configuration (mirrored, striped, mirror-striped, JBOD, or any supported combination) • Setting Up a Spare RAID... Disk • View free and/or dedicated free disks • Designate a free disk to a particular array • Rebuilding a RAID Mirrored Array...shows an example of rebuilding an array Viewing RAID Array Configurations To view your system. The ...Programs -> NVIDIA Corporation ->RAID Manager -> RAID Manager ] The RAID configuration information appears in your RAID configuration from what it is 55.90...

User Guide
Page 99
... that you want to and not by any other array, unlike a free disk which can be used by any array (if one of any available RAID 1 or RAID 0+1 array. Assigning a Free Disk To mark a disk as a free disk, then if one free disk. 5-13 NVRAID supports two types of spare drives:... fails, the free disk will be automatically assigned to the mirrored array to be used as free is RAID enabled. 2. nVIDIA RAID Introduction Setting Up a Spare RAID Disk You can designate a hard drive to a RAID 1 or RAID 0+1 array and that disk is used by that array only when needed, for example during a system ...
... that you want to and not by any other array, unlike a free disk which can be used by any array (if one of any available RAID 1 or RAID 0+1 array. Assigning a Free Disk To mark a disk as a free disk, then if one free disk. 5-13 NVRAID supports two types of spare drives:... fails, the free disk will be automatically assigned to the mirrored array to be used as free is RAID enabled. 2. nVIDIA RAID Introduction Setting Up a Spare RAID Disk You can designate a hard drive to a RAID 1 or RAID 0+1 array and that disk is used by that array only when needed, for example during a system ...

User Guide
Page 100
... array using one of accomplishing the same task. Both methods are equally simple ways of the available disks under the Free Disk section. MS-7025 ATX Mainboard Assigning a Dedicated Disk To mark a disk as dedicated, or reserve it to an array. 1. The drive appears under the Free Disk section.... Right click one of any array (if one exists). 3. Enter the RAID BIOS and make sure that the drive that the drive is RAID enabled. 2. Step 2: Dedicate the Free Disk to an Array While running NVRAIDMAN, dedicate the free disk to it. ...
... array using one of accomplishing the same task. Both methods are equally simple ways of the available disks under the Free Disk section. MS-7025 ATX Mainboard Assigning a Dedicated Disk To mark a disk as dedicated, or reserve it to an array. 1. The drive appears under the Free Disk section.... Right click one of any array (if one exists). 3. Enter the RAID BIOS and make sure that the drive that the drive is RAID enabled. 2. Step 2: Dedicate the Free Disk to an Array While running NVRAIDMAN, dedicate the free disk to it. ...

User Guide
Page 101
... page appears. 6. As shown in figure below, the ST380023AS drive is the array to which you want to a particular array, it . 5-15 nVIDIA RAID Introduction 4. Click Next. If a system crash occurs that causes any time. Once a dedicated disk has been assigned to allocate the dedicated free disk. 5.... From the RAID Array Selection page, select one of the two ST360015A drives to remove it can be used in the mirrored array. Click Finish. To remove the...
... page appears. 6. As shown in figure below, the ST380023AS drive is the array to which you want to a particular array, it . 5-15 nVIDIA RAID Introduction 4. Click Next. If a system crash occurs that causes any time. Once a dedicated disk has been assigned to allocate the dedicated free disk. 5.... From the RAID Array Selection page, select one of the two ST360015A drives to remove it can be used in the mirrored array. Click Finish. To remove the...

User Guide
Page 103
You have now assigned a dedicated free disk to remove it can be removed at any time. Once a dedicated disk has been assigned to a particular array, it . 5-17 To remove the disk, right click on the dedicated disk and select the option to a mirrored array. Click Next. The Completing the NVIDIA Spare Disk Allocation page appears. 6. nVIDIA RAID Introduction 5. Click Finish.
You have now assigned a dedicated free disk to remove it can be removed at any time. Once a dedicated disk has been assigned to a particular array, it . 5-17 To remove the disk, right click on the dedicated disk and select the option to a mirrored array. Click Next. The Completing the NVIDIA Spare Disk Allocation page appears. 6. nVIDIA RAID Introduction 5. Click Finish.
