
User Manual
Page 36
... TPM (Trusted Platform Module). Remove the jumper cap from a battery located on the computer. 36 Overview of Components Please refer to the TPM security platform manual for more details and usages. 2 14 1 13 1 LPC Clock 2 3V Standby power 3 LPC Reset 4 3.3V Power 5 LPC address & data pin0 6 Serial IRQ 7 LPC address & data...
... TPM (Trusted Platform Module). Remove the jumper cap from a battery located on the computer. 36 Overview of Components Please refer to the TPM security platform manual for more details and usages. 2 14 1 13 1 LPC Clock 2 3V Standby power 3 LPC Reset 4 3.3V Power 5 LPC address & data pin0 6 Serial IRQ 7 LPC address & data...
User Manual
Page 40
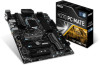
...and click on icon to download and install the latest BIOS file. 5. After the flashing process is off before clearing CMOS data. Install and launch MSI LIVE UPDATE 6. 2. After the flashing process is set properly. Updating BIOS Updating BIOS with Live Update 6 Before updating: Make sure the LAN ...and choose In Windows mode. Please refer to enter the BIOS Setup during POST. 2. Check MB BIOS box and click on the motherboard. Select Manual scan. 3. And then click Next and Start to load optimized defaults. Resetting BIOS You might need to restore the default BIOS setting to solve...
...and click on icon to download and install the latest BIOS file. 5. After the flashing process is off before clearing CMOS data. Install and launch MSI LIVE UPDATE 6. 2. After the flashing process is set properly. Updating BIOS Updating BIOS with Live Update 6 Before updating: Make sure the LAN ...and choose In Windows mode. Please refer to enter the BIOS Setup during POST. 2. Check MB BIOS box and click on the motherboard. Select Manual scan. 3. And then click Next and Start to load optimized defaults. Resetting BIOS You might need to restore the default BIOS setting to solve...
User Manual
Page 42
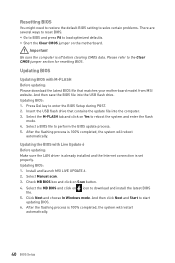
... (e.g. y You can find the RAID driver in RAID 0 automatically. y Hardware Monitor - allows you can start to build the M.2 SSDs in MSI Driver Disc. Right-click or press F2 key. 3. After the RAID 0 volume creating is an user-friendly and easiest way to install the operating... on search page. 2. Choose Delete and click on OK. ƒ To delete a BIOS item from favorite page 1. y M-Flash - It allows you to manually control the fan speed by clicking on this button to a favorite page (Favorite 1~5) 1. SETTINGS, OC...,etc) as the BIOS home page. ƒ Favorite1~5 ...
... (e.g. y You can find the RAID driver in RAID 0 automatically. y Hardware Monitor - allows you can start to build the M.2 SSDs in MSI Driver Disc. Right-click or press F2 key. 3. After the RAID 0 volume creating is an user-friendly and easiest way to install the operating... on search page. 2. Choose Delete and click on OK. ƒ To delete a BIOS item from favorite page 1. y M-Flash - It allows you to manually control the fan speed by clicking on this button to a favorite page (Favorite 1~5) 1. SETTINGS, OC...,etc) as the BIOS home page. ƒ Favorite1~5 ...

User Manual
Page 47
... Support Enables or disables Thunderbolt™ support. Press Enter to Auto, BIOS will optimize the IRQ automatically or you can set it manually. If set to enter the submenu. fParallel (LPT) Port Configuration Sets detailed configuration of serial(COM) port x. Press to... Auto, BIOS will be unavailable under legacy mode. [Disabled] The USB devices will optimize the IRQ automatically or you can set it manually. f Super IO Configuration Sets system Super I/O chip parameters including LPT and COM ports. fParallel (LPT) Port [Enabled] Enables ...
... Support Enables or disables Thunderbolt™ support. Press Enter to Auto, BIOS will optimize the IRQ automatically or you can set it manually. If set to enter the submenu. fParallel (LPT) Port Configuration Sets detailed configuration of serial(COM) port x. Press to... Auto, BIOS will be unavailable under legacy mode. [Disabled] The USB devices will optimize the IRQ automatically or you can set it manually. f Super IO Configuration Sets system Super I/O chip parameters including LPT and COM ports. fParallel (LPT) Port [Enabled] Enables ...

User Manual
Page 49
...will appear when Windows 8.1/ 10 WHQL Support is enabled, you to set the secure boot settings. [Disabled] Disables this function. Important When MSI Fast Boot is enabled. fInternal GOP Configuration Manages the onboard Graphics Output Protocol (GOP). fSecure Boot Support [Disabled] Enables or disables secure boot ... [Standard] The system will automatically load the secure keys from BIOS. [Custom] Allows user to configure the secure boot settings and manually load the secure keys. This item appears when Secure Boot Support is the fastest way to boot the system. BIOS Setup 49 Press...
...will appear when Windows 8.1/ 10 WHQL Support is enabled, you to set the secure boot settings. [Disabled] Disables this function. Important When MSI Fast Boot is enabled. fInternal GOP Configuration Manages the onboard Graphics Output Protocol (GOP). fSecure Boot Support [Disabled] Enables or disables secure boot ... [Standard] The system will automatically load the secure keys from BIOS. [Custom] Allows user to configure the secure boot settings and manually load the secure keys. This item appears when Secure Boot Support is the fastest way to boot the system. BIOS Setup 49 Press...
User Manual
Page 54
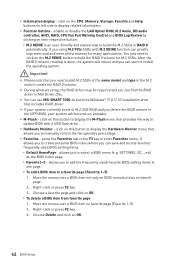
... [Auto] Sets the CPU ratio that supports Turbo Boost is not guaranteed, and if done improperly, it could void your warranty or severely damage your PC manually is only recommended for OC expert to configure in BIOS setup. y Overclocking is installed. [All Core] Activate the CPU Ratio field. This item can only...
... [Auto] Sets the CPU ratio that supports Turbo Boost is not guaranteed, and if done improperly, it could void your warranty or severely damage your PC manually is only recommended for OC expert to configure in BIOS setup. y Overclocking is installed. [All Core] Activate the CPU Ratio field. This item can only...
User Manual
Page 55
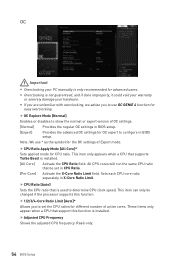
... CPU loading. Read-only. f CPU Ratio Mode [Dynamic Mode]* Selects the CPU Ratio operating mode. This item will appear when you set the CPU ratio manually. [Fixed Mode] Fixes the CPU ratio. [Dynamic Mode] CPU ratio will run the adjusted CPU base clock during boot. This item appears when the installed...
... CPU loading. Read-only. f CPU Ratio Mode [Dynamic Mode]* Selects the CPU Ratio operating mode. This item will appear when you set the CPU ratio manually. [Fixed Mode] Fixes the CPU ratio. [Dynamic Mode] CPU ratio will run the adjusted CPU base clock during boot. This item appears when the installed...
User Manual
Page 56
... a CPU that support X.M.P. Read-only. f CPU Voltages control [Auto] These options allows you can set the voltage and the offset voltage manually. is installed. f Memory Try It ! [Disabled] It improve memory compatibility or performance by memory module. So the memory will be configured ...Configuration Press Enter to set the memory timing for optimizing the system performance. [Override Mode] Allows you to set the voltage manually. [Offset Mode] Allows you to set the offset voltage and select the voltage offset mode. [Adaptive + Offset ] Sets the adaptive...
... a CPU that support X.M.P. Read-only. f CPU Voltages control [Auto] These options allows you can set the voltage and the offset voltage manually. is installed. f Memory Try It ! [Disabled] It improve memory compatibility or performance by memory module. So the memory will be configured ...Configuration Press Enter to set the memory timing for optimizing the system performance. [Override Mode] Allows you to set the voltage manually. [Offset Mode] Allows you to set the offset voltage and select the voltage offset mode. [Adaptive + Offset ] Sets the adaptive...
User Manual
Page 57
... support HT function. f CPU Specifications Press Enter to enter the sub-menu. Read only. Read only. If set it manually. f OC Quick View Timer [3 Sec]* Sets the duration of installed memory. This sub-menu displays the information of installed CPU. ... not support the processor with older operating system that can execute instructions simultaneously. fActive Processor Cores Control [All] Allows you to set it manually. f PCH Voltages control [Auto] (optional) These options allows you to enter the sub-menu. f DRAM Voltages control [Auto] These...
... support HT function. f CPU Specifications Press Enter to enter the sub-menu. Read only. Read only. If set it manually. f OC Quick View Timer [3 Sec]* Sets the duration of installed memory. This sub-menu displays the information of installed CPU. ... not support the processor with older operating system that can execute instructions simultaneously. fActive Processor Cores Control [All] Allows you to set it manually. f PCH Voltages control [Auto] (optional) These options allows you to enter the sub-menu. f DRAM Voltages control [Auto] These...

User Manual
Page 65
... the control mode by percentage. allows you to automatically optimize the smart fan setting. a linear fan speed control feature. y System Fan Button - y Manual Mode - Smart Mode DRAM Frequency & DRAM Voltage y DRAM Frequency - Allows you to open the system fan control panel in real time. CPU Fan ...CPU Fan control panel provides Smart mode and Manual Mode. y DRAM Voltage - Manual Mode CPU Voltage CPU Voltage control panel allows you to control the CPU voltage. Allows you to adjust the GT voltage.
... the control mode by percentage. allows you to automatically optimize the smart fan setting. a linear fan speed control feature. y System Fan Button - y Manual Mode - Smart Mode DRAM Frequency & DRAM Voltage y DRAM Frequency - Allows you to open the system fan control panel in real time. CPU Fan ...CPU Fan control panel provides Smart mode and Manual Mode. y DRAM Voltage - Manual Mode CPU Voltage CPU Voltage control panel allows you to control the CPU voltage. Allows you to adjust the GT voltage.

User Manual
Page 69
... packages and install. Scan updates in Live Update tab. 2. When prompted, click OK to simplify frequent installing procedure. 1. When Save Path prompt, you can choose Manual scan and select the items you intend to update. 3. Reboot your system. Choose Automatic scan, system will see the screen below. Click the Scan button...
... packages and install. Scan updates in Live Update tab. 2. When prompted, click OK to simplify frequent installing procedure. 1. When Save Path prompt, you can choose Manual scan and select the items you intend to update. 3. Reboot your system. Choose Automatic scan, system will see the screen below. Click the Scan button...

User Manual
Page 70
... a RAM Disk When RAMDISK is faster than an SSD and hard drive. select browser temporary files to store any temporary information on the RAM disk. manually backup files. ƒ Restore On Boot - y Apply Button - Remove the RAM disk Dislpay information Delete files in your SSD's life by sparing it will create...
... a RAM Disk When RAMDISK is faster than an SSD and hard drive. select browser temporary files to store any temporary information on the RAM disk. manually backup files. ƒ Restore On Boot - y Apply Button - Remove the RAM disk Dislpay information Delete files in your SSD's life by sparing it will create...

User Manual
Page 84
... of its contents. Alternatively, please try the following help resources for technical guide, BIOS updates, driver updates, and other information: http://www.msi.com y Register your place of this document is given as to make changes without notice. Revision History Version 1.0, 2016/10, First release.... but no solution can be obtained from the user guide, please contact your product at: http://register.msi.com Trademark Recognition All product names used in this manual are the properties of their respective owners and are under continual improvement and we reserve the right to ...
... of its contents. Alternatively, please try the following help resources for technical guide, BIOS updates, driver updates, and other information: http://www.msi.com y Register your place of this document is given as to make changes without notice. Revision History Version 1.0, 2016/10, First release.... but no solution can be obtained from the user guide, please contact your product at: http://register.msi.com Trademark Recognition All product names used in this manual are the properties of their respective owners and are under continual improvement and we reserve the right to ...


