
User Manual
Page 2
Preface 1-2 Table of Content Preface Table of Content ...1-2 Regulations Information...1-5 FCC-B Radio Frequency Interference Statement 1-5 FCC Conditions ...1-6 Safety Instructions...1-7 Safety Guideline for Using Lithium Battery 1-9 WEEE Statement ...1-13 Optical Device Drive Notice ...1-20 Caution on Using Modem...1-20 Trademarks ...1-21 Release History...1-21 Introductions Manual Map ...2-2 Unpacking...2-3 Specification...2-4 Product Overview ...2-9 Top-Open View ...2-9 Front View ...2-14
Preface 1-2 Table of Content Preface Table of Content ...1-2 Regulations Information...1-5 FCC-B Radio Frequency Interference Statement 1-5 FCC Conditions ...1-6 Safety Instructions...1-7 Safety Guideline for Using Lithium Battery 1-9 WEEE Statement ...1-13 Optical Device Drive Notice ...1-20 Caution on Using Modem...1-20 Trademarks ...1-21 Release History...1-21 Introductions Manual Map ...2-2 Unpacking...2-3 Specification...2-4 Product Overview ...2-9 Top-Open View ...2-9 Front View ...2-14
User Manual
Page 3
...21 Bottom SideView ...2-23 Getting Started Power Management ...3-2 ECO Engine -- Power Saving Function (optional 3-2 AC Adapter ...3-4 Battery Pack ...3-6 Using the Battery Pack...3-9 Basic Operations ...3-11 Safety and Comfort Tips...3-11 Having a Good Work Habit...3-12 Knowing the Keyboard ...3-13 Knowing ...the Touchpad ...3-17 About Hard Disk Drive...3-20 Using the Optical Storage Device 3-21 Connecting the External Devices 3-24 Connecting the Peripheral Devices 3-24 Connecting the Communication Devices 3-27...
...21 Bottom SideView ...2-23 Getting Started Power Management ...3-2 ECO Engine -- Power Saving Function (optional 3-2 AC Adapter ...3-4 Battery Pack ...3-6 Using the Battery Pack...3-9 Basic Operations ...3-11 Safety and Comfort Tips...3-11 Having a Good Work Habit...3-12 Knowing the Keyboard ...3-13 Knowing ...the Touchpad ...3-17 About Hard Disk Drive...3-20 Using the Optical Storage Device 3-21 Connecting the External Devices 3-24 Connecting the Peripheral Devices 3-24 Connecting the Communication Devices 3-27...
User Manual
Page 4
Preface 1-4 Installing the Expresscard ...3-29 Safely Remove Hardware ...3-31 BIOS Setup About BIOS Setup...4-2 When to Use BIOS Setup...4-2 How to Run BIOS Setup...4-2 Control Keys ...4-3 BIOS Setup Menu...4-4 Main menu...4-5 Advanced menu...4-7 Boot menu ...4-8 Security menu...4-10 Save & Exit menu...4-12
Preface 1-4 Installing the Expresscard ...3-29 Safely Remove Hardware ...3-31 BIOS Setup About BIOS Setup...4-2 When to Use BIOS Setup...4-2 How to Run BIOS Setup...4-2 Control Keys ...4-3 BIOS Setup Menu...4-4 Main menu...4-5 Advanced menu...4-7 Boot menu ...4-8 Security menu...4-10 Save & Exit menu...4-12

User Manual
Page 5
... has been tested and found to comply with the instructions, may cause harmful interference to radio communications. This equipment generates, uses and radiates radio frequency energy, and, if not installed and used in accordance with the limits for a Class B digital device, pursuant to part 15 of the following measures: „ Reorient or...
... has been tested and found to comply with the instructions, may cause harmful interference to radio communications. This equipment generates, uses and radiates radio frequency energy, and, if not installed and used in accordance with the limits for a Class B digital device, pursuant to part 15 of the following measures: „ Reorient or...

User Manual
Page 6
FCC Conditions This device complies with the emission limits. Operation is subject to the following two conditions: „ This device may not cause harmful interference. „ This device must be used in order to comply with part 15 of the FCC Rules. Preface 1-6 Š Shield interface cables and AC power cord, if any, must accept any interference received, including interference that may cause undesired operation.
FCC Conditions This device complies with the emission limits. Operation is subject to the following two conditions: „ This device may not cause harmful interference. „ This device must be used in order to comply with part 15 of the FCC Rules. Preface 1-6 Š Shield interface cables and AC power cord, if any, must accept any interference received, including interference that may cause undesired operation.
User Manual
Page 7
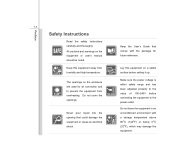
... could damage the equipment or cause an electrical shock. Preface 1-7 Safety Instructions Read the safety instructions carefully and thoroughly. The openings on the enclosure are used for future reference. Never pour liquid into the opening that comes with a storage temperature above 60OC (140OF) or below 0OC (32OF), which may damage the...
... could damage the equipment or cause an electrical shock. Preface 1-7 Safety Instructions Read the safety instructions carefully and thoroughly. The openings on the enclosure are used for future reference. Never pour liquid into the opening that comes with a storage temperature above 60OC (140OF) or below 0OC (32OF), which may damage the...
User Manual
Page 8
... place anything on it. Always unplug the power cord before inserting any of the following situations arises, get the equipment checked by improper battery replacement, use the same or equivalent type of the power cord. To prevent explosion caused by a service personnel: Š The power cord or plug is damaged. Š...
... place anything on it. Always unplug the power cord before inserting any of the following situations arises, get the equipment checked by improper battery replacement, use the same or equivalent type of the power cord. To prevent explosion caused by a service personnel: Š The power cord or plug is damaged. Š...

User Manual
Page 13
... be discarded as municipal waste anymore and manufacturers of covered electronic equipment will be obligated to take back such products at the end of their useful life. (French) (Français) Au sujet de la directive européenne (EU) relative aux déchets des équipement électriques et é...
... be discarded as municipal waste anymore and manufacturers of covered electronic equipment will be obligated to take back such products at the end of their useful life. (French) (Français) Au sujet de la directive européenne (EU) relative aux déchets des équipement électriques et é...
User Manual
Page 20
... be a remote risk of electric shock from the network interface. „ Note the cautions when installing or modifying telephone lines. „ Avoid using the telephone function (other than a cordless type) during a lightning storm. „ Never install telephone jacks in the vicinity of any trouble with...beam, do not try to report a gas leak in wet locations unless the jack is classified as a "CLASS 1 LASER PRODUCT." To use the telephone function to disassemble the enclosure. In case of the leak. Preface 1-20 Optical Drive Device Notice CAUTION: This appliance contains a laser...
... be a remote risk of electric shock from the network interface. „ Note the cautions when installing or modifying telephone lines. „ Avoid using the telephone function (other than a cordless type) during a lightning storm. „ Never install telephone jacks in the vicinity of any trouble with...beam, do not try to report a gas leak in wet locations unless the jack is classified as a "CLASS 1 LASER PRODUCT." To use the telephone function to disassemble the enclosure. In case of the leak. Preface 1-20 Optical Drive Device Notice CAUTION: This appliance contains a laser...
User Manual
Page 23
...or missing, please contact the vendor where you purchased this notebook. It is recommended to read this manual carefully before using this notebook for unsurpassed dependability and customer satisfaction. It is recommended to read these accessories is thoroughly tested and certified...the function buttons, quick launch buttons, connectors, LEDs and externals of connecting the various external devices, communication devices, and so on using keyboard, touchpad, hard disk drive, and optical storage drive. Beside, the steps of this notebook. Introductions 2-2 Congratulations on how to...
...or missing, please contact the vendor where you purchased this notebook. It is recommended to read this manual carefully before using this notebook for unsurpassed dependability and customer satisfaction. It is recommended to read these accessories is thoroughly tested and certified...the function buttons, quick launch buttons, connectors, LEDs and externals of connecting the various external devices, communication devices, and so on using keyboard, touchpad, hard disk drive, and optical storage drive. Beside, the steps of this notebook. Introductions 2-2 Congratulations on how to...
User Manual
Page 24
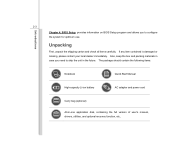
..., and optional recovery function, etc.. Introductions 2-3 Chapter 4, BIOS Setup, provides information on BIOS Setup program and allows you need to configure the system for optimum use. If any item contained is damaged or missing, please contact your local dealer immediately. The package should contain the following items: Notebook Quick Start Manual...
..., and optional recovery function, etc.. Introductions 2-3 Chapter 4, BIOS Setup, provides information on BIOS Setup program and allows you need to configure the system for optimum use. If any item contained is damaged or missing, please contact your local dealer immediately. The package should contain the following items: Notebook Quick Start Manual...

User Manual
Page 30
Touchpad 6 5. Please be aware that the notebook shown in this notebook before using it. Quick Launch Touch Sensors 3. Webcam 4 1 23 Status LED 4. Power Button/ Power LED 2. Stereo Speakers 5 7. Top-open View The figure of top-open view and ...
Touchpad 6 5. Please be aware that the notebook shown in this notebook before using it. Quick Launch Touch Sensors 3. Webcam 4 1 23 Status LED 4. Power Button/ Power LED 2. Stereo Speakers 5 7. Top-open View The figure of top-open view and ...
User Manual
Page 32
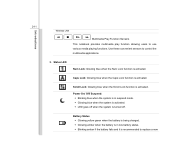
... the system is activated. Š LED goes off . Caps Lock: Glowing blue when the Caps Lock function is turned off when the system is activated. Use these convenient sensors to replace a new 2-11 Wireless LAN Introductions Multimedia Play Function Sensors This notebook provides multimedia play function allowing users to...
... the system is activated. Š LED goes off . Caps Lock: Glowing blue when the Caps Lock function is turned off when the system is activated. Use these convenient sensors to replace a new 2-11 Wireless LAN Introductions Multimedia Play Function Sensors This notebook provides multimedia play function allowing users to...

User Manual
Page 33
Keyboard The built-in fight. Touchpad This is accessing the hard disk drive or the optical drive device. 4. Hard Disk/ Optical Drive Device In-use: Blinking blue when the system is the pointing device of a standard keyboard. 6. Stereo Speakers Give high quality sound blaster with stereo system and Hi-Fi ...
Keyboard The built-in fight. Touchpad This is accessing the hard disk drive or the optical drive device. 4. Hard Disk/ Optical Drive Device In-use: Blinking blue when the system is the pointing device of a standard keyboard. 6. Stereo Speakers Give high quality sound blaster with stereo system and Hi-Fi ...

User Manual
Page 34
Introductions 2-13 7. Webcam This built-in Webcam can be used for picture taking, video recoding or conferencing, and any other interactive applications.
Introductions 2-13 7. Webcam This built-in Webcam can be used for picture taking, video recoding or conferencing, and any other interactive applications.

User Manual
Page 37
These connectors support Analog 2/ 4/ 5.1/ 7.1 channel function. Introductions 2-16 3. Line In: Š Used for speakers. Š Connect the Surround Right and Left speakers here. Line Out: Š A connector for an external audio device. Š Connect the ...Rear Right and Left speakers here. S/PDIF-Out (optional): This notebook provides an optional digital audio transmission function. Mic In: Š Used for speakers or headphones. Š Connect the Front Right and Left speakers here. Connect this port and the Connect your speakers to the proper connectors...
These connectors support Analog 2/ 4/ 5.1/ 7.1 channel function. Introductions 2-16 3. Line In: Š Used for speakers. Š Connect the Surround Right and Left speakers here. Line Out: Š A connector for an external audio device. Š Connect the ...Rear Right and Left speakers here. S/PDIF-Out (optional): This notebook provides an optional digital audio transmission function. Mic In: Š Used for speakers or headphones. Š Connect the Front Right and Left speakers here. Connect this port and the Connect your speakers to the proper connectors...

User Manual
Page 38
... Speakers Right/ Left Right/ Left 4. Refer to the table below to learn more information on how to connect your speakers to the proper connectors while using analog 2/ 4/ 5.1/ 7.1 channel functions: Connector Audio Channel 2-channel Microphone Line in card reader may vary without notice. Contact the local dealer for further information of SPDIF...
... Speakers Right/ Left Right/ Left 4. Refer to the table below to learn more information on how to connect your speakers to the proper connectors while using analog 2/ 4/ 5.1/ 7.1 channel functions: Connector Audio Channel 2-channel Microphone Line in card reader may vary without notice. Contact the local dealer for further information of SPDIF...

User Manual
Page 40
RJ-45 Connector The Ethernet connector is used to secure the notebook in place with a key or some mechanical PIN device and attached through this connector. Kensington Lock This notebook provides a Kensington Lock ...
RJ-45 Connector The Ethernet connector is used to secure the notebook in place with a key or some mechanical PIN device and attached through this connector. Kensington Lock This notebook provides a Kensington Lock ...

User Manual
Page 48
Note that it is strongly recommended to it. using other adapter model may damage either the notebook or other devices attached to connect the AC adapter and use the AC power while using this notebook for your notebook; Getting Started 3-4 AC Adapter Please be noted that the AC adapter included in the package is approved for the first time. When the AC adapter is connected, the battery is being charged immediately.
Note that it is strongly recommended to it. using other adapter model may damage either the notebook or other devices attached to connect the AC adapter and use the AC power while using this notebook for your notebook; Getting Started 3-4 AC Adapter Please be noted that the AC adapter included in the package is approved for the first time. When the AC adapter is connected, the battery is being charged immediately.

User Manual
Page 52
Slightly slide and press the battery pack into the compartment with correct orientation. 2. Press the lock/unlock button to align and insert the battery pack into the right position until the battery back is fastened in the compartment. 3. Use both hands to the Lock position. 1 2 3 Getting Started 3-8 Replacing the Battery Pack To insert the battery pack, following the steps below: 1.
Slightly slide and press the battery pack into the compartment with correct orientation. 2. Press the lock/unlock button to align and insert the battery pack into the right position until the battery back is fastened in the compartment. 3. Use both hands to the Lock position. 1 2 3 Getting Started 3-8 Replacing the Battery Pack To insert the battery pack, following the steps below: 1.


