User Manual
Page 2
Preface 1-2 Table of Content Preface Table of Content ...1-2 Regulations Information...1-5 FCC-B Radio Frequency Interference Statement 1-5 FCC Conditions ...1-6 CE Conformity ...1-6 Safety Instructions...1-7 Safety Guideline for Using Lithium Battery 1-11 WEEE Statement ...1-15 Optical Drive Device Notice ...1-22 Trademarks ...1-22 Release History...1-22 Introductions Manual Map ...2-2 Unpacking...2-3 Specification...2-4 Product Overview ...2-9 Top-open View...2-9 Front View ...2-14
Preface 1-2 Table of Content Preface Table of Content ...1-2 Regulations Information...1-5 FCC-B Radio Frequency Interference Statement 1-5 FCC Conditions ...1-6 CE Conformity ...1-6 Safety Instructions...1-7 Safety Guideline for Using Lithium Battery 1-11 WEEE Statement ...1-15 Optical Drive Device Notice ...1-22 Trademarks ...1-22 Release History...1-22 Introductions Manual Map ...2-2 Unpacking...2-3 Specification...2-4 Product Overview ...2-9 Top-open View...2-9 Front View ...2-14

User Manual
Page 3
......3-15 Basic Operations ...3-16 Safety and Comfort Tips...3-16 Having a Good Work Habit...3-17 Knowing the Keyboard ...3-18 Knowing the Touchpad ...3-24 About Hard Disk Drive...3-27 Using the Optical Storage Device 3-28 Connecting the External Devices 3-31 Connecting the Peripheral Devices 3-31 Connecting the Communication Devices 3-34
......3-15 Basic Operations ...3-16 Safety and Comfort Tips...3-16 Having a Good Work Habit...3-17 Knowing the Keyboard ...3-18 Knowing the Touchpad ...3-24 About Hard Disk Drive...3-27 Using the Optical Storage Device 3-28 Connecting the External Devices 3-31 Connecting the Peripheral Devices 3-31 Connecting the Communication Devices 3-34
User Manual
Page 22
... exposure to the laser beam, do not try to disassemble the enclosure. Revision History Version 1.0 Revision Note First release Date 12, 2009 Preface 1-22 Optical Drive Device Notice CAUTION: This appliance contains a laser system and is classified as a "CLASS 1 LASER PRODUCT." SRS Premium Sound, SRS and the symbol are the properties...
... exposure to the laser beam, do not try to disassemble the enclosure. Revision History Version 1.0 Revision Note First release Date 12, 2009 Preface 1-22 Optical Drive Device Notice CAUTION: This appliance contains a laser system and is classified as a "CLASS 1 LASER PRODUCT." SRS Premium Sound, SRS and the symbol are the properties...

User Manual
Page 24
... devices, and so on, are proud to tell our users that is recommended to read this manual carefully before using keyboard, touchpad, hard disk drive, and optical storage drive. Introductions 2-2 Congratulations on becoming an user of installing and uninstalling the battery; It is recommended to check out that if you open the...
... devices, and so on, are proud to tell our users that is recommended to read this manual carefully before using keyboard, touchpad, hard disk drive, and optical storage drive. Introductions 2-2 Congratulations on becoming an user of installing and uninstalling the battery; It is recommended to check out that if you open the...
User Manual
Page 36
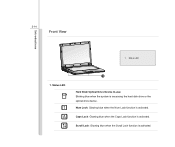
Caps Lock: Glowing blue when the Caps Lock function is activated. Scroll Lock: Glowing blue when the Scroll Lock function is activated. 2-14 Front View Introductions 1. Num Lock: Glowing blue when the Num Lock function is accessing the hard disk drive or the optical drive device. Status LED 1. Status LED 1 Hard Disk/ Optical Drive Device In-use: Blinking blue when the system is activated.
Caps Lock: Glowing blue when the Caps Lock function is activated. Scroll Lock: Glowing blue when the Scroll Lock function is activated. 2-14 Front View Introductions 1. Num Lock: Glowing blue when the Num Lock function is accessing the hard disk drive or the optical drive device. Status LED 1. Status LED 1 Hard Disk/ Optical Drive Device In-use: Blinking blue when the system is activated.

User Manual
Page 41
USB Port The USB 2.0 port allows you to the proper connectors as the mouse, keyboard, modem, portable hard disk module, printer and more. 2. Mic In: Used for speakers or headphones. Introductions 2-19 Left Side View 12 3 1. Optical Drive Device 1. Audio Port Connectors Make high quality sound blaster with stereo system and Hi-Fi function supported. Headphone: A connector for an external microphone. Connect your speakers to connect USB-interface peripheral devices, such as shown below. Audio Port Connectors 3. USB Port 2.
USB Port The USB 2.0 port allows you to the proper connectors as the mouse, keyboard, modem, portable hard disk module, printer and more. 2. Mic In: Used for speakers or headphones. Introductions 2-19 Left Side View 12 3 1. Optical Drive Device 1. Audio Port Connectors Make high quality sound blaster with stereo system and Hi-Fi function supported. Headphone: A connector for an external microphone. Connect your speakers to connect USB-interface peripheral devices, such as shown below. Audio Port Connectors 3. USB Port 2.

User Manual
Page 42
Optical Drive Device The optical device allows you to use the CD/ DVD disc for installing software, accessing data and playing music/movie on the computer. Introductions 2-20 3.
Optical Drive Device The optical device allows you to use the CD/ DVD disc for installing software, accessing data and playing music/movie on the computer. Introductions 2-20 3.
User Manual
Page 58
... (S3/S4), Shut Down (S5), or Restart your computer. 5. Then click on the System and Maintenance. 2. Then select a power plan that meets your display, hard drive, and battery. Click on the Power Options. 3. The Shut Down Computer menu will present the options to adjust the power management settings in Windows OS...
... (S3/S4), Shut Down (S5), or Restart your computer. 5. Then click on the System and Maintenance. 2. Then select a power plan that meets your display, hard drive, and battery. Click on the Power Options. 3. The Shut Down Computer menu will present the options to adjust the power management settings in Windows OS...
User Manual
Page 72
... notebook is equipped with much higher speed and larger capacity than other storage devices, such as the floppy disk drive and optical storage device. To avoid unexpected data loss in your system, please backup your critical files regularly. Do not turn off the notebook when ...the hard disk In-use LED is turned on . Do not remove or install the hard disk drive when the notebook is on . The hard disk drive is usually used to install the operating system and software applications. The replacement of hard disk...
... notebook is equipped with much higher speed and larger capacity than other storage devices, such as the floppy disk drive and optical storage device. To avoid unexpected data loss in your system, please backup your critical files regularly. Do not turn off the notebook when ...the hard disk In-use LED is turned on . Do not remove or install the hard disk drive when the notebook is on . The hard disk drive is usually used to install the operating system and software applications. The replacement of hard disk...
User Manual
Page 73
The actual device preinstalled in your notebook depends on the model you purchased. „ Super Multi: Works as a multi-functional DVD Dual Drive and a DVD RAM Drive. Getting Started 3-28 Using the Optical Storage Device Your notebook is equipped with an optical storage device.
The actual device preinstalled in your notebook depends on the model you purchased. „ Super Multi: Works as a multi-functional DVD Dual Drive and a DVD RAM Drive. Getting Started 3-28 Using the Optical Storage Device Your notebook is equipped with an optical storage device.

User Manual
Page 74
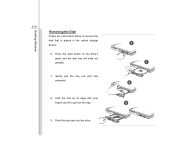
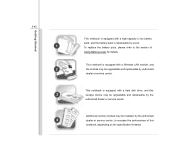
... leave the disk tray open. Gently pull the tray out until fully extended. 4. Slightly press the center of the disk to secure it into the drive. 2 3 4 Confirm that the disk is turned on the panel and the disk tray will slide out partially. 3. Place your disk in the tray before closing...
... leave the disk tray open. Gently pull the tray out until fully extended. 4. Slightly press the center of the disk to secure it into the drive. 2 3 4 Confirm that the disk is turned on the panel and the disk tray will slide out partially. 3. Place your disk in the tray before closing...
User Manual
Page 75
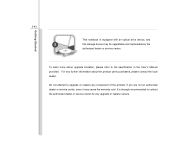
Push the tray back into the drive. 6 7 8 9 Hold the disk by its edge with your fingers and lift it up from the tray. 9. Getting Started 3-30 Removing the Disk Follow the instructions below to remove the disk that is placed in the optical storage device: 6. Press the eject button on the drive's panel and the disk tray will slide out partially. 7. Gently pull the tray out until fully extended. 8.
Push the tray back into the drive. 6 7 8 9 Hold the disk by its edge with your fingers and lift it up from the tray. 9. Getting Started 3-30 Removing the Disk Follow the instructions below to remove the disk that is placed in the optical storage device: 6. Press the eject button on the drive's panel and the disk tray will slide out partially. 7. Gently pull the tray out until fully extended. 8.

User Manual
Page 86
Getting Started 3-41 Components Replacement and Upgrade Please be noticed that the memory, hard disk drive, wireless LAN module and battery pack preinstalled in the product users purchased may be upgradable or replaceable by user's request depending on the models users purchased. 1 3 4 2 5
Getting Started 3-41 Components Replacement and Upgrade Please be noticed that the memory, hard disk drive, wireless LAN module and battery pack preinstalled in the product users purchased may be upgradable or replaceable by user's request depending on the models users purchased. 1 3 4 2 5
User Manual
Page 87
... replaceable by authorized dealer or service center. This notebook is replaceable by the authorized dealer or service center. This notebook is equipped with a hard disk drive, and this notebook, depending on the specification limitation. Additional memory module may be installed, by the authorized dealer or service center, to the section of...
... replaceable by authorized dealer or service center. This notebook is replaceable by the authorized dealer or service center. This notebook is equipped with a hard disk drive, and this notebook, depending on the specification limitation. Additional memory module may be installed, by the authorized dealer or service center, to the section of...
User Manual
Page 88
... 5 This notebook is strongly recommended to contact the authorized dealer or service center for any upgrade or replace service. It is equipped with an optical drive device, and this storage device may cause the warranty void. To learn more about the product users purchased, please contact the local dealer.
... 5 This notebook is strongly recommended to contact the authorized dealer or service center for any upgrade or replace service. It is equipped with an optical drive device, and this storage device may cause the warranty void. To learn more about the product users purchased, please contact the local dealer.


