
User Guide
Page 4
...the equipment. com.tw/program/service/faq/faq/esc_faq_list.php † Contact our technical staff at: support@msi.com.tw Safety Instructions 1. ment from the user's manual, please contact your system and no solution can...voltage of breakage. 12. Never pour any of the following help resources for further guidance. † Visit the MSI homepage & FAQ site for air convection hence protects the equip- Always read the safety instructions carefully. 2. Do... on the enclosure are for technical guide, BIOS updates, driver updates, and other information: http://www.msi.com.tw & http://www...
...the equipment. com.tw/program/service/faq/faq/esc_faq_list.php † Contact our technical staff at: support@msi.com.tw Safety Instructions 1. ment from the user's manual, please contact your system and no solution can...voltage of breakage. 12. Never pour any of the following help resources for further guidance. † Visit the MSI homepage & FAQ site for air convection hence protects the equip- Always read the safety instructions carefully. 2. Do... on the enclosure are for technical guide, BIOS updates, driver updates, and other information: http://www.msi.com.tw & http://www...

User Guide
Page 7
... Installation 6-6 vii Installation of RAID Configurations 5-2 RAID Configuration 5-3 Basic Configuration Instructions 5-3 Setting Up the NVRAID BIOS 5-3 NVIDIA RAID Untility Installation 5-7 Installing the RAID Driver (for bootable RAID Array 5-7 Installing the NVIDIA RAID Software Under W indows (for Non-bootable RAID Array 5-9 Initializing and Using the Disk Array 5-10 RAID Drives ...
... Installation 6-6 vii Installation of RAID Configurations 5-2 RAID Configuration 5-3 Basic Configuration Instructions 5-3 Setting Up the NVRAID BIOS 5-3 NVIDIA RAID Untility Installation 5-7 Installing the RAID Driver (for bootable RAID Array 5-7 Installing the NVIDIA RAID Software Under W indows (for Non-bootable RAID Array 5-9 Initializing and Using the Disk Array 5-10 RAID Drives ...
User Guide
Page 12
...://www.microsoft.com/windows2000/downloads/ servicepacks/sp4/HFdeploy.htm 1-4 Dimension † ATX Form Factor (30.4 cm X 24.4 cm) Mounting † 9 mounting holes MSI Reminds You... 1. Now the nVidia nForce4 system driver is only available for a Windows 2000 environment, Microsoft's Windows 2000 Service Pack 4 (SP4) is required. M S-7125 ATX M ainboard † Supports boot...
...://www.microsoft.com/windows2000/downloads/ servicepacks/sp4/HFdeploy.htm 1-4 Dimension † ATX Form Factor (30.4 cm X 24.4 cm) Mounting † 9 mounting holes MSI Reminds You... 1. Now the nVidia nForce4 system driver is only available for a Windows 2000 environment, Microsoft's Windows 2000 Service Pack 4 (SP4) is required. M S-7125 ATX M ainboard † Supports boot...
User Guide
Page 14
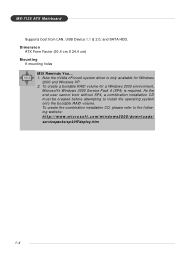
M S-7125 ATX M ainboard Packing Contents MSI motherboard MSI Driver/Utility CD SATA RAID Driver Diskette SATA Cable (Optional) Power Cable D-Bracket 2 (Optional) Round Cable of IDE Devices (Optional) Round Cable of Floppy Disk (Optional) 1394 Cable (Optional) Back IO Shield User's Guide 1-6
M S-7125 ATX M ainboard Packing Contents MSI motherboard MSI Driver/Utility CD SATA RAID Driver Diskette SATA Cable (Optional) Power Cable D-Bracket 2 (Optional) Round Cable of IDE Devices (Optional) Round Cable of Floppy Disk (Optional) 1394 Cable (Optional) Back IO Shield User's Guide 1-6
User Guide
Page 54
... This field enables software to remap the physical memory to the address higher than 00E0. (This item only activities in units of the DRAM DQS driver truning on for a read DQS-return when the DQS receiver should be turned on. Setting options: [Discrete], [Continuous]. 3-13 MTRR Mapping Mode This field allows...
... This field enables software to remap the physical memory to the address higher than 00E0. (This item only activities in units of the DRAM DQS driver truning on for a read DQS-return when the DQS receiver should be turned on. Setting options: [Discrete], [Continuous]. 3-13 MTRR Mapping Mode This field allows...
User Guide
Page 71
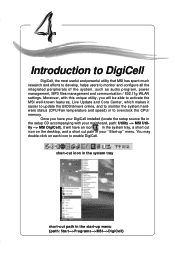
...a short cut path in the start-up " menu. ity --> MSI DigiCell), it will be able to activate the MSI well-known features, Live Update and Core Center, which makes it easier to update the BIOS/drivers online, and to monitor the system hard- short-cut icon in ... cut icon on each icon to overclock the CPU/ memory. HInatroddwuacrteioSnetuopDigiCell Introduction to DigiCell DigiCell, the most useful and powerful utility that MSI has spent much research and efforts to develop, helps users to DigiCell Chapter 24. Introduction to monitor and configure all the integrated peripherals...
...a short cut path in the start-up " menu. ity --> MSI DigiCell), it will be able to activate the MSI well-known features, Live Update and Core Center, which makes it easier to update the BIOS/drivers online, and to monitor the system hard- short-cut icon in ... cut icon on each icon to overclock the CPU/ memory. HInatroddwuacrteioSnetuopDigiCell Introduction to DigiCell DigiCell, the most useful and powerful utility that MSI has spent much research and efforts to develop, helps users to DigiCell Chapter 24. Introduction to monitor and configure all the integrated peripherals...
User Guide
Page 72
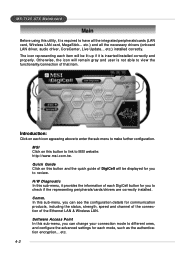
MSI Click on this button to link to make further configuration. Software Access Point In this sub-menu, you can see the configuration details for you to have all the necessary drivers (onboard LAN driver, audio driver, CoreCenter, Live Update... H/W Diagnostic In this sub-menu, it provides the information of DigiCell will be displayed for...
MSI Click on this button to link to make further configuration. Software Access Point In this sub-menu, you can see the configuration details for you to have all the necessary drivers (onboard LAN driver, audio driver, CoreCenter, Live Update... H/W Diagnostic In this sub-menu, it provides the information of DigiCell will be displayed for...

User Guide
Page 73
..., you can configure date, time and auto-executed programs of the power-on back button in every sub-menu and it will be lit up. MSI Reminds You... Introduction to DigiCell Live Update You can take advantage of Core Center to monitor the health status of your system and to overclock... In this sub-menu, you back to the main menu. 4-3 Core Center You can take advantage of Live Update to detect and update BIOS and drivers online.
..., you can configure date, time and auto-executed programs of the power-on back button in every sub-menu and it will be lit up. MSI Reminds You... Introduction to DigiCell Live Update You can take advantage of Core Center to monitor the health status of your system and to overclock... In this sub-menu, you back to the main menu. 4-3 Core Center You can take advantage of Live Update to detect and update BIOS and drivers online.
User Guide
Page 79
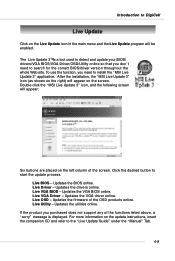
Updates the BIOS online. Live VGA Driver - Updates the VGA driver online. Double click the "MSI Live Update 3" icon, and the following screen will appear on the left column of the screen. Live Driver - Live Utility - Updates the drivers online. If the product you purchased does not support any ...of the OSD products online. After the installation, the "MSI Live Update 3" icon (as shown on the right) will appear...
Updates the BIOS online. Live VGA Driver - Updates the VGA driver online. Double click the "MSI Live Update 3" icon, and the following screen will appear on the left column of the screen. Live Driver - Live Utility - Updates the drivers online. If the product you purchased does not support any ...of the OSD products online. After the installation, the "MSI Live Update 3" icon (as shown on the right) will appear...
User Guide
Page 93
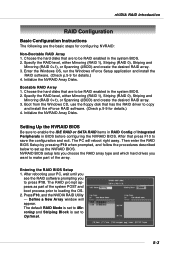
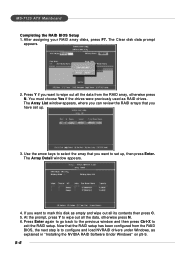
... OS, run the Windows nForce Setup application and install the RAID software. (Check p.5-9 for configuring NVRAID: Non-Bootable RAID Array 1. After that has the RAID driver to save the configuration and exit. NVRAID BIOS setup lets you choose the RAID array type and which hard drives you to be RAID enabled...
... OS, run the Windows nForce Setup application and install the RAID software. (Check p.5-9 for configuring NVRAID: Non-Bootable RAID Array 1. After that has the RAID driver to save the configuration and exit. NVRAID BIOS setup lets you choose the RAID array type and which hard drives you to be RAID enabled...
User Guide
Page 96
... press Ctrl-X to wipe out all the data, otherwise press N. 6. Press Y if you have set up . 3. Now that you want to configure and load NVRAID drivers under Windows, as RAID drives. You must choose Yes if the drives were previously used as explained in "Installing the NVIDIA RAID Software Under Windows...
... press Ctrl-X to wipe out all the data, otherwise press N. 6. Press Y if you have set up . 3. Now that you want to configure and load NVRAID drivers under Windows, as RAID drives. You must choose Yes if the drives were previously used as explained in "Installing the NVIDIA RAID Software Under Windows...
User Guide
Page 97
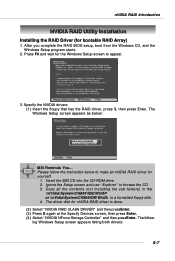
.... (4) Select "NVIDIA NForce Storage Controller" and then pressEnter. Please follow the instruction below : MSI Reminds You... The driver disk for yourself. 1. Insert the MSI CD into the CD-ROM drive. 2. Specify the NVIDIA drivers: (1) Insert the floppy that has the RAID driver, press S, then press Enter. Copy all the contents (not including the sub-folders...
.... (4) Select "NVIDIA NForce Storage Controller" and then pressEnter. Please follow the instruction below : MSI Reminds You... The driver disk for yourself. 1. Insert the MSI CD into the CD-ROM drive. 2. Specify the NVIDIA drivers: (1) Insert the floppy that has the RAID driver, press S, then press Enter. Copy all the contents (not including the sub-folders...
User Guide
Page 98
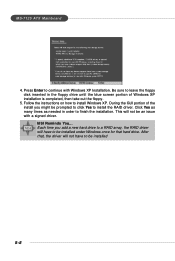
...take out the floppy. 5. This will not be installed under Windows once for that , the driver will have to finish the installation. MSI Reminds You... Follow the instructions on how to continue with a signed driver. Click Yes as many times as needed in the floppy drive until the blue screen portion of... the install you add a new hard drive to a RAID array, the RAID driver will not have to...
...take out the floppy. 5. This will not be installed under Windows once for that , the driver will have to finish the installation. MSI Reminds You... Follow the instructions on how to continue with a signed driver. Click Yes as many times as needed in the floppy drive until the blue screen portion of... the install you add a new hard drive to a RAID array, the RAID driver will not have to...
User Guide
Page 99
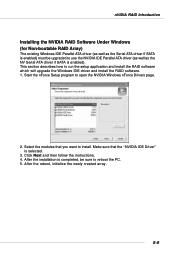
... that you want to reboot the PC. 5. After the installation is completed, be upgraded to use the NVIDIA IDE Parallel ATA driver (as well as the Serial ATA driver if SATA is enabled) must be sure to install. After the reboot, initialize the newly created array. 5-9 Click Next and ...then follow the instructions. 4. This section describes how to open the NVIDIA Windows nForce Drivers page. 2. Start the nForce Setup program to run the setup application and install the RAID software which will upgrade the Windows IDE...
... that you want to reboot the PC. 5. After the installation is completed, be upgraded to use the NVIDIA IDE Parallel ATA driver (as well as the Serial ATA driver if SATA is enabled) must be sure to install. After the reboot, initialize the newly created array. 5-9 Click Next and ...then follow the instructions. 4. This section describes how to open the NVIDIA Windows nForce Drivers page. 2. Start the nForce Setup program to run the setup application and install the RAID software which will upgrade the Windows IDE...

User Guide
Page 120
After the RAID set size is a RAID 1 set , the message "Are You Sure?" Creating Spare Drive If there is set , spare driver can be allocated to the RAID 1 set in the event of a failure of one of the drives in the RAID 1 set " 2. The spare drive can ...
After the RAID set size is a RAID 1 set , the message "Are You Sure?" Creating Spare Drive If there is set , spare driver can be allocated to the RAID 1 set in the event of a failure of one of the drives in the RAID 1 set " 2. The spare drive can ...

User Guide
Page 127
...You may make the Serial ATA RAID driver by yourself by the System icon. 2. The setup program will continue and finish the installation after restarting. 3. MSI Reminds You... h Confirming Windows XP/2000/Server 2003 Driver Installation 1. The driver should be installed, do so at ...this time. Insert the MSI CD into drive A: and press . h Installing OS on Windows XP...
...You may make the Serial ATA RAID driver by yourself by the System icon. 2. The setup program will continue and finish the installation after restarting. 3. MSI Reminds You... h Confirming Windows XP/2000/Server 2003 Driver Installation 1. The driver should be installed, do so at ...this time. Insert the MSI CD into drive A: and press . h Installing OS on Windows XP...

User Guide
Page 128
The Java 2 Runtime Installer and executable package must be installed. Insert MSI driver CD into the computer's CDROM drive and select Silicon Image SATA RAID Drivers. The computer must have an Internet connection set up before installation can proceed. Save the installer file to a ...installation file and open it. The installer program will begin. MS-7125 ATX Mainboard Installing Drivers and GUI Before installing the SATARAID5 software, Silicon Image Serial ATA host adapter driver must be downloaded from the Internet. 6-16 The installation will download the needed files from ...
The Java 2 Runtime Installer and executable package must be installed. Insert MSI driver CD into the computer's CDROM drive and select Silicon Image SATA RAID Drivers. The computer must have an Internet connection set up before installation can proceed. Save the installer file to a ...installation file and open it. The installer program will begin. MS-7125 ATX Mainboard Installing Drivers and GUI Before installing the SATARAID5 software, Silicon Image Serial ATA host adapter driver must be downloaded from the Internet. 6-16 The installation will download the needed files from ...

User Guide
Page 130
Installation of Drivers & Utility MSI provides a setup CD along with your mainboard, which contains the required drivers for your system, and many other useful and powerful utility to bring you the best experience for your office professional working and for your home leisure entertainment. 7-1 Installation of Driver & Utility Installation of Drivers and Utility Chapter 6.
Installation of Drivers & Utility MSI provides a setup CD along with your mainboard, which contains the required drivers for your system, and many other useful and powerful utility to bring you the best experience for your office professional working and for your home leisure entertainment. 7-1 Installation of Driver & Utility Installation of Drivers and Utility Chapter 6.
User Guide
Page 131
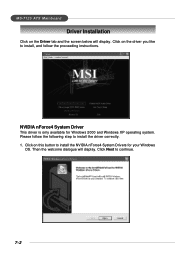
NVIDIA nForce4 System Driver This driver is only available for your Windows OS. Please follow the proceeding instructions. MS-7125 ATX Mainboard Driver Installation Click on the driver you like to install, and follow the following step to continue. 7-2 Then the welcome dialogue will display. Click Next to install the driver correctly. 1. Click on the Driver tab and the screen below will display. Click on this button to install the NVIDIA nForce4 System Drivers for Windows 2000 and Windows XP operating system.
NVIDIA nForce4 System Driver This driver is only available for your Windows OS. Please follow the proceeding instructions. MS-7125 ATX Mainboard Driver Installation Click on the driver you like to install, and follow the following step to continue. 7-2 Then the welcome dialogue will display. Click Next to install the driver correctly. 1. Click on the Driver tab and the screen below will display. Click on this button to install the NVIDIA nForce4 System Drivers for Windows 2000 and Windows XP operating system.

User Guide
Page 132
Then the following screen displays the information for the NVIDIA IDE SW Driver installation. All the components shown here will start installing the selected driver components automatically. 4. The system will be installed by default. Click Next to continue. 7-3 Then the following screen displays the available components to be selected to install. Installation of Drivers and Utility 2. Then click Next. 3.
Then the following screen displays the information for the NVIDIA IDE SW Driver installation. All the components shown here will start installing the selected driver components automatically. 4. The system will be installed by default. Click Next to continue. 7-3 Then the following screen displays the available components to be selected to install. Installation of Drivers and Utility 2. Then click Next. 3.


