HDS Gen2 Touch FAQ
Page 1
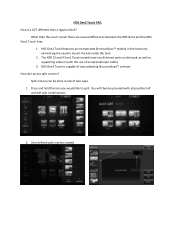
HDS Gen2 Touch is a G2T different than the touch screen there are several differences between the HDS Gen2 and the HDS Gen2 Touch lines. 1. Press and hold the icon you would like to mount the box inside the boat. 2. HDS Gen2 Touch features an incorporated StructureScan™ module in the head unit, eliminating the need to... split. User defined splits can be done in (with all possible half and half split combinations 2. The HDS 12 and 9 Gen2 Touch models have two Ethernet ports on the back, as well as supporting video in one of two ways 1. Split screens can...
HDS Gen2 Touch is a G2T different than the touch screen there are several differences between the HDS Gen2 and the HDS Gen2 Touch lines. 1. Press and hold the icon you would like to mount the box inside the boat. 2. HDS Gen2 Touch features an incorporated StructureScan™ module in the head unit, eliminating the need to... split. User defined splits can be done in (with all possible half and half split combinations 2. The HDS 12 and 9 Gen2 Touch models have two Ethernet ports on the back, as well as supporting video in one of two ways 1. Split screens can...
HDS Gen2 Touch FAQ
Page 2
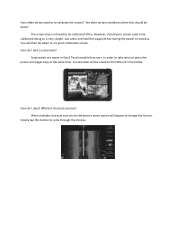
The screen does not need to re-calibrate the screen? When multiple structure sources are easier in Gen2 Touch models than ever. Simply tap this should your screen need to be calibrated doing so is very simple. However, should be done? In order to ... button to cycle through the choices. You will then be taken to a 9 point calibration screen. Screenshots are detected a menu option will be saved to the HDS unit's hard drive. Just press and hold the waypoint key during the power on process. How do I take one just press the power and pages...
The screen does not need to re-calibrate the screen? When multiple structure sources are easier in Gen2 Touch models than ever. Simply tap this should your screen need to be calibrated doing so is very simple. However, should be done? In order to ... button to cycle through the choices. You will then be taken to a 9 point calibration screen. Screenshots are detected a menu option will be saved to the HDS unit's hard drive. Just press and hold the waypoint key during the power on process. How do I take one just press the power and pages...
HDS Gen2 Touch FAQ
Page 4
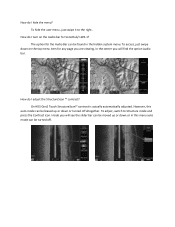
... altogether. To hide the user menu, just swipe it to Structure mode and press the Contrast icon. How do I adjust the StructureScan ™ contrast? On HDS Gen2 Touch StructureScan™ contrast is actually automatically adjusted. How do I hide the menu?
... altogether. To hide the user menu, just swipe it to Structure mode and press the Contrast icon. How do I adjust the StructureScan ™ contrast? On HDS Gen2 Touch StructureScan™ contrast is actually automatically adjusted. How do I hide the menu?

Installation Manual
Page 1
HDS Gen2 Touch Installation Manual ENGLISH lowrance.com
HDS Gen2 Touch Installation Manual ENGLISH lowrance.com

Installation Manual
Page 4
... modifications not expressly approved by one or more information please refer to our website: www.lowrance.com Warning The user is no guarantee that the interference will not occur in a particular installation. Compliance Statements Lowrance HDS-7, HDS-9, and HDS-12 Gen2 Touch: • meet the technical standards in accordance with Part 15.103 of the FCC rules...
... modifications not expressly approved by one or more information please refer to our website: www.lowrance.com Warning The user is no guarantee that the interference will not occur in a particular installation. Compliance Statements Lowrance HDS-7, HDS-9, and HDS-12 Gen2 Touch: • meet the technical standards in accordance with Part 15.103 of the FCC rules...
Installation Manual
Page 5
... of Kongsberg Maritime AS Company registered in the US and other countries and is available from the reader is a reference guide for installing the Lowrance HDS-7, HDS-9, and HDS-12 Gen2 Touch system. The manual does not cover basic background information about how equipment such as follows: ¼¼ Note: Used to draw the reader's attention...
... of Kongsberg Maritime AS Company registered in the US and other countries and is available from the reader is a reference guide for installing the Lowrance HDS-7, HDS-9, and HDS-12 Gen2 Touch system. The manual does not cover basic background information about how equipment such as follows: ¼¼ Note: Used to draw the reader's attention...

Installation Manual
Page 6
... 22 NMEA 2000 device connection 24 NMEA 0183 device connection 25 Video In 25 Connecting video sources 26 Software setup 26 Sonar installation settings 28 Touch Screen Calibration 28 Software upgrades 29 Dimensional drawings 29 HDS 7 Gen2 Touch 29 HDS 9 Gen2 Touch 29 HDS 12 Gen2 Touch 4 | Contents 6 HDS Gen2 Touch overview 7 Front - controls 8 Rear -
... 22 NMEA 2000 device connection 24 NMEA 0183 device connection 25 Video In 25 Connecting video sources 26 Software setup 26 Sonar installation settings 28 Touch Screen Calibration 28 Software upgrades 29 Dimensional drawings 29 HDS 7 Gen2 Touch 29 HDS 9 Gen2 Touch 29 HDS 12 Gen2 Touch 4 | Contents 6 HDS Gen2 Touch overview 7 Front - controls 8 Rear -
Installation Manual
Page 8
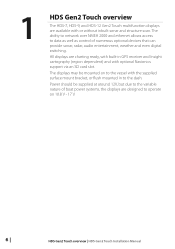
...can provide sonar, radar, audio entertainment, weather and even digital switching. Power should be mounted on 10.8 V - 17 V. 6 | HDS Gen2 Touch overview | HDS Gen2 Touch Installation Manual The displays may be supplied at around 12V, but due to the dash. The ability to network over NMEA 2000 and ethernet...mounted in GPS receiver and Insight cartography (region dependent) and with or without inbuilt sonar and structure scan. 1 HDS Gen2 Touch overview The HDS-7, HDS-9, and HDS-12 Gen2 Touch multifunction displays are available with optional Navionics support via an SD card slot.
...can provide sonar, radar, audio entertainment, weather and even digital switching. Power should be mounted on 10.8 V - 17 V. 6 | HDS Gen2 Touch overview | HDS Gen2 Touch Installation Manual The displays may be supplied at around 12V, but due to the dash. The ability to network over NMEA 2000 and ethernet...mounted in GPS receiver and Insight cartography (region dependent) and with or without inbuilt sonar and structure scan. 1 HDS Gen2 Touch overview The HDS-7, HDS-9, and HDS-12 Gen2 Touch multifunction displays are available with optional Navionics support via an SD card slot.
Installation Manual
Page 9
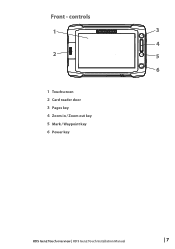
Front - controls 1 3 4 2 5 6 1 Touchscreen 2 Card reader door 3 Pages key 4 Zoom in / Zoom out key 5 Mark / Waypoint key 6 Power key HDS Gen2 Touch overview | HDS Gen2 Touch Installation Manual | 7
Front - controls 1 3 4 2 5 6 1 Touchscreen 2 Card reader door 3 Pages key 4 Zoom in / Zoom out key 5 Mark / Waypoint key 6 Power key HDS Gen2 Touch overview | HDS Gen2 Touch Installation Manual | 7
Installation Manual
Page 10
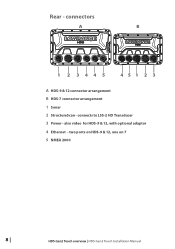
connectors A B 1 2 3445 451 2 3 A HDS-9 & 12 connector arrangement B HDS-7 connector arrangement 1 Sonar 2 StructureScan - two ports on HDS-9 & 12, one on 7 5 NMEA 2000 8 | HDS Gen2 Touch overview | HDS Gen2 Touch Installation Manual also video for HDS-9 & 12, with optional adaptor 4 Ethernet - connects to LSS-2 HD Transducer 3 Power - Rear -
connectors A B 1 2 3445 451 2 3 A HDS-9 & 12 connector arrangement B HDS-7 connector arrangement 1 Sonar 2 StructureScan - two ports on HDS-9 & 12, one on 7 5 NMEA 2000 8 | HDS Gen2 Touch overview | HDS Gen2 Touch Installation Manual also video for HDS-9 & 12, with optional adaptor 4 Ethernet - connects to LSS-2 HD Transducer 3 Power - Rear -
Installation Manual
Page 11
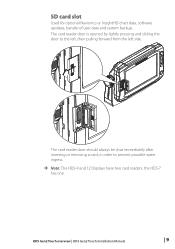
HDS Gen2 Touch overview | HDS Gen2 Touch Installation Manual | 9 The card reader door is opened by lightly pressing and sliding the door to prevent possible water ingress. ¼¼ Note: The HDS-9 and 12 Displays have two card readers, the HDS-7 has one. SD card slot Used for optional Navionics or InsightHD chart data, software updates, transfer of user data and system backup. The card reader door should always be shut immediately after inserting or removing a card, in order to the left, then pulling forward from the left side.
HDS Gen2 Touch overview | HDS Gen2 Touch Installation Manual | 9 The card reader door is opened by lightly pressing and sliding the door to prevent possible water ingress. ¼¼ Note: The HDS-9 and 12 Displays have two card readers, the HDS-7 has one. SD card slot Used for optional Navionics or InsightHD chart data, software updates, transfer of user data and system backup. The card reader door should always be shut immediately after inserting or removing a card, in order to the left, then pulling forward from the left side.
Installation Manual
Page 12
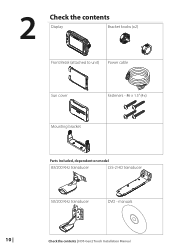
2 Check the contents Display Bracket knobs (x2) Front Bezel (attached to unit) Power cable Sun cover Fasteners - #6 x 1.5" (4x) Mounting bracket Parts Included, dependent on model 83/200 KHz transducer LSS-2 HD transducer 50/200 KHz transducer DVD - manuals 10 | Check the contents | HDS Gen2 Touch Installation Manual
2 Check the contents Display Bracket knobs (x2) Front Bezel (attached to unit) Power cable Sun cover Fasteners - #6 x 1.5" (4x) Mounting bracket Parts Included, dependent on model 83/200 KHz transducer LSS-2 HD transducer 50/200 KHz transducer DVD - manuals 10 | Check the contents | HDS Gen2 Touch Installation Manual
Installation Manual
Page 13
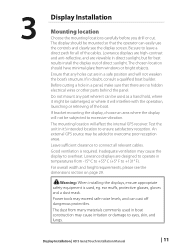
... or damage to ensure satisfactory reception. Good ventilation is used in it will not weaken the boat's structure. Display Installation | HDS Gen2 Touch Installation Manual | 11 Leave sufficient clearance to +131° F). 3 Display Installation Mounting location Choose the mounting locations carefully before...sure to overcome poor reception areas. Before cutting a hole in a panel, make sure that there are designed to overheat. Lowrance displays are no hidden electrical wires or other parts behind the panel. For overall width and height requirements, please see the ...
... or damage to ensure satisfactory reception. Good ventilation is used in it will not weaken the boat's structure. Display Installation | HDS Gen2 Touch Installation Manual | 11 Leave sufficient clearance to +131° F). 3 Display Installation Mounting location Choose the mounting locations carefully before...sure to overcome poor reception areas. Before cutting a hole in a panel, make sure that there are designed to overheat. Lowrance displays are no hidden electrical wires or other parts behind the panel. For overall width and height requirements, please see the ...
Installation Manual
Page 14
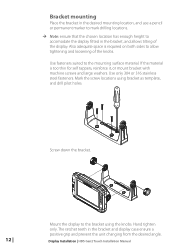
Use fasteners suited to accomodate the display fitted in the bracket, and allows tilting of the knobs. Display Installation | HDS Gen2 Touch Installation Manual If the material is required on both sides to the bracket using bracket as template, and drill pilot holes. Hand tighten only. The ...
Use fasteners suited to accomodate the display fitted in the bracket, and allows tilting of the knobs. Display Installation | HDS Gen2 Touch Installation Manual If the material is required on both sides to the bracket using bracket as template, and drill pilot holes. Hand tighten only. The ...
Installation Manual
Page 15
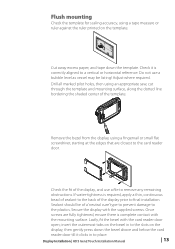
... or small flat screwdriver, starting at the edges that are fully tightened, ensure there is complete contact with the card reader door open; Display Installation | HDS Gen2 Touch Installation Manual | 13 Drill all marked pilot holes, then using an appropriate saw, cut through the template and mounting surface, along the dotted line bordering...
... or small flat screwdriver, starting at the edges that are fully tightened, ensure there is complete contact with the card reader door open; Display Installation | HDS Gen2 Touch Installation Manual | 13 Drill all marked pilot holes, then using an appropriate saw, cut through the template and mounting surface, along the dotted line bordering...
Installation Manual
Page 16
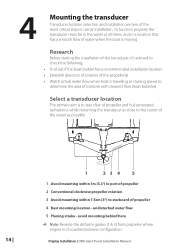
... primary aim is moving. avoid mounting behind here ¼¼ Note: Reverse the distance guides (1 & 3) from propeller where engine is of counterclockwise configuration. Display Installation | HDS Gen2 Touch Installation Manual 4 Mounting the transducer Transducer location selection and installation are two of the most critical steps in a location that has a smooth flow of water...
... primary aim is moving. avoid mounting behind here ¼¼ Note: Reverse the distance guides (1 & 3) from propeller where engine is of counterclockwise configuration. Display Installation | HDS Gen2 Touch Installation Manual 4 Mounting the transducer Transducer location selection and installation are two of the most critical steps in a location that has a smooth flow of water...
Installation Manual
Page 17
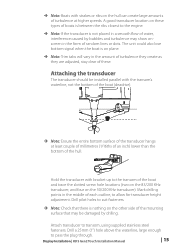
... transducer is not placed in the amount of turbulence they create as they are adjusted, stay clear of water, interference caused by drilling. Display Installation | HDS Gen2 Touch Installation Manual | 15 A good transducer location on these . ¼¼ Note: Boats with strakes or ribs on the hull can create large amounts of the...
... transducer is not placed in the amount of turbulence they create as they are adjusted, stay clear of water, interference caused by drilling. Display Installation | HDS Gen2 Touch Installation Manual | 15 A good transducer location on these . ¼¼ Note: Boats with strakes or ribs on the hull can create large amounts of the...
Installation Manual
Page 18
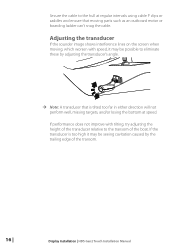
... the cable. If the transducer is too high it may be possible to eliminate these by the trailing edge of the transom. 16 | Display Installation | HDS Gen2 Touch Installation Manual If performance does not improve with speed, it may be seeing cavitation caused by adjusting the transducer's angle. ¼¼ Note: A transducer that...
... the cable. If the transducer is too high it may be possible to eliminate these by the trailing edge of the transom. 16 | Display Installation | HDS Gen2 Touch Installation Manual If performance does not improve with speed, it may be seeing cavitation caused by adjusting the transducer's angle. ¼¼ Note: A transducer that...
Installation Manual
Page 19
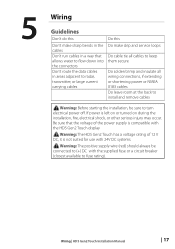
...'t run cables in a way that the voltage of 12 V DC, it is not suited for use with 24V DC systems. ! Warning: The HDS Gen2 Touch has a voltage rating of the power supply is left on or turned on during the installation, fire, electrical shock, or other serious injury may occur.... If power is compatible with the supplied fuse or a circuit breaker (closest available to fuse rating). Wiring | HDS Gen2 Touch Installation Manual | 17 5 Wiring Guidelines Don't do this Do this Don't make drip and service loops Do cable tie all cables to keep them secure...
...'t run cables in a way that the voltage of 12 V DC, it is not suited for use with 24V DC systems. ! Warning: The HDS Gen2 Touch has a voltage rating of the power supply is left on or turned on during the installation, fire, electrical shock, or other serious injury may occur.... If power is compatible with the supplied fuse or a circuit breaker (closest available to fuse rating). Wiring | HDS Gen2 Touch Installation Manual | 17 5 Wiring Guidelines Don't do this Do this Don't make drip and service loops Do cable tie all cables to keep them secure...
Installation Manual
Page 20
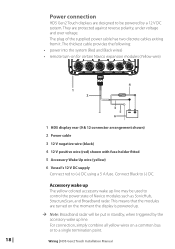
This means that the modules are protected against reverse polarity, under voltage and over voltage. Wiring | HDS Gen2 Touch Installation Manual The plug of Navico modules such as SonicHub, StructureScan, and Broadband radar. They are turned on the moment the display is powered up. ... (Red and Black wires) • remote turn-on a common bus or to (-) DC. Accessory wake up The yellow colored accessory wake up line. Power connection HDS Gen2 Touch displays are designed to be used to control the power state of the supplied power cable has two discrete cables exiting from it.
This means that the modules are protected against reverse polarity, under voltage and over voltage. Wiring | HDS Gen2 Touch Installation Manual The plug of Navico modules such as SonicHub, StructureScan, and Broadband radar. They are turned on the moment the display is powered up. ... (Red and Black wires) • remote turn-on a common bus or to (-) DC. Accessory wake up The yellow colored accessory wake up line. Power connection HDS Gen2 Touch displays are designed to be used to control the power state of the supplied power cable has two discrete cables exiting from it.


