
Manual
Page 2
... original warranty period or 30 days, whichever is distributed. This equipment generates, uses, and can be , at Logitech's option, either (a) return of the price paid or (b) repair or replacement of the device. Where shielded interface cables have been provided with Part 15 of Industry and Science Canada. This device complies with the instructions, may cause harmful interference to the U.S. Power Output...
... original warranty period or 30 days, whichever is distributed. This equipment generates, uses, and can be , at Logitech's option, either (a) return of the price paid or (b) repair or replacement of the device. Where shielded interface cables have been provided with Part 15 of Industry and Science Canada. This device complies with the instructions, may cause harmful interference to the U.S. Power Output...
Manual
Page 3
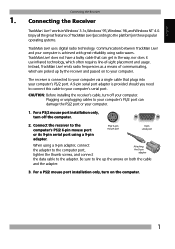
Communication between TrackMan Live! TrackMan Live! Connect the receiver to the computer's PS/2 6-pin mouse port or its 9-pin serial port using a 9-pin adapter, connect the adapter to the computer port, tighten the thumb screws, and connect Attaching the 9-pin adapter the data cable to the adapter. Connecting the Receiver TrackMan® Live!™ works in the way, nor does it use infrared technology, which are picked up...
Communication between TrackMan Live! TrackMan Live! Connect the receiver to the computer's PS/2 6-pin mouse port or its 9-pin serial port using a 9-pin adapter, connect the adapter to the computer port, tighten the thumb screws, and connect Attaching the 9-pin adapter the data cable to the adapter. Connecting the Receiver TrackMan® Live!™ works in the way, nor does it use infrared technology, which are picked up...
Manual
Page 4
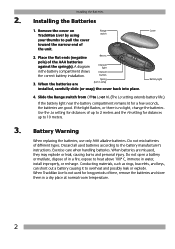
... in water, install improperly, or recharge. Do not mix batteries of the AAA batteries against the spring(s). Discard all used for long periods of up to the battery manufacturer's instructions. is no light, change the batteries. When batteries are good. Channel light Channel button 3. Slide the Range switch from Off to Lo or Hi. (The Lo setting extends battery life.) If the battery light near the battery compartment remains...
... in water, install improperly, or recharge. Do not mix batteries of the AAA batteries against the spring(s). Discard all used for long periods of up to the battery manufacturer's instructions. is no light, change the batteries. When batteries are good. Channel light Channel button 3. Slide the Range switch from Off to Lo or Hi. (The Lo setting extends battery life.) If the battery light near the battery compartment remains...
Manual
Page 5
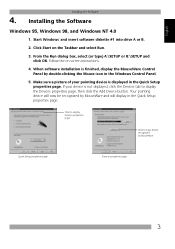
... Quick Setup properties page Devices properties page 3 Start Windows® and insert software diskette #1 into drive A or B. 2. Make sure a picture of your device is finished, display the MouseWare Control Panel by MouseWare and will now be recognized by double-clicking the Mouse icon in the Quick Setup properties page. Click to display Devices properties page Click to display the Devices properties page, then click the Add Device button. English Installing the Software 4. Installing the Software Windows 95, Windows...
... Quick Setup properties page Devices properties page 3 Start Windows® and insert software diskette #1 into drive A or B. 2. Make sure a picture of your device is finished, display the MouseWare Control Panel by MouseWare and will now be recognized by double-clicking the Mouse icon in the Quick Setup properties page. Click to display Devices properties page Click to display the Devices properties page, then click the Add Device button. English Installing the Software 4. Installing the Software Windows 95, Windows...
Manual
Page 6
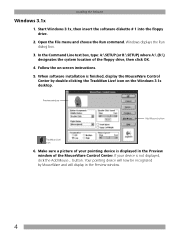
Start Windows 3.1x, then insert the software diskette # 1 into the floppy drive. 2. Windows displays the Run dialog box. 3. Open the File menu and choose the Run command. When software installation is not displayed, click the Add Mouse... Make sure a picture of your device is finished, display the MouseWare Control Center by MouseWare and will now be recognized by double-clicking the TrackMan Live! button. Installing the Software Windows 3.1x 1. Preview window Add...
Start Windows 3.1x, then insert the software diskette # 1 into the floppy drive. 2. Windows displays the Run dialog box. 3. Open the File menu and choose the Run command. When software installation is not displayed, click the Add Mouse... Make sure a picture of your device is finished, display the MouseWare Control Center by MouseWare and will now be recognized by double-clicking the TrackMan Live! button. Installing the Software Windows 3.1x 1. Preview window Add...
Manual
Page 7
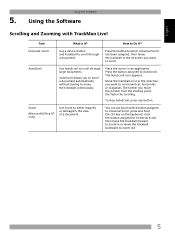
... view of a document. Zoom (Microsoft Office 97 only) Use Zoom to scroll through a document. Using the Software Scrolling and Zooming with a button assigned to Universal Scroll: press and hold the Ctrl key on the keyboard, click the button assigned to Universal Scroll, then move the trackball forward to zoom in the direction you want to AutoScroll. How to scroll through large documents. Universal Scroll Use a device button and trackball to Do It...
... view of a document. Zoom (Microsoft Office 97 only) Use Zoom to scroll through a document. Using the Software Scrolling and Zooming with a button assigned to Universal Scroll: press and hold the Ctrl key on the keyboard, click the button assigned to Universal Scroll, then move the trackball forward to zoom in the direction you want to AutoScroll. How to scroll through large documents. Universal Scroll Use a device button and trackball to Do It...
Manual
Page 8
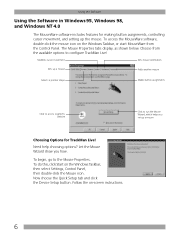
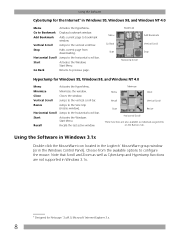
... Device Setup button. Need help choosing options? Let the Mouse Wizard show you set up the mouse. To do this, click Start on the Windows Taskbar, or start MouseWare from the available options to the Mouse Properties. Choose from the Control Panel. To begin, go to configure TrackMan Live! Follow the on-screen instructions. 6 Using the Software Using the Software in Windows 95, Windows 98, and Windows NT 4.0 The MouseWare software includes features for making button...
... Device Setup button. Need help choosing options? Let the Mouse Wizard show you set up the mouse. To do this, click Start on the Windows Taskbar, or start MouseWare from the available options to the Mouse Properties. Choose from the Control Panel. To begin, go to configure TrackMan Live! Follow the on-screen instructions. 6 Using the Software Using the Software in Windows 95, Windows 98, and Windows NT 4.0 The MouseWare software includes features for making button...
Manual
Page 9
... the cursor to an icon on the grid, then click to mouse buttons using the Buttons tab. Note To perform a double-click with the button assigned to various parts of the Mouse Properties, by clicking the Options button on the Windows Taskbar after MouseWare has been installed. This icon makes it possible for Windows 95, Windows 98 and Windows NT 4.0 into one convenient grid so you do...
... the cursor to an icon on the grid, then click to mouse buttons using the Buttons tab. Note To perform a double-click with the button assigned to various parts of the Mouse Properties, by clicking the Options button on the Windows Taskbar after MouseWare has been installed. This icon makes it possible for Windows 95, Windows 98 and Windows NT 4.0 into one convenient grid so you do...
Manual
Page 10
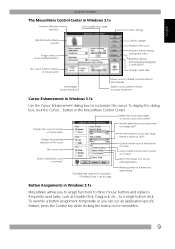
.... Using the Software in Windows 3.1x Double-click the MouseWare icon located in the Logitech® MouseWare group window (or in Windows 3.1x. * Designed for Netscape® 3.x/4.0, Microsoft® Internet Explorer 3.x. 8 Note that Scroll and Zoom as well as CyberJump and HyperJump functions are also available as individual assignments on the Buttons tab. Returns to Bookmark Add Bookmark Vertical Scroll Stop Horizontal Scroll Start...
.... Using the Software in Windows 3.1x Double-click the MouseWare icon located in the Logitech® MouseWare group window (or in Windows 3.1x. * Designed for Netscape® 3.x/4.0, Microsoft® Internet Explorer 3.x. 8 Note that Scroll and Zoom as well as CyberJump and HyperJump functions are also available as individual assignments on the Buttons tab. Returns to Bookmark Add Bookmark Vertical Scroll Stop Horizontal Scroll Start...
Manual
Page 11
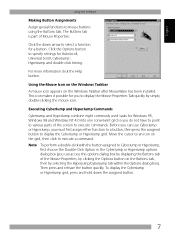
...-specific feature, press the Control key while clicking the button to a single button click. English Using the Software The MouseWare Control Center in Windows 3.1x Performs Windows functions Sets double-click speed Saves settings Identifies button being pressed Assigns shortcuts to second/third buttons Sets cursor travel in relation to mouse speed Interchanges button functions Cancels changes Enhances the cursor Provides channel setting and battery status Redetects devices after plugging/unplugging a serial mouse Provides online help...
...-specific feature, press the Control key while clicking the button to a single button click. English Using the Software The MouseWare Control Center in Windows 3.1x Performs Windows functions Sets double-click speed Saves settings Identifies button being pressed Assigns shortcuts to second/third buttons Sets cursor travel in relation to mouse speed Interchanges button functions Cancels changes Enhances the cursor Provides channel setting and battery status Redetects devices after plugging/unplugging a serial mouse Provides online help...
Manual
Page 12
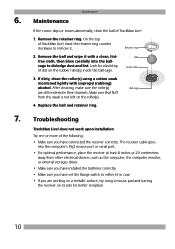
... that fluff from other electrical devices, such as the computer, the computer monitor, or external storages drives. • Make sure you have installed the batteries correctly. • Make sure you are still centered in their channels. Troubleshooting TrackMan Live! The receiver cable goes into the ballcage to remove it with isopropyl (rubbing) alcohol. Ball Inside roller 3. Replace the ball and retainer ring. 7. Maintenance...
... that fluff from other electrical devices, such as the computer, the computer monitor, or external storages drives. • Make sure you have installed the batteries correctly. • Make sure you are still centered in their channels. Troubleshooting TrackMan Live! The receiver cable goes into the ballcage to remove it with isopropyl (rubbing) alcohol. Ball Inside roller 3. Replace the ball and retainer ring. 7. Maintenance...
Manual
Page 13
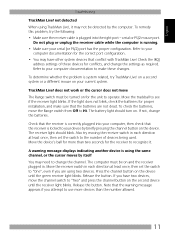
... the receiver switch in each direction at least once, then set the switch to the number of these changes. Note that the batteries are using two devices. serial or PS/2 mouse port. Do not plug or unplug the receiver cable while the computer is using TrackMan Live!, it . The battery light should blink. If not, change the settings as required. Move the device's ball for proper installation, and make these devices for...
... the receiver switch in each direction at least once, then set the switch to the number of these changes. Note that the batteries are using two devices. serial or PS/2 mouse port. Do not plug or unplug the receiver cable while the computer is using TrackMan Live!, it . The battery light should blink. If not, change the settings as required. Move the device's ball for proper installation, and make these devices for...
Manual
Page 14
... the receiver's radio reception. Also change the position of radio devices on Airplanes TrackMan Live! on Airplanes Aviation regulations do not permit the use TrackMan Live!, and make sure that you have turned its Range switch to Off. 12 Try moving the receiver and/or cordless device to Hi. Using TrackMan Live! Using TrackMan Live! Check the batteries as described in, "TrackMan Live! For TrackMan Live!, set the range switch...
... the receiver's radio reception. Also change the position of radio devices on Airplanes TrackMan Live! on Airplanes Aviation regulations do not permit the use TrackMan Live!, and make sure that you have turned its Range switch to Off. 12 Try moving the receiver and/or cordless device to Hi. Using TrackMan Live! Using TrackMan Live! Check the batteries as described in, "TrackMan Live! For TrackMan Live!, set the range switch...
Manual
Page 80
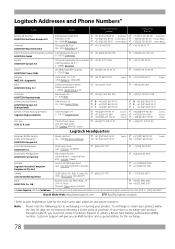
... 78 Logitech Addresses and Phone Numbers* Country Address Product Information (Infoline) Technical Help (Hotline) Benelux (B, LUX, NL) LOGITECH Northern Europe B.V. Ltd. Industrial Park ROC - Canada Sales & ...41 (0)21 863 54 01 Fax +41 (0)21 863 54 02 English 6505 Kaiser Drive USA - Dee Why NSW 2099, Australia ¥ +1 (702) 269 3457 &#...Suite 200 ¥ (800) 231-7717 CDN - Note Please read the following prior to the point of purchase. Corporate Headquarters LOGITECH Inc. If you return or exchange your local authorized distributor, or call our Customer Support...
... 78 Logitech Addresses and Phone Numbers* Country Address Product Information (Infoline) Technical Help (Hotline) Benelux (B, LUX, NL) LOGITECH Northern Europe B.V. Ltd. Industrial Park ROC - Canada Sales & ...41 (0)21 863 54 01 Fax +41 (0)21 863 54 02 English 6505 Kaiser Drive USA - Dee Why NSW 2099, Australia ¥ +1 (702) 269 3457 &#...Suite 200 ¥ (800) 231-7717 CDN - Note Please read the following prior to the point of purchase. Corporate Headquarters LOGITECH Inc. If you return or exchange your local authorized distributor, or call our Customer Support...

