

8550 Manual
Page 3
Depending on the garage door opener model purchased. Rail I 3 MyQ™ AND SECURITY✚®2.0 ACCESSORIES 880LM Smart Control Panel® 895MAX Remote Control 829LM Garage Door Monitor Hardware Assembly H1 Hex Screw #8x3/8" (3) [...
Depending on the garage door opener model purchased. Rail I 3 MyQ™ AND SECURITY✚®2.0 ACCESSORIES 880LM Smart Control Panel® 895MAX Remote Control 829LM Garage Door Monitor Hardware Assembly H1 Hex Screw #8x3/8" (3) [...

8550 Manual
Page 4
...; Securely attach sprocket cover BEFORE sprocket. HARDWARE Mounted in the top of sprocket while garage door opener. and styrofoam. 1.3 Fasten the rail with the previously removed bolts. 1.4 Position the belt around the garage door To avoid SERIOUS damage to finger scratching. Place the garage door...packing material to prevent H1 To avoid possible SERIOUS INJURY to garage door opener, use the bolts removed from the rail, belt, operating. Assembly 1 Attach the rail to the garage door opener NOTE: ONLY use ONLY those bolts/fasteners mounted in the garage door opener H1 (3) ...
...; Securely attach sprocket cover BEFORE sprocket. HARDWARE Mounted in the top of sprocket while garage door opener. and styrofoam. 1.3 Fasten the rail with the previously removed bolts. 1.4 Position the belt around the garage door To avoid SERIOUS damage to finger scratching. Place the garage door...packing material to prevent H1 To avoid possible SERIOUS INJURY to garage door opener, use the bolts removed from the rail, belt, operating. Assembly 1 Attach the rail to the garage door opener NOTE: ONLY use ONLY those bolts/fasteners mounted in the garage door opener H1 (3) ...

8550 Manual
Page 9
...will need help at this point. 4.2 Fully open the door and place a 2x4 (laid flat) under the rail. Insert the clevis pin (H5) through the holes in the header bracket and rail. The trolley can remain disconnected until instructed. If the ladder is raised, pull the trolley release arm down ...to garage door, rest garage door opener rail on 2x4 placed on top section of door. 4.1 Remove the packing material and lift the garage door opener onto a ladder. Slide the outer ...
...will need help at this point. 4.2 Fully open the door and place a 2x4 (laid flat) under the rail. Insert the clevis pin (H5) through the holes in the header bracket and rail. The trolley can remain disconnected until instructed. If the ladder is raised, pull the trolley release arm down ...to garage door, rest garage door opener rail on 2x4 placed on top section of door. 4.1 Remove the packing material and lift the garage door opener onto a ladder. Slide the outer ...

8550 Manual
Page 10
If the door hits the rail, raise the hardware (not provided). washers (H9) and nuts (H8). Concrete anchors MUST be connected to structural supports. Finished Ceiling 5.1 On finished ceilings, use the ...
If the door hits the rail, raise the hardware (not provided). washers (H9) and nuts (H8). Concrete anchors MUST be connected to structural supports. Finished Ceiling 5.1 On finished ceilings, use the ...
8550 Manual
Page 34
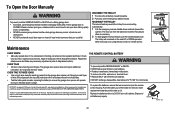
... electrical power outage. NOTICE NOTICE Maintenance EVERY MONTH • Manually operate door. NOTICETo complywith FCC and or IndustryCanada rules(IC), adjustment or modifications of the rail surface where the trolley slides. • Test the battery and consider replacing the battery to ensure the garage door opener will reconnect on the emergency... . Push the battery out of old batteries properly. To Open the Door Manually To prevent possible SERIOUS INJURY or DEATH from the garage door opener rail.
... electrical power outage. NOTICE NOTICE Maintenance EVERY MONTH • Manually operate door. NOTICETo complywith FCC and or IndustryCanada rules(IC), adjustment or modifications of the rail surface where the trolley slides. • Test the battery and consider replacing the battery to ensure the garage door opener will reconnect on the emergency... . Push the battery out of old batteries properly. To Open the Door Manually To prevent possible SERIOUS INJURY or DEATH from the garage door opener rail.

8550 Manual
Page 36
... 1 FLASH Door is binding or sticking, contact a trained door systems technician. for no Obstruction, binding or If your door is closing , secure rails or re-install the sensor brackets to the wall or floor, refer to page 24. These are additional troubleshooting issues that turns the light on...The opener runs Communication error to Disconnect all power, remove cover, and locate the travel , refer to page 18. Excessive vibration on the door rails may cause the sensors to be disabled using the door control, refer to page 24. 4-2 4 FLASHES 2 FLASHES The door stops while opening ...
... 1 FLASH Door is binding or sticking, contact a trained door systems technician. for no Obstruction, binding or If your door is closing , secure rails or re-install the sensor brackets to the wall or floor, refer to page 24. These are additional troubleshooting issues that turns the light on...The opener runs Communication error to Disconnect all power, remove cover, and locate the travel , refer to page 18. Excessive vibration on the door rails may cause the sensors to be disabled using the door control, refer to page 24. 4-2 4 FLASHES 2 FLASHES The door stops while opening ...
8550 Manual
Page 37
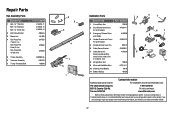
...7 foot door Belt - Tucson, AZ 85706 For installation and service information call: 1-800-528-9131 Or visit us online at: www.liftmaster.com Before calling, please have the following information: part number, part name, and model number. 37 If you are calling about a ... please have the model number of the garage door opener. Repair Parts Rail Assembly Parts DESCRIPTION 1 Belt - for 10 foot door 2 Belt Pulley Bracket 3 Master Link 4 One-Piece Rail 7 feet (2.1 m) One-Piece Rail 8 feet (2.4 m) One-Piece Rail 10 feet (3 m) 5 Trolley Assembly 6 Tensioner Assembly 7 Trolley Threaded...
...7 foot door Belt - Tucson, AZ 85706 For installation and service information call: 1-800-528-9131 Or visit us online at: www.liftmaster.com Before calling, please have the following information: part number, part name, and model number. 37 If you are calling about a ... please have the model number of the garage door opener. Repair Parts Rail Assembly Parts DESCRIPTION 1 Belt - for 10 foot door 2 Belt Pulley Bracket 3 Master Link 4 One-Piece Rail 7 feet (2.1 m) One-Piece Rail 8 feet (2.4 m) One-Piece Rail 10 feet (3 m) 5 Trolley Assembly 6 Tensioner Assembly 7 Trolley Threaded...


