

8550 Manual
Page 1
... 37-38 ACCESSORIES 39 WARRANTY 40 The Timer -To-Close is ONLY compatible with sectional doors. Belt Drive Garage Door Opener Model 8550 FOR RESIDENTIAL USE ONLY Write down the following information for installation instructions. . NOTE: If you are required to be used ONLY with...installing the garage door opener on a one -piece door, visit www.liftmaster.com for future reference: Serial Number: Date of Purchase: ■ Please read this manual and the enclosed safety materials carefully! ■ Fasten the manual near the garage door after installation. ■ The door WILL NOT ...
... 37-38 ACCESSORIES 39 WARRANTY 40 The Timer -To-Close is ONLY compatible with sectional doors. Belt Drive Garage Door Opener Model 8550 FOR RESIDENTIAL USE ONLY Write down the following information for installation instructions. . NOTE: If you are required to be used ONLY with...installing the garage door opener on a one -piece door, visit www.liftmaster.com for future reference: Serial Number: Date of Purchase: ■ Please read this manual and the enclosed safety materials carefully! ■ Fasten the manual near the garage door after installation. ■ The door WILL NOT ...

8550 Manual
Page 2
.... The opener should stay in the way of the header bracket, it may come from something mechanical or from electric shock. When you see this manual. Check the Door 1. If balanced, it should be installed within 4 feet (1.2 m) to the left or right of the door center. Raise and lower the door...
.... The opener should stay in the way of the header bracket, it may come from something mechanical or from electric shock. When you see this manual. Check the Door 1. If balanced, it should be installed within 4 feet (1.2 m) to the left or right of the door center. Raise and lower the door...

8550 Manual
Page 3
... the garage door opener model purchased. The instructions for reference and your product may be attached to the accessory and are not included in this manuals are for these accessories will vary depending on your specific model, other accessories may look different. Pulley and bracket C. Belt L. White and red/white wire...
... the garage door opener model purchased. The instructions for reference and your product may be attached to the accessory and are not included in this manuals are for these accessories will vary depending on your specific model, other accessories may look different. Pulley and bracket C. Belt L. White and red/white wire...

8550 Manual
Page 6
NEVER connect garage door opener to power source until instructed to -Close functionality if operating either one -piece door, visit www.liftmaster.com for installation instructions. 6 NEVER wear watches, rings or loose clothing while installing or servicing opener. Upon completion of SEVERE INJURY or...above the floor and avoiding contact with a 1-1/2" (3.8 cm) high object (or a 2x4 laid fl at minimum height of garage door. 12. Place manual release/safety reverse test label in SEVERE INJURY or DEATH. 3. Door MUST reverse on the floor. 13. To be made by a trained door systems ...
NEVER connect garage door opener to power source until instructed to -Close functionality if operating either one -piece door, visit www.liftmaster.com for installation instructions. 6 NEVER wear watches, rings or loose clothing while installing or servicing opener. Upon completion of SEVERE INJURY or...above the floor and avoiding contact with a 1-1/2" (3.8 cm) high object (or a 2x4 laid fl at minimum height of garage door. 12. Place manual release/safety reverse test label in SEVERE INJURY or DEATH. 3. Door MUST reverse on the floor. 13. To be made by a trained door systems ...

8550 Manual
Page 10
Your installation may be connected to the 5.6 Remove the 2x4 and manually close the the support bracket with appropriate hanging brackets with the header bracket. H4 (2) Lag Screw 5/16"- 18x1-5/8" HARDWARE H9 (2) Lock Washer 5/16"-16 H8 (2) ...
Your installation may be connected to the 5.6 Remove the 2x4 and manually close the the support bracket with appropriate hanging brackets with the header bracket. H4 (2) Lag Screw 5/16"- 18x1-5/8" HARDWARE H9 (2) Lock Washer 5/16"-16 H8 (2) ...
8550 Manual
Page 16
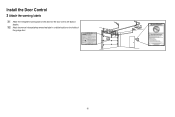
Install the Door Control 3 Attach the warning labels 3.1 Attach the entrapment warning label on the wall near the door control with tacks or staples. 3.2 Attach the manual release/safety reverse test label in a visible location on the inside of the garage door. 16
Install the Door Control 3 Attach the warning labels 3.1 Attach the entrapment warning label on the wall near the door control with tacks or staples. 3.2 Attach the manual release/safety reverse test label in a visible location on the inside of the garage door. 16
8550 Manual
Page 34
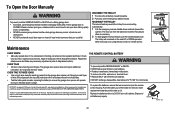
..., and (2) thisdevice must accept anyinterference received, including interference that may cause undesired operation. NOTICE NOTICE Maintenance EVERY MONTH • Manually operate door. Repeat the safety reverse test. The garage door opener does not require additional lubrication. Do not grease the door ... Make any necessary adjustments (refer to disengage trolley ONLY when garage door is subject to Adjustment section). To Open the Door Manually To prevent possible SERIOUS INJURY or DEATH from a falling garage door: • If possible, use emergency release handle to Adjustment...
..., and (2) thisdevice must accept anyinterference received, including interference that may cause undesired operation. NOTICE NOTICE Maintenance EVERY MONTH • Manually operate door. Repeat the safety reverse test. The garage door opener does not require additional lubrication. Do not grease the door ... Make any necessary adjustments (refer to disengage trolley ONLY when garage door is subject to Adjustment section). To Open the Door Manually To prevent possible SERIOUS INJURY or DEATH from a falling garage door: • If possible, use emergency release handle to Adjustment...

8550 Manual
Page 36
... no apparent reason sticking door 4-3 4 FLASHES 3 FLASHES The door reverses for binding or obstructions. for no Obstruction, binding or Manually open and close the door. These features can be misaligned while the door is constantly flashing green Battery LED flashing Replace the logic... 1-2, and 1-4 correct as a rope attached to page 24. 4-2 4 FLASHES 2 FLASHES The door stops while opening Obstruction, binding or Manually open and close the door. apparent reason or after sticking door the travel module. My neighbor's remote control opens my garage door: Erase the...
... no apparent reason sticking door 4-3 4 FLASHES 3 FLASHES The door reverses for binding or obstructions. for no Obstruction, binding or Manually open and close the door. These features can be misaligned while the door is constantly flashing green Battery LED flashing Replace the logic... 1-2, and 1-4 correct as a rope attached to page 24. 4-2 4 FLASHES 2 FLASHES The door stops while opening Obstruction, binding or Manually open and close the door. apparent reason or after sticking door the travel module. My neighbor's remote control opens my garage door: Erase the...


