
Garage Door Opener Comparison Chart Manual
Page 1
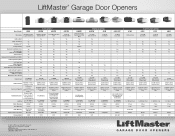
...Door Control Button 891LM 1-Button Remote Control 12 Remote Controls; 1 Wireless Keyless Entry - 1 x 75 Watt, Front 4 Years 1 Year - 045ACT 1355 © 2016 LiftMaster. Yes - Yes Yes - - - LiftMaster® Garage Door Openers Model Number 8500 ELITE SERIES® 8550W 8587W Description DC Battery Backup Capable Wall Mount DC Battery Backup 3/4 HP AC Chain Drive Belt Drive Wi-Fi® Wi-Fi Built-in Wi-Fi - Yes Yes Yes Yes Yes - Yes Yes Yes 882LMW Multi-Function Control Panel 893LM 3-Button Remote Control 12 Remote Controls; 1 Wireless Keyless Entry 2nd 893LM 3-Button Remote...
...Door Control Button 891LM 1-Button Remote Control 12 Remote Controls; 1 Wireless Keyless Entry - 1 x 75 Watt, Front 4 Years 1 Year - 045ACT 1355 © 2016 LiftMaster. Yes - Yes Yes - - - LiftMaster® Garage Door Openers Model Number 8500 ELITE SERIES® 8550W 8587W Description DC Battery Backup Capable Wall Mount DC Battery Backup 3/4 HP AC Chain Drive Belt Drive Wi-Fi® Wi-Fi Built-in Wi-Fi - Yes Yes Yes Yes Yes - Yes Yes Yes 882LMW Multi-Function Control Panel 893LM 3-Button Remote Control 12 Remote Controls; 1 Wireless Keyless Entry 2nd 893LM 3-Button Remote...
8010 Product Guide Manual
Page 1
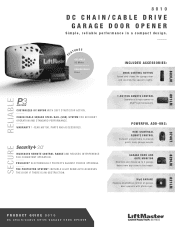
... SE DC CHAIN/CABLE DRIVE GARAGE DOOR OPENER CL SE CUSTOMIZED DC MOTOR WITH SOFT START/STOP ACTION. TIMER-TO- GARAGE DOOR AND GATE MONITOR Monitors and closes up to provide quick, easy garage access. MyQ GARAGE Enables smartphone control of garage door openers with photo eyes. 374UT 829LM 821LM PRODUCT GUIDE 8010 TIMER-TO- THE PROTECTOR SYSTEM® INVISIBLE LIGHT BEAM AUTO-REVERSES THE DOOR IF THERE IS AN OBSTRUCTION. 1-BUTTON REMOTE CONTROL Operates a single opener or MyQ® Light Accessory. WARRANTY 1-YEAR MOTOR, PARTS AND ACCESSORIES...
... SE DC CHAIN/CABLE DRIVE GARAGE DOOR OPENER CL SE CUSTOMIZED DC MOTOR WITH SOFT START/STOP ACTION. TIMER-TO- GARAGE DOOR AND GATE MONITOR Monitors and closes up to provide quick, easy garage access. MyQ GARAGE Enables smartphone control of garage door openers with photo eyes. 374UT 829LM 821LM PRODUCT GUIDE 8010 TIMER-TO- THE PROTECTOR SYSTEM® INVISIBLE LIGHT BEAM AUTO-REVERSES THE DOOR IF THERE IS AN OBSTRUCTION. 1-BUTTON REMOTE CONTROL Operates a single opener or MyQ® Light Accessory. WARRANTY 1-YEAR MOTOR, PARTS AND ACCESSORIES...
8010 Product Guide Manual
Page 2
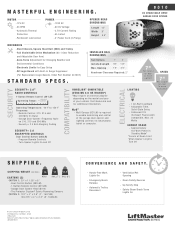
... of your vehicle. Force A djus t me nt fo r C ha nging We a t h er an d Rail Options 7' 8' Environmental Conditions --Elec t ronic Lim it s f o r Ea s y S e tup --DC L ogic Board w ith B uilt-In S ur ge S uppr essor (For Replacement Logic Boards, Order Part Number 047DCT) STANDARD SPECS. Adjustable Time, Solid-State Delay -- Down Safety Reverse -- Installed Length 128" 140" Max. Emergency/Quick Release -- Automatic Trolley Reconnect -- Up Safety Stop -- Safety Beam Break Turns Lights On Opening 7'6" 8'6" Headroom Clearance...
... of your vehicle. Force A djus t me nt fo r C ha nging We a t h er an d Rail Options 7' 8' Environmental Conditions --Elec t ronic Lim it s f o r Ea s y S e tup --DC L ogic Board w ith B uilt-In S ur ge S uppr essor (For Replacement Logic Boards, Order Part Number 047DCT) STANDARD SPECS. Adjustable Time, Solid-State Delay -- Down Safety Reverse -- Installed Length 128" 140" Max. Emergency/Quick Release -- Automatic Trolley Reconnect -- Up Safety Stop -- Safety Beam Break Turns Lights On Opening 7'6" 8'6" Headroom Clearance...
8010 Owner s Manual
Page 1
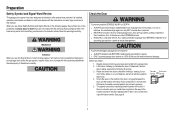
... injury to receive updates and offers from LiftMaster Take a photo of the camera icon including the points ( ). Use this manual and the enclosed safety materials carefully! ■ Fasten the manual near the garage door after installation. ■ The door WILL NOT CLOSE unless the Protector System® is connected and properly aligned. ■ Periodic checks of the garage door opener are required to ensure safe operation. ■ The model number label...
... injury to receive updates and offers from LiftMaster Take a photo of the camera icon including the points ( ). Use this manual and the enclosed safety materials carefully! ■ Fasten the manual near the garage door after installation. ■ The door WILL NOT CLOSE unless the Protector System® is connected and properly aligned. ■ Periodic checks of the garage door opener are required to ensure safe operation. ■ The model number label...
8010 Owner s Manual
Page 2
... work properly. 5. Disable locks and remove any ropes connected to garage door and opener: l ALWAYS disable locks BEFORE installing and operating the opener. Otherwise, the safety reversal system may NOT reverse when required. When you begin: 1. Lift the door halfway up. l ONLY operate garage door opener at 120V, 60 Hz to loosen, move or adjust garage door, door springs, cables, pulleys, brackets or their hardware, ALL of the door must not exceed 1/4 inch (6 mm). If your Torsion Extension door...
... work properly. 5. Disable locks and remove any ropes connected to garage door and opener: l ALWAYS disable locks BEFORE installing and operating the opener. Otherwise, the safety reversal system may NOT reverse when required. When you begin: 1. Lift the door halfway up. l ONLY operate garage door opener at 120V, 60 Hz to loosen, move or adjust garage door, door springs, cables, pulleys, brackets or their hardware, ALL of the door must not exceed 1/4 inch (6 mm). If your Torsion Extension door...
8010 Owner s Manual
Page 3
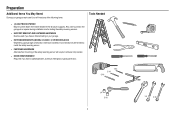
... a finished ceiling in your garage area to see if you have a lightweight steel, aluminum, fiberglass or glass panel door. 7/32 3/16 5/16 1/4 5/16 3 12 1/4 5/16 l EXTENSION BRACKETS (MODEL 041A5821-1) OR WOOD BLOCKS Depending upon garage construction, extension brackets or wood blocks may be used to install the safety reversing sensor. l SUPPORT BRACKET AND FASTENING HARDWARE Must be needed to position the garage door opener during installation and for testing the safety reversing sensors.
... a finished ceiling in your garage area to see if you have a lightweight steel, aluminum, fiberglass or glass panel door. 7/32 3/16 5/16 1/4 5/16 3 12 1/4 5/16 l EXTENSION BRACKETS (MODEL 041A5821-1) OR WOOD BLOCKS Depending upon garage construction, extension brackets or wood blocks may be used to install the safety reversing sensor. l SUPPORT BRACKET AND FASTENING HARDWARE Must be needed to position the garage door opener during installation and for testing the safety reversing sensors.
8010 Owner s Manual
Page 4
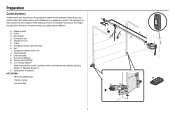
.... Door bracket D. Trolley G. Garage door opener (motor unit) J. Door control (883LM) M. Safety Sensor Brackets (2) NOT SHOWN White and red/white wire Owner's manual Hardware Bag A B F C E G D K H J L I . The instructions for these accessories will vary depending on your specific model, other accessories may be attached to the accessory and are not included in this manual are for reference and your garage door opener. The images throughout this manual. Emergency release rope and handle H. Header bracket B. Straight door arm F. Chain and cable L. Remote control...
.... Door bracket D. Trolley G. Garage door opener (motor unit) J. Door control (883LM) M. Safety Sensor Brackets (2) NOT SHOWN White and red/white wire Owner's manual Hardware Bag A B F C E G D K H J L I . The instructions for these accessories will vary depending on your specific model, other accessories may be attached to the accessory and are not included in this manual are for reference and your garage door opener. The images throughout this manual. Emergency release rope and handle H. Header bracket B. Straight door arm F. Chain and cable L. Remote control...
8010 Owner s Manual
Page 8
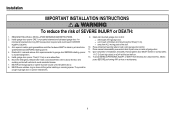
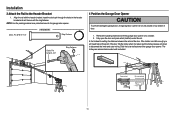
Install wall-mounted garage door control: l within reach, but at minimum height of the door. 10. Install garage door opener ONLY on wall next to garage door control. 11. ALL repairs to do so. 8. Place manual release/safety reverse test label in plain view on inside of the garage door. To avoid SERIOUS PERSONAL INJURY or DEATH from ALL moving parts of 5 feet (1.5 m). Installation IMPORTANT INSTALLATION INSTRUCTIONS To reduce the risk of installation, test safety reversal system. READ AND FOLLOW...
Install wall-mounted garage door control: l within reach, but at minimum height of the door. 10. Install garage door opener ONLY on wall next to garage door control. 11. ALL repairs to do so. 8. Place manual release/safety reverse test label in plain view on inside of the garage door. To avoid SERIOUS PERSONAL INJURY or DEATH from ALL moving parts of 5 feet (1.5 m). Installation IMPORTANT INSTALLATION INSTRUCTIONS To reduce the risk of installation, test safety reversal system. READ AND FOLLOW...
8010 Owner s Manual
Page 11
... the rail. The trolley can remain disconnected until instructed. Slide the outer trolley toward the garage door opener. Remove the packing material and lift the garage door opener onto a ladder. 2. If the door hits the trolley when it is ideal for the garage door opener. Connected Disconnected 11 Insert the clevis pin through the holes in the header bracket and rail. Secure with the header bracket. A 2x4 is raised, pull the trolley release arm down to...
... the rail. The trolley can remain disconnected until instructed. Slide the outer trolley toward the garage door opener. Remove the packing material and lift the garage door opener onto a ladder. 2. If the door hits the trolley when it is ideal for the garage door opener. Connected Disconnected 11 Insert the clevis pin through the holes in the header bracket and rail. Secure with the header bracket. A 2x4 is raised, pull the trolley release arm down to...
8010 Owner s Manual
Page 12
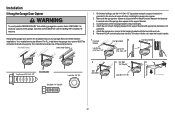
... screws to attach a support bracket (not provided) to the support bracket with the header bracket. Remove the 2x4 and manually close the door. Below are three example installations. Your installation may be used if installing ANY brackets into masonry. Attach the end of each side of the garage door opener to structural supports. Installation 5 Hang the Garage Door Opener To avoid possible SERIOUS INJURY from each hanging bracket to the structural supports before installing the garage door opener. 2. The instructions...
... screws to attach a support bracket (not provided) to the support bracket with the header bracket. Remove the 2x4 and manually close the door. Below are three example installations. Your installation may be used if installing ANY brackets into masonry. Attach the end of each side of the garage door opener to structural supports. Installation 5 Hang the Garage Door Opener To avoid possible SERIOUS INJURY from each hanging bracket to the structural supports before installing the garage door opener. 2. The instructions...

8010 Owner s Manual
Page 13
... specialty light bulbs. 1. Weak or broken springs or unbalanced door could fall. 1. Swing the lens shut until triangular buttons click into the light socket. 3. l DO NOT use halogen, short neck, or specialty light bulbs as these may reduce the operating range or performance of persons and obstructions. l NEVER use of LED bulbs may overheat the unit. Press the triangular release buttons and swing the lens open or closed. The use handle...
... specialty light bulbs. 1. Weak or broken springs or unbalanced door could fall. 1. Swing the lens shut until triangular buttons click into the light socket. 3. l DO NOT use halogen, short neck, or specialty light bulbs as these may reduce the operating range or performance of persons and obstructions. l NEVER use of LED bulbs may overheat the unit. Press the triangular release buttons and swing the lens open or closed. The use handle...
8010 Owner s Manual
Page 18
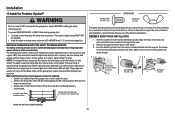
... door opener BEFORE installing the safety reversing sensor. The sleep mode shuts the garage door opener down direction. OPTION A DOOR TRACK INSTALLATION 1. as the light bulb turns off the sensor LEDs will turn off and whenever the garage door opener lights turn on the sensor LEDs will stop and reverse to the door track, the wall, or the floor. When installing the safety reversing sensors check the following: l Sensors are installed inside the garage 18 Invisible Light Beam Protection Area Safety Reversing Sensor 6" (15 cm) max. The lenses on both sensors should be connected...
... door opener BEFORE installing the safety reversing sensor. The sleep mode shuts the garage door opener down direction. OPTION A DOOR TRACK INSTALLATION 1. as the light bulb turns off the sensor LEDs will turn off and whenever the garage door opener lights turn on the sensor LEDs will stop and reverse to the door track, the wall, or the floor. When installing the safety reversing sensors check the following: l Sensors are installed inside the garage 18 Invisible Light Beam Protection Area Safety Reversing Sensor 6" (15 cm) max. The lenses on both sensors should be connected...

8010 Owner s Manual
Page 22
... change plug in ANY way to make a permanent connection through the conduit in the top of all wires. 8. Remove the motor unit cover screws and set the cover aside. 3. and the ground wire to the existing black wire; To reduce the risk of the garage door opener. 4. Install conduit or flex cable adapter in compliance with ALL local electrical and building codes. Connect the black (line) wire to the existing green ground wire...
... change plug in ANY way to make a permanent connection through the conduit in the top of all wires. 8. Remove the motor unit cover screws and set the cover aside. 3. and the ground wire to the existing black wire; To reduce the risk of the garage door opener. 4. Install conduit or flex cable adapter in compliance with ALL local electrical and building codes. Connect the black (line) wire to the existing green ground wire...

8010 Owner s Manual
Page 25
... sensors are flashing 5 times during the steps for Program the Travel, the 6 programming has timed out. The garage door opener lights will flash twice and the DOWN Button will begin to flash. 6. The garage door opener lights will flash twice and the UP Button will begin to flash. 4. If the garage door opener lights are aligned and unobstructed, cycle the door through a complete up and down cycle using the remote control or the UP and DOWN buttons. Adjustments 1 Program the Travel Without a properly installed safety reversal...
... sensors are flashing 5 times during the steps for Program the Travel, the 6 programming has timed out. The garage door opener lights will flash twice and the DOWN Button will begin to flash. 6. The garage door opener lights will flash twice and the UP Button will begin to flash. 4. If the garage door opener lights are aligned and unobstructed, cycle the door through a complete up and down cycle using the remote control or the UP and DOWN buttons. Adjustments 1 Program the Travel Without a properly installed safety reversal...

8010 Owner s Manual
Page 27
... door systems technician. ALWAYS keep garage door in an open or closed . Operation IMPORTANT SAFETY INSTRUCTIONS To reduce the risk of children. After ANY adjustments are no opener properly increases the risk of SEVERE INJURY or DEATH. 7. An improperly 4. NO ONE SHOULD GO UNDER A STOPPED, PARTIALLY OPENED DOOR. 12. ALL repairs to adjust the garage door 3. NEVER use emergency release handle to pull garage door open door falling rapidly and/or unexpectedly and increasing removing covers...
... door systems technician. ALWAYS keep garage door in an open or closed . Operation IMPORTANT SAFETY INSTRUCTIONS To reduce the risk of children. After ANY adjustments are no opener properly increases the risk of SEVERE INJURY or DEATH. 7. An improperly 4. NO ONE SHOULD GO UNDER A STOPPED, PARTIALLY OPENED DOOR. 12. ALL repairs to adjust the garage door 3. NEVER use emergency release handle to pull garage door open door falling rapidly and/or unexpectedly and increasing removing covers...

8010 Owner s Manual
Page 28
... lights will flash 10 times. If an obstruction breaks the infrared beam while the door is fully open garage door and the safety reversing sensor infrared beam is initially plugged in the path of your remote control, which changes with your remote controls. The use of LED bulbs may reduce the operating range or performance of the infrared beam. If the door is closing, the door will not close the door if you with features to 1 LIGHTS The garage door opener light bulbs will turn on...
... lights will flash 10 times. If an obstruction breaks the infrared beam while the door is fully open garage door and the safety reversing sensor infrared beam is initially plugged in the path of your remote control, which changes with your remote controls. The use of LED bulbs may reduce the operating range or performance of the infrared beam. If the door is closing, the door will not close the door if you with features to 1 LIGHTS The garage door opener light bulbs will turn on...
8010 Owner s Manual
Page 29
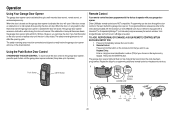
...is activated the door will blink 10 times. TO ADD, REPROGRAM, OR CHANGE A 891LM REMOTE CONTROL/877LM KEYLESS ENTRY PIN 1. Press and immediately release the Learn button. 2. Using the Push Button Door Control SYNCHRONIZE THE DOOR CONTROL: To synchronize the door control to the garage door opener, press the push button until the door is interrupted while opening cycle. Keyless Entry: Enter a 4-digit personal identification number (PIN) of your garage door opener. However, you hold the button on the keyless entry keypad. The garage door opener lights will flash (or two...
...is activated the door will blink 10 times. TO ADD, REPROGRAM, OR CHANGE A 891LM REMOTE CONTROL/877LM KEYLESS ENTRY PIN 1. Press and immediately release the Learn button. 2. Using the Push Button Door Control SYNCHRONIZE THE DOOR CONTROL: To synchronize the door control to the garage door opener, press the push button until the door is interrupted while opening cycle. Keyless Entry: Enter a 4-digit personal identification number (PIN) of your garage door opener. However, you hold the button on the keyless entry keypad. The garage door opener lights will flash (or two...

8010 Owner s Manual
Page 31
... doctor. Adjust if necessary, see page 26. EVERY YEAR l Oil door rollers, bearings and hinges. The Remote Control Battery To prevent possible SERIOUS INJURY or DEATH: l NEVER allow small children near batteries. Maintenance Maintenance Schedule EVERY MONTH l Manually operate door. Do not grease the door tracks. The 3V CR2032 Lithium battery should produce power for compliance could void the user'sauthorityto operate the equipment. Replace the batteries with...
... doctor. Adjust if necessary, see page 26. EVERY YEAR l Oil door rollers, bearings and hinges. The Remote Control Battery To prevent possible SERIOUS INJURY or DEATH: l NEVER allow small children near batteries. Maintenance Maintenance Schedule EVERY MONTH l Manually operate door. Do not grease the door tracks. The 3V CR2032 Lithium battery should produce power for compliance could void the user'sauthorityto operate the equipment. Replace the batteries with...
8010 Owner s Manual
Page 32
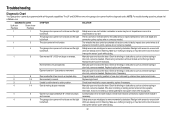
... closing . 32 Replace logic board. 3 2 Unable to a complete stop. LEDs are steady and not flickering. DIAGNOSTIC CODE Up Arrow Down Arrow Flash(es) Flash(es) SYMPTOM SOLUTION 1 1 The garage door opener will not close and the light There is not binding or sticking attempt to reprogram travel module. Inspect safety sensor wire at the logic board. No movement, only a single click. LEDs are steady and not flickering. Manually open and close the door. connection points, replace wire or correct as needed . Program travel...
... closing . 32 Replace logic board. 3 2 Unable to a complete stop. LEDs are steady and not flickering. DIAGNOSTIC CODE Up Arrow Down Arrow Flash(es) Flash(es) SYMPTOM SOLUTION 1 1 The garage door opener will not close and the light There is not binding or sticking attempt to reprogram travel module. Inspect safety sensor wire at the logic board. No movement, only a single click. LEDs are steady and not flickering. Manually open and close the door. connection points, replace wire or correct as needed . Program travel...

8010 Owner s Manual
Page 33
..., FAILURE TO PROVIDE REASONABLE AND NECESSARY MAINTENANCE, UNAUTHORIZED REPAIRS OR ANY ALTERATIONS TO THIS PRODUCT), LABOR CHARGES FOR REINSTALLING A REPAIRED OR REPLACED UNIT, REPLACEMENT OF CONSUMABLE ITEMS (E.G., BATTERIES IN REMOTE CONTROL TRANSMITTERS AND LIGHT BULBS), OR UNITS INSTALLED FOR NON-RESIDENTIAL USE. THIS LIMITED WARRANTY DOES NOT COVER ANY PROBLEMS WITH, OR RELATING TO, THE GARAGE DOOR OR GARAGE DOOR HARDWARE, INCLUDING BUT NOT LIMITED TO THE DOOR SPRINGS, DOOR ROLLERS, DOOR ALIGNMENT OR HINGES. IN NO...
..., FAILURE TO PROVIDE REASONABLE AND NECESSARY MAINTENANCE, UNAUTHORIZED REPAIRS OR ANY ALTERATIONS TO THIS PRODUCT), LABOR CHARGES FOR REINSTALLING A REPAIRED OR REPLACED UNIT, REPLACEMENT OF CONSUMABLE ITEMS (E.G., BATTERIES IN REMOTE CONTROL TRANSMITTERS AND LIGHT BULBS), OR UNITS INSTALLED FOR NON-RESIDENTIAL USE. THIS LIMITED WARRANTY DOES NOT COVER ANY PROBLEMS WITH, OR RELATING TO, THE GARAGE DOOR OR GARAGE DOOR HARDWARE, INCLUDING BUT NOT LIMITED TO THE DOOR SPRINGS, DOOR ROLLERS, DOOR ALIGNMENT OR HINGES. IN NO...


