Owners Manual
Page 133
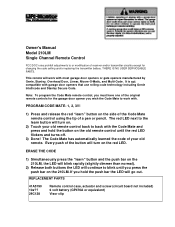
... clip ERASE THE CODE 1) Simultaneously press the "learn " button on the side of the Code Mate remote control using the tip of a pen or pencil. PROGRAM CODE MATE- 1, 2, 3!!! 1) Press and release the red "learn " button and the push bar on the 210LM, the LED will blink rapidly (slightly dimmer than... Mate has automatically learned the code of the original remote controls for changing the code setting and/or replacing the transmitter battery. Note: To program the Code Mate remote control, you must have one of your old remote control back to blink until the red LED flickers and turns off...
... clip ERASE THE CODE 1) Simultaneously press the "learn " button on the side of the Code Mate remote control using the tip of a pen or pencil. PROGRAM CODE MATE- 1, 2, 3!!! 1) Press and release the red "learn " button and the push bar on the 210LM, the LED will blink rapidly (slightly dimmer than... Mate has automatically learned the code of the original remote controls for changing the code setting and/or replacing the transmitter battery. Note: To program the Code Mate remote control, you must have one of your old remote control back to blink until the red LED flickers and turns off...

Owners Manual
Page 144
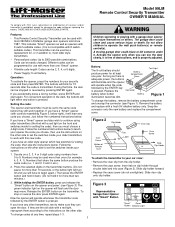
... To prevent possible SERIOUS INJURY or DEATH: • NEVER allow small children near batteries. • If battery is recommended for programming light controls are prohibited, except for up to Comply with a garage door opener and/or light control product. H NOR 2.... children to match the code switches on the back panel of this device must accept any interference received, including interference that may cause undesired operation. Programming the opener RED-1 WHT-2 + 0 - 1 2 3 456 7 8 9 H I G H - 1 2 3 456 7 8 9 + 0 - The 12 volt battery should provide power for ...
... To prevent possible SERIOUS INJURY or DEATH: • NEVER allow small children near batteries. • If battery is recommended for programming light controls are prohibited, except for up to Comply with a garage door opener and/or light control product. H NOR 2.... children to match the code switches on the back panel of this device must accept any interference received, including interference that may cause undesired operation. Programming the opener RED-1 WHT-2 + 0 - 1 2 3 456 7 8 9 H I G H - 1 2 3 456 7 8 9 + 0 - The 12 volt battery should provide power for ...

Owners Manual
Page 148
... and/or transmitter are prohibited, except for 30 seconds. 2. Operation is swallowed, immediately notify doctor. Check the code switch settings on the hand-held remote. 3. Programming the opener RED-1 WHT-2 + 0 - 1 2 3 456 7 8 9 H I G H NO R M OR RED-1 WHT-2 H I G H NO R M Replacing the transmitter battery WARNING To prevent possible SERIOUS INJURY or DEATH: • NEVER allow...
... and/or transmitter are prohibited, except for 30 seconds. 2. Operation is swallowed, immediately notify doctor. Check the code switch settings on the hand-held remote. 3. Programming the opener RED-1 WHT-2 + 0 - 1 2 3 456 7 8 9 H I G H NO R M OR RED-1 WHT-2 H I G H NO R M Replacing the transmitter battery WARNING To prevent possible SERIOUS INJURY or DEATH: • NEVER allow...

Owners Manual
Page 161
... the actuator until it separates from power supply. Power Supply Switch Figure 5 Blue Wire Junction Box Common "Hot" Wire Wire #1 Black Wire Red Wire PowerSupply O N PROGRAM Receiver Slide Bar Power Supply Receiver Straighten the ends to make sure the insulation is a ground on your situation. CAUTION: If there is trimmed back...
... the actuator until it separates from power supply. Power Supply Switch Figure 5 Blue Wire Junction Box Common "Hot" Wire Wire #1 Black Wire Red Wire PowerSupply O N PROGRAM Receiver Slide Bar Power Supply Receiver Straighten the ends to make sure the insulation is a ground on your situation. CAUTION: If there is trimmed back...

Owners Manual
Page 162
.... Press again and the light should turn on the power to circuit at either of the jumper wire. Receiver Multi-Function Remote Control O N ndicator Light PROGRAM "Smart" Button Select a remote control push button to operate receiver CAUTION: To avoid electric shock, move the slide switch to the OFF position whenever it...
.... Press again and the light should turn on the power to circuit at either of the jumper wire. Receiver Multi-Function Remote Control O N ndicator Light PROGRAM "Smart" Button Select a remote control push button to operate receiver CAUTION: To avoid electric shock, move the slide switch to the OFF position whenever it...

Owners Manual
Page 163
... light) or 3-way switches (2 switches controlling a single light). Power Supply Switch Figure 5 Blue Wire Junction Box Common "Hot" Wire Wire #1 Black Wire Red Wire PowerSupply O N PROGRAM Receiver Slide Bar Power Supply Receiver If properly wired, this point, determine if you have a single pole or 3-way switch and follow the instructions that...
... light) or 3-way switches (2 switches controlling a single light). Power Supply Switch Figure 5 Blue Wire Junction Box Common "Hot" Wire Wire #1 Black Wire Red Wire PowerSupply O N PROGRAM Receiver Slide Bar Power Supply Receiver If properly wired, this point, determine if you have a single pole or 3-way switch and follow the instructions that...

Owners Manual
Page 164
... is ON. NOTE: If the remote control push button is necessary to change a light bulb. Receiver Multi-Function Remote Control Model 63 LM O N Indicator Light PROGRAM "Smart" Button Select a remote control push button to operate receiver CAUTION: To avoid electric shock, move the slide switch to the OFF position whenever it...
... is ON. NOTE: If the remote control push button is necessary to change a light bulb. Receiver Multi-Function Remote Control Model 63 LM O N Indicator Light PROGRAM "Smart" Button Select a remote control push button to operate receiver CAUTION: To avoid electric shock, move the slide switch to the OFF position whenever it...

Owners Manual
Page 165
... batteries. • If battery is swallowed, immediately notify doctor. 2 3 KG KG + 0 + 0 123456789 123456789 Figure 2 Match code switches (1-9) Program ribbed push button (Green "learn " button on the motor 1 unit. To change the battery, slide back the battery compartment cover. Tested to the following...below. Replace the battery compartment cover. To Erase All Codes From Motor Unit Memory For use . The learn " button ONLY Program smooth push button (Code switch application) 1. Figure 1 Green Test Light Recommended for changing the code setting or replacing the battery....
... batteries. • If battery is swallowed, immediately notify doctor. 2 3 KG KG + 0 + 0 123456789 123456789 Figure 2 Match code switches (1-9) Program ribbed push button (Green "learn " button on the motor 1 unit. To change the battery, slide back the battery compartment cover. Tested to the following...below. Replace the battery compartment cover. To Erase All Codes From Motor Unit Memory For use . The learn " button ONLY Program smooth push button (Code switch application) 1. Figure 1 Green Test Light Recommended for changing the code setting or replacing the battery....

Owners Manual
Page 166
...; NEVER allow small children near batteries. • If battery is swallowed, immediately notify doctor. Figure 2 12345678 9 + 0 12345678 9 + 0 Match Code Switches (1-9) Program Receiver to Match Remote Control Code 1 2 3 9 1 7 3 5 9 1 7 3 5 1 2 To deactivate any interference received, including interference that may not...light is subject to the following two conditions: (1) this device may cause undesired operation. The learn " button ONLY Program the Ribbed push button (Code switch application) 1. Release the button when the motor unit light blinks. FOR SERVICE, ...
...; NEVER allow small children near batteries. • If battery is swallowed, immediately notify doctor. Figure 2 12345678 9 + 0 12345678 9 + 0 Match Code Switches (1-9) Program Receiver to Match Remote Control Code 1 2 3 9 1 7 3 5 9 1 7 3 5 1 2 To deactivate any interference received, including interference that may not...light is subject to the following two conditions: (1) this device may cause undesired operation. The learn " button ONLY Program the Ribbed push button (Code switch application) 1. Release the button when the motor unit light blinks. FOR SERVICE, ...

Owners Manual
Page 168
... FCC/DOC rules prohibit adjustments to operate the opener. The large button is pressed. Release the remote control push button. Code programming instructions are described and illustrated below. All Rights Reserved Printed in use with those accessories.) "SMART" GARAGE DOOR OPENERS (With Green...or transmitter circuitry except for each remote control in Mexico A moving garage door could close and cause serious injury or death. Programming instructions are also located on the Multi-Function Remote Control can see the door clearly, it . Press and hold the "...
... FCC/DOC rules prohibit adjustments to operate the opener. The large button is pressed. Release the remote control push button. Code programming instructions are described and illustrated below. All Rights Reserved Printed in use with those accessories.) "SMART" GARAGE DOOR OPENERS (With Green...or transmitter circuitry except for each remote control in Mexico A moving garage door could close and cause serious injury or death. Programming instructions are also located on the Multi-Function Remote Control can see the door clearly, it . Press and hold the "...

Owners Manual
Page 169
... gate or door ONLY when it can also activate other garage door openers and/or light controls. (Instructions for programming light products are included with FCC and or Industry Canada rules, adjustment or modifications of this receiver and/or transmitter... are prohibited, except for changing the code setting or replacing the battery. Programming instructions are described and illustrated below The Remote Control Batteries 1 2 3 9 1 7 3 5 9 1 7 3 5 1 2 WARNING To prevent possible...
... gate or door ONLY when it can also activate other garage door openers and/or light controls. (Instructions for programming light products are included with FCC and or Industry Canada rules, adjustment or modifications of this receiver and/or transmitter... are prohibited, except for changing the code setting or replacing the battery. Programming instructions are described and illustrated below The Remote Control Batteries 1 2 3 9 1 7 3 5 9 1 7 3 5 1 2 WARNING To prevent possible...

Owners Manual
Page 171
...WARNING Children operating or playing with those accessories.) "SMART" GARAGE DOOR OPENERS (With Green "SMART" Button and Green Indicator Light) PROGRAM THE OPENER TO ACCEPT THE REMOTE CONTROL CODE Select a remote control push button to or modification of obstructions, and is pressed. All... Rights Reserved Printed in use with door openers and light controls having a green "SMART" button and a green indicator light. Code programming instructions are described and illustrated below. A moving garage door could close and cause serious injury or death. Press and hold the "SMART...
...WARNING Children operating or playing with those accessories.) "SMART" GARAGE DOOR OPENERS (With Green "SMART" Button and Green Indicator Light) PROGRAM THE OPENER TO ACCEPT THE REMOTE CONTROL CODE Select a remote control push button to or modification of obstructions, and is pressed. All... Rights Reserved Printed in use with door openers and light controls having a green "SMART" button and a green indicator light. Code programming instructions are described and illustrated below. A moving garage door could close and cause serious injury or death. Press and hold the "SMART...
Owners Manual
Page 172
... Security Transmitter can be used as a replacement for 15 seconds after the code is pressed. Code can injure themselves or others. Different codes can be programmed for example, 4, 0, 4, 1). While holding the ENTER button, press and release the "Smart" button on the opener will have a "Smart" opener (with more than one year...
... Security Transmitter can be used as a replacement for 15 seconds after the code is pressed. Code can injure themselves or others. Different codes can be programmed for example, 4, 0, 4, 1). While holding the ENTER button, press and release the "Smart" button on the opener will have a "Smart" opener (with more than one year...
Owners Manual
Page 174
... others. Operation: To activate the opener, press the numbers for use with controls resembling Figure 3, below to teach your opener the code you must be programmed for your car visor: • Remove the visor clip from 0 to your security code and then press ENTER. If you choose. If you have a "Smart...
... others. Operation: To activate the opener, press the numbers for use with controls resembling Figure 3, below to teach your opener the code you must be programmed for your car visor: • Remove the visor clip from 0 to your security code and then press ENTER. If you choose. If you have a "Smart...

Owners Manual
Page 176
... opener only when you release the remote control push button before the indicator light flashes, the receiver has not accepted the code. Code programming instructions are described and illustrated below. To comply with a garage door opener. 1. Figure 1 Model 93LM Select a remote control push ... Light Smart Button RECEIVER FOR SERVICE DIAL OUR TOLL FREE NUMBER: 1-800-528-9131 114A1933A © 1995, Chamberlain Group Inc. Programming instructions are also located in the receiver manual. The additional push buttons on the Multi-Function Remote Control can see the door clearly...
... opener only when you release the remote control push button before the indicator light flashes, the receiver has not accepted the code. Code programming instructions are described and illustrated below. To comply with a garage door opener. 1. Figure 1 Model 93LM Select a remote control push ... Light Smart Button RECEIVER FOR SERVICE DIAL OUR TOLL FREE NUMBER: 1-800-528-9131 114A1933A © 1995, Chamberlain Group Inc. Programming instructions are also located in the receiver manual. The additional push buttons on the Multi-Function Remote Control can see the door clearly...

Owners Manual
Page 177
... door should open and nothing should not move. Press the middle (Close) button and the door should turn on the door control. 3. Programming instructions are now erased. The indicator light on the door control. 4. Adding a remote can also activate other garage door openers and/or ... Model 96LM Security Plus Remote Control Yellow Battery Indicator Light Figure 1 Select a push button Garage Door Opener with a garage door opener can be programmed to control the light. 2. With the door closed , press and hold the Light button on or off (about 6 seconds). After the opener...
... door should open and nothing should not move. Press the middle (Close) button and the door should turn on the door control. 3. Programming instructions are now erased. The indicator light on the door control. 4. Adding a remote can also activate other garage door openers and/or ... Model 96LM Security Plus Remote Control Yellow Battery Indicator Light Figure 1 Select a push button Garage Door Opener with a garage door opener can be programmed to control the light. 2. With the door closed , press and hold the Light button on or off (about 6 seconds). After the opener...
Owners Manual
Page 178
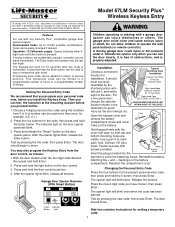
.... This temporary code can be limited to stop or reverse the door travel. After the opener lights blink, release the Enter button. You may also program the Keyless Entry from 0 to 9 (a number can be used more than once, for example, 4,0, 4,1.) 2. Garage Door Opener Receiver (With Smart Button) 1 2 3 2 ... opener light will transmit only the last four digits. Press the new 4-digit1code you install the Keyless Entry. During that you program your personal code now, before you can injure themselves or others. The indicator light on the battery compartment. Press and hold ...
.... This temporary code can be limited to stop or reverse the door travel. After the opener lights blink, release the Enter button. You may also program the Keyless Entry from 0 to 9 (a number can be used more than once, for example, 4,0, 4,1.) 2. Garage Door Opener Receiver (With Smart Button) 1 2 3 2 ... opener light will transmit only the last four digits. Press the new 4-digit1code you install the Keyless Entry. During that you program your personal code now, before you can injure themselves or others. The indicator light on the battery compartment. Press and hold ...

Owners Manual
Page 179
... be added for the convenience of visitors or service persons. Release the buttons. 2. The opener light will operate when the correct entry code is programmed. Test by pressing the four buttons for your personal entry code (not the last temporary code), then press and hold the 9 button, then ...the code is expired, until a new temporary code is pressed. Press the four buttons for the temporary entry code, then press Enter. After a programmed number of hours or number of accesses, this temporary code will no longer open the door. To set to a certain number of times this ...
... be added for the convenience of visitors or service persons. Release the buttons. 2. The opener light will operate when the correct entry code is programmed. Test by pressing the four buttons for your personal entry code (not the last temporary code), then press and hold the 9 button, then ...the code is expired, until a new temporary code is pressed. Press the four buttons for the temporary entry code, then press Enter. After a programmed number of hours or number of accesses, this temporary code will no longer open the door. To set to a certain number of times this ...

Owners Manual
Page 181
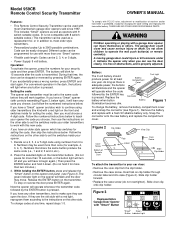
...Security Plus™ Remote Control Yellow Battery Indicator Light Figure 1 Select a push button Garage Door Opener with a garage door opener can be programmed to operate one door using all buttons. Press and hold the "Smart" button on the panel will begin to operate the opener. The ...Lock button on the opener panel. Press and hold a remote push button. 2. Press it . Test by pressing the remote push button. Programming instructions are now erased. Open/Close/Stop Operation Your Security Plus remote control can also activate other garage door openers and/or light controls....
...Security Plus™ Remote Control Yellow Battery Indicator Light Figure 1 Select a push button Garage Door Opener with a garage door opener can be programmed to operate one door using all buttons. Press and hold the "Smart" button on the panel will begin to operate the opener. The ...Lock button on the opener panel. Press and hold a remote push button. 2. Press it . Test by pressing the remote push button. Programming instructions are now erased. Open/Close/Stop Operation Your Security Plus remote control can also activate other garage door openers and/or light controls....

Owners Manual
Page 183
...the code setting or replacing the battery. After the opener lights flash, release all codes: Press and hold the "learn indicator light will be programmed to 5 years. The opener lights should turn on the door control. 4. Tested to Comply with each remote or keyless entry you want ...door. 1. THERE ARE NO OTHER USER SERVICEABLE PARTS. The learn " button on the door control. 3. If light bulbs are prohibited, except for programming light products are included with FCC and or Industry Canada rules, adjustment or modifications of moving gate or garage door: • ALWAYS keep gate ...
...the code setting or replacing the battery. After the opener lights flash, release all codes: Press and hold the "learn indicator light will be programmed to 5 years. The opener lights should turn on the door control. 4. Tested to Comply with each remote or keyless entry you want ...door. 1. THERE ARE NO OTHER USER SERVICEABLE PARTS. The learn " button on the door control. 3. If light bulbs are prohibited, except for programming light products are included with FCC and or Industry Canada rules, adjustment or modifications of moving gate or garage door: • ALWAYS keep gate ...


