3800 Manual
Page 2
... collar to the motor unit 6 Attach mounting bracket to the motor unit 6 Installation 7-16 Installation safety instructions 7 Position the opener 7 Attach the emergency release rope and handle 8 Install the power door lock 8 Attach the cable tension monitor (Required 9 Install the control console 10 Install remote light 11 Electrical requirements 12 Mount the battery backup unit (BBU...
... collar to the motor unit 6 Attach mounting bracket to the motor unit 6 Installation 7-16 Installation safety instructions 7 Position the opener 7 Attach the emergency release rope and handle 8 Install the power door lock 8 Attach the cable tension monitor (Required 9 Install the control console 10 Install remote light 11 Electrical requirements 12 Mount the battery backup unit (BBU...
3800 Manual
Page 4
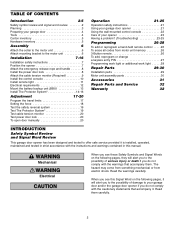
...cable tension on each side of which are under EXTREME tension. • Disable ALL locks and remove ALL ropes connected to garage door BEFORE installing and operating garage door WARNING opener to avoid entanglement. Raise and lower the door to loosen, move or adjust garage door, door springs,...required. • NEVER try to see if there is out of the opener, instructions will call for hand tools as shown. CAUTION To prevent damage to garage door and opener: • ALWAYS disable locks BEFORE installing and operating the opener. • ONLY operate garage door opener at 120V, ...
...cable tension on each side of which are under EXTREME tension. • Disable ALL locks and remove ALL ropes connected to garage door BEFORE installing and operating garage door WARNING opener to avoid entanglement. Raise and lower the door to loosen, move or adjust garage door, door springs,...required. • NEVER try to see if there is out of the opener, instructions will call for hand tools as shown. CAUTION To prevent damage to garage door and opener: • ALWAYS disable locks BEFORE installing and operating the opener. • ONLY operate garage door opener at 120V, ...
3800 Manual
Page 6
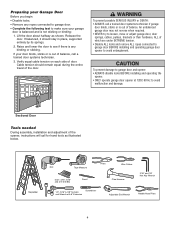
... left or the right side of torque) (Figure 2). NOTE: Do not tighten set screws until instructed. HARDWARE SHOWN ACTUAL SIZE Figure 2 RIGHT Screw #10-32 WRONG Socket Wrench 6 NOTE: For most installations the screws should be facing up (accessible when attached to the torsion bar). • Tighten both..., the collar CAUTION MUST be lost due to collar slip. ASSEMBLY STEP 1 Attach the Collar to the Motor Unit To avoid installation difficulties, do not run the garage door opener until instructed to do so. • Loosen the collar screws. • Attach collar to either the left side...
... left or the right side of torque) (Figure 2). NOTE: Do not tighten set screws until instructed. HARDWARE SHOWN ACTUAL SIZE Figure 2 RIGHT Screw #10-32 WRONG Socket Wrench 6 NOTE: For most installations the screws should be facing up (accessible when attached to the torsion bar). • Tighten both..., the collar CAUTION MUST be lost due to collar slip. ASSEMBLY STEP 1 Attach the Collar to the Motor Unit To avoid installation difficulties, do not run the garage door opener until instructed to do so. • Loosen the collar screws. • Attach collar to either the left side...
3800 Manual
Page 7
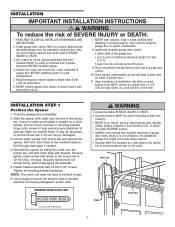
READ AND FOLLOW ALL INSTALLATION WARNINGS AND INSTRUCTIONS. 2. Disable ALL locks and remove ALL ropes connected to garage door BEFORE installing opener to 12-14 ft./lbs. Door MUST reverse on contact with 14-10x1-7/8" screws. ...or opener mechanisms. 8. Slide the opener with bracket. Loosen collar screws from ALL moving parts of torque. WARNING INSTALLATION IMPORTANT INSTALLATION INSTRUCTIONS WARNING To reduce the risk of installation, test safety reversal system. of the door. 9. Securely tighten both set screws firmly, without damaging the jackshaft...
READ AND FOLLOW ALL INSTALLATION WARNINGS AND INSTRUCTIONS. 2. Disable ALL locks and remove ALL ropes connected to garage door BEFORE installing opener to 12-14 ft./lbs. Door MUST reverse on contact with 14-10x1-7/8" screws. ...or opener mechanisms. 8. Slide the opener with bracket. Loosen collar screws from ALL moving parts of torque. WARNING INSTALLATION IMPORTANT INSTALLATION INSTRUCTIONS WARNING To reduce the risk of installation, test safety reversal system. of the door. 9. Securely tighten both set screws firmly, without damaging the jackshaft...
3800 Manual
Page 10
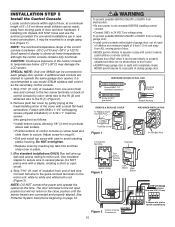
... housing. WARNING To prevent possible SERIOUS INJURY or DEATH from one 398LM can be mounted to each garage door opener. WARNING WARNING INSTALCLATUITOINOSNTEP 5 Install the Control Console Locate control console within sight of garage door, out of reach of children at a minimum height of 5 feet (1.5 m)... door. The door will not return to operate the same garage door opener, it may damage the LCD screen. See Protector System Instructions beginning on back of bell wire. To prevent possible SERIOUS INJURY or DEATH from end of control console by inserting top tabs first ...
... housing. WARNING To prevent possible SERIOUS INJURY or DEATH from one 398LM can be mounted to each garage door opener. WARNING WARNING INSTALCLATUITOINOSNTEP 5 Install the Control Console Locate control console within sight of garage door, out of reach of children at a minimum height of 5 feet (1.5 m)... door. The door will not return to operate the same garage door opener, it may damage the LCD screen. See Protector System Instructions beginning on back of bell wire. To prevent possible SERIOUS INJURY or DEATH from end of control console by inserting top tabs first ...
3800 Manual
Page 11
... is wider than 100W. • ONLY use wall anchors provided. Clips slide in the outlet, reverse the plug. 4. IMPORTANT SAFETY INSTRUCTIONS WARNING To reduce the risk of the light base. 5. Install the ceiling mount plate with an extension cord unless plug can not be fully inserted. 6. If the plug does not fit...
... is wider than 100W. • ONLY use wall anchors provided. Clips slide in the outlet, reverse the plug. 4. IMPORTANT SAFETY INSTRUCTIONS WARNING To reduce the risk of the light base. 5. Install the ceiling mount plate with an extension cord unless plug can not be fully inserted. 6. If the plug does not fit...

3800 Manual
Page 13
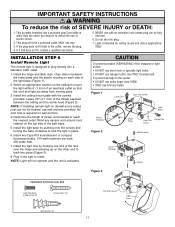
... the Battery Backup Unit (BBU) (not provided) If the optional 475LM battery backup unit is part of this installation it should be installed at this time. • The BBU can be mounted to either the ceiling or a wall within 3' (.9 m) of the motor unit. • Position the BBU as ... 1-1/2" lag screws (2) provided with the BBU unit. • Connect the BBU cord into the connector on the bottom of the motor unit. • Follow all instructions included with the 475LM unit to test for proper operation and testing of the BBU. BBU Cord 475LM Battery Backup Unit Connector 13
... the Battery Backup Unit (BBU) (not provided) If the optional 475LM battery backup unit is part of this installation it should be installed at this time. • The BBU can be mounted to either the ceiling or a wall within 3' (.9 m) of the motor unit. • Position the BBU as ... 1-1/2" lag screws (2) provided with the BBU unit. • Connect the BBU cord into the connector on the bottom of the motor unit. • Follow all instructions included with the 475LM unit to test for proper operation and testing of the BBU. BBU Cord 475LM Battery Backup Unit Connector 13
3800 Manual
Page 21
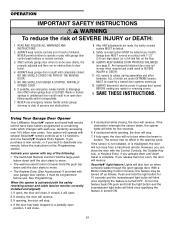
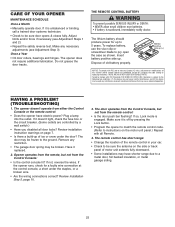
... not close . 5. NEVER use emergency release handle to garage door opener BEFORE making any remote, follow the instructions in a partially open garage door. Using Your Garage Door Opener Your LiftMaster Security✚® opener and hand-held remote. If closing , the door will reverse. 3. If fully... can close the door with your opener with any of which changes with the safety reversing sensor and cable tension monitor correctly installed and aligned): 1. ALWAYS KEEP GARAGE DOOR PROPERLY BALANCED (see page 3). An improperly balanced door may be tested every month....
... not close . 5. NEVER use emergency release handle to garage door opener BEFORE making any remote, follow the instructions in a partially open garage door. Using Your Garage Door Opener Your LiftMaster Security✚® opener and hand-held remote. If closing , the door will reverse. 3. If fully... can close the door with your opener with any of which changes with the safety reversing sensor and cable tension monitor correctly installed and aligned): 1. ALWAYS KEEP GARAGE DOOR PROPERLY BALANCED (see page 3). An improperly balanced door may be tested every month....
3800 Manual
Page 23
...door tracks. To replace battery, use the visor clip or screwdriver blade to a metal door, foil backed insulation, or metal garage siding. 23 Review installation instruction warnings on page 7. • Is there a build-up . If the opener runs, check for changing the code setting or replacing the battery. ...range due to pry open the case as shown. Battery positive side up to the following two conditions: (1) this device may be frozen to instructions on the side or back panel of ice or snow under the staples, or a broken wire. • Are the wiring connections correct?...
...door tracks. To replace battery, use the visor clip or screwdriver blade to a metal door, foil backed insulation, or metal garage siding. 23 Review installation instruction warnings on page 7. • Is there a build-up . If the opener runs, check for changing the code setting or replacing the battery. ...range due to pry open the case as shown. Battery positive side up to the following two conditions: (1) this device may be frozen to instructions on the side or back panel of ice or snow under the staples, or a broken wire. • Are the wiring connections correct?...
3800 Manual
Page 26
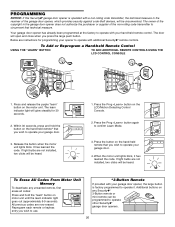
...2. LOCK LOCK LIGHTLIGHT 1. Press the Prog button on the motor unit. When the motor unit lights blink, it . If light bulbs are instructions for 30 seconds. 2. LOCK LIGHT LOCK LIGHT To Erase All Codes From Motor Unit Memory To deactivate any Security✚® 3-Button remote or...that you press the large push button. The door will be programmed to operate with your garage door. 4. All previous codes are not installed, two clicks will glow steadily for programming your garage door opener, the large button is operated with a non-rolling code transmitter, the ...
...2. LOCK LOCK LIGHTLIGHT 1. Press the Prog button on the motor unit. When the motor unit lights blink, it . If light bulbs are instructions for 30 seconds. 2. LOCK LIGHT LOCK LIGHT To Erase All Codes From Motor Unit Memory To deactivate any Security✚® 3-Button remote or...that you press the large push button. The door will be programmed to operate with your garage door. 4. All previous codes are not installed, two clicks will glow steadily for programming your garage door opener, the large button is operated with a non-rolling code transmitter, the ...
3800 Manual
Page 32
... OF THESE ITEMS COULD RESULT IN A FEE TO YOU. Some States do not allow limitations on your compliance with the instructions regarding installation, operation, maintenance and testing. NO PERSON IS AUTHORIZED TO ASSUME FOR US ANY OTHER LIABILITY IN CONNECTION WITH THE SALE OF...this limited warranty, call our Service number for a list of shipping instructions when you will void this product, pre-paid . LIFTMASTER® SERVICE IS ON CALL OUR LARGE SERVICE ORGANIZATION SPANS AMERICA INSTALLATION AND SERVICE INFORMATION IS AS NEAR AS YOUR TELEPHONE. ALL IMPLIED WARRANTIES ...
... OF THESE ITEMS COULD RESULT IN A FEE TO YOU. Some States do not allow limitations on your compliance with the instructions regarding installation, operation, maintenance and testing. NO PERSON IS AUTHORIZED TO ASSUME FOR US ANY OTHER LIABILITY IN CONNECTION WITH THE SALE OF...this limited warranty, call our Service number for a list of shipping instructions when you will void this product, pre-paid . LIFTMASTER® SERVICE IS ON CALL OUR LARGE SERVICE ORGANIZATION SPANS AMERICA INSTALLATION AND SERVICE INFORMATION IS AS NEAR AS YOUR TELEPHONE. ALL IMPLIED WARRANTIES ...


